Why Mexican Flan Is a Beloved Dessert
Mexican flan holds a special place at the heart of family gatherings, Sunday dinners, and festive celebrations across Latin America. This classic dessert, known for its silky custard base and golden caramel topping, is both nostalgic and crowd-pleasing. Its irresistible texture—smooth, creamy, and just firm enough to hold together—makes it a universal favorite.
Unlike more complex baked goods, flan requires minimal ingredients yet delivers maximum impact. It’s approachable for novice bakers but still holds room for mastery by seasoned cooks. Whether served in a humble ramekin or as a stunning centerpiece molded in a flanera, Mexican flan brings comfort, elegance, and a touch of culinary history to the table.
From birthdays to holidays to quiet weekends, flan is that one dessert that feels both timeless and indulgent—proof that a few simple ingredients, handled with care, can create something truly magical.
What Is Mexican Flan? (And How It Differs from Other Flans)
At its core, Mexican flan is a baked custard dessert topped with a glistening layer of amber-colored caramel sauce. The custard is made from eggs, sweetened condensed milk, evaporated milk, and vanilla extract, resulting in a dessert that’s rich, sweet, and luxuriously smooth.
While it shares similarities with Spanish flan and French crème caramel, Mexican flan sets itself apart with the inclusion of sweetened condensed milk, which adds body and depth, and evaporated milk, which enhances the creamy texture without being overly heavy. French crème caramel tends to be lighter and made with cream and sugar, while Filipino leche flan is denser, often using more egg yolks and steamed rather than baked.
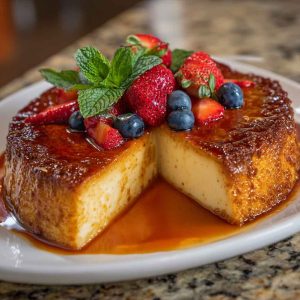
Mexican flan is traditionally baked in a flanera (a round lidded mold) or individual ramekins, often using a water bath (bain-marie) to ensure gentle, even cooking. Its visual hallmark is the dramatic reveal: a silky dome crowned with a shiny cascade of caramel sauce that pools beautifully onto the plate. It’s both rustic and elegant, with a flavor and presentation that’s hard to resist.
A Brief History of Flan in Mexican Cuisine
The roots of flan date back to ancient Rome, where early versions were made with eggs and milk, often sweetened with honey. As the Roman Empire expanded, so did the reach of this egg-based custard. Eventually, it made its way to Spain, where it evolved into flan as we recognize it today, topped with caramel.
Spanish colonizers brought this beloved dessert to Mexico, where it was warmly adopted and adapted using locally available ingredients. The Mexican version embraced canned dairy products like evaporated and sweetened condensed milk, which were accessible, shelf-stable, and perfect for the arid climate.
Over time, flan became deeply woven into Mexican culture—found in home kitchens, street bakeries, and even gourmet restaurants. It’s a dessert with colonial roots but a wholly Mexican soul, enjoyed at quinceañeras, Christmas feasts, Sunday lunches, and more. Its continued popularity is a testament to its comforting simplicity and enduring charm.
Essential Ingredients for Authentic Mexican Flan
The beauty of Mexican flan lies in its short ingredient list, where each element plays a vital role in flavor and texture:
Eggs: Provide structure and richness. Whole eggs help the custard set properly and contribute to its creamy texture.
Sweetened Condensed Milk: Adds sweetness and body. This thick, sugary milk is a staple in Latin American desserts and gives the flan its signature richness.
Evaporated Milk: Offers a silky, light creaminess without the heaviness of cream. It balances the sweetness of the condensed milk perfectly.
Granulated Sugar: Used to make the caramel. When cooked carefully, it transforms into a deep amber sauce that tops the custard.
Vanilla Extract: Mexican vanilla is particularly prized for its deep, floral aroma. It rounds out the custard with warmth and complexity.
Optional Add-ins:
A bit of orange or lemon zest adds brightness.
A dash of cinnamon provides a subtle spice.
For a twist, cream cheese can be blended in for a flan de queso (cheesecake flan) variation.
Bold Tip: Always use room temperature eggs to help your custard blend smoothly and avoid curdling during baking.
Tools You’ll Need for Flan Success
While flan doesn’t require fancy equipment, having the right tools makes all the difference in ease and outcome:
A heavy-bottomed saucepan for making the caramel (prevents burning)
A blender, hand mixer, or whisk for combining the custard
Ramekins or a flanera (a lidded round mold) for baking
A roasting pan to hold a hot water bath (bain-marie), ensuring gentle, even cooking
Aluminum foil (if your flanera has no lid) to prevent overbrowning
An oven-safe thermometer or toothpick to test doneness
A fine-mesh sieve (optional but recommended) for straining the custard for a silky-smooth texture
With these tools in place, you’re set up for flan success—whether it’s your first or fiftieth time making this classic dessert.
Step-by-Step Instructions for Making Mexican Flan
1. Make the caramel
In a heavy-bottomed saucepan, heat ¾ cup sugar over medium heat, swirling occasionally (don’t stir). Watch carefully—it will melt into a golden syrup. Once it turns amber, immediately pour it into the bottom of your flan mold or ramekins. Tilt to coat the base evenly. Set aside to cool and harden.
2. Mix the custard
In a blender, combine 4 eggs, 1 can sweetened condensed milk, 1 can evaporated milk, and 1 tablespoon vanilla extract. Blend until smooth. Optional: strain through a fine-mesh sieve for extra smoothness.
3. Prepare the water bath
Place the caramel-lined mold(s) inside a roasting pan. Pour the custard over the hardened caramel. Add hot water to the roasting pan until it reaches halfway up the sides of the mold.
4. Bake the flan
Cover the mold(s) with foil. Bake at 350°F (175°C) for 50–60 minutes. It’s done when the center jiggles slightly and a knife inserted comes out clean.
5. Cool and unmold
Remove from the water bath and cool at room temperature. Refrigerate at least 4 hours or overnight. To serve, run a knife around the edges and invert onto a plate—watch the caramel flow over the custard in that iconic golden drizzle.
Delicious Variations of Mexican Flan
One of the beauties of Mexican flan is how adaptable it is to different flavors. These delicious variations allow you to put a unique spin on the classic dessert:
Flan Napolitano – A rich twist made by blending in cream cheese, creating a texture similar to cheesecake. It’s thicker, silkier, and perfect for those who enjoy a richer dessert.
Coconut Flan – Add coconut milk or shredded coconut for a tropical flair. The nuttiness and mild sweetness of coconut beautifully complement the caramel.
Chocolate Flan (Chocoflan) – Also called “impossible cake,” this dessert layers chocolate cake batter beneath flan custard. During baking, the layers magically swap, giving you a stunning two-toned treat.
Coffee Flan – For a sophisticated twist, incorporate espresso or coffee extract into the custard. The bitterness of coffee cuts through the sweetness for a balanced, grown-up flavor.
Citrus Zest Flan – A touch of orange or lemon zest in the custard adds a refreshing brightness. This version is especially great in warmer months or as a light finish to a heavy meal.
Each variation keeps the heart of flan intact—silky custard and caramel—while adding bold new dimensions of flavor.
How to Serve Mexican Flan Like a Pro
Serving flan with finesse elevates it from simple to sensational. For the best flavor and texture, serve flan chilled but not ice-cold—remove it from the fridge about 10–15 minutes before plating.
For a beautiful presentation, flip the flan onto a rimmed serving plate to catch the luscious caramel. Garnish with fresh berries, a dollop of whipped cream, or a sprinkle of citrus zest for contrast and color.
If you made one large flan, slice it into wedges like a pie. For a more refined touch, bake and serve in individual ramekins—perfect for dinner parties or elegant plating.
Add a sprig of fresh mint or edible flowers for a restaurant-worthy finish. You can also drizzle extra caramel sauce or pair with a light dessert wine or coffee to complete the experience.
Presentation counts, and with a few simple touches, your flan can look as impressive as it tastes.
Troubleshooting Common Flan Issues
Even experienced bakers can run into flan mishaps. Here are the most common issues and how to fix or avoid them:
Flan didn’t set – This usually means it was underbaked. Make sure your oven is properly calibrated, and use a water bath to maintain even heat. A knife inserted near the center should come out clean.
Caramel hardened before pouring – Caramel can crystallize or firm up if left too long. Once it reaches a golden amber color, immediately pour it into your mold and tilt to coat the base quickly.
Bubbles in custard – Overmixing or baking at too high a temperature causes air bubbles. Blend gently and bake slowly in a water bath. Tent with foil if needed to avoid browning or overheating.
Sticking to the mold – Flan must be thoroughly chilled (at least 4 hours or overnight) before unmolding. Run a thin knife around the edges, then place a plate over the mold and flip confidently.
Pro Tip: A longer chill time not only ensures easy release, but also improves the texture and flavor of your flan.
Make-Ahead, Storage & Shelf Life Tips
Mexican flan is a great make-ahead dessert, perfect for entertaining or prepping in advance. Once baked and cooled, store it in the refrigerator (still in the mold) for up to 5 days.
To cover, use plastic wrap or a lid, but avoid placing anything directly on the surface to preserve the smooth finish.
Can you freeze flan? Yes, though the texture may become slightly grainy. Wrap well and freeze for up to 1 month. Thaw in the fridge overnight.
For parties, prepare the day before. Flan tastes even better after chilling overnight, and unmolding just before serving adds a dramatic touch.
FAQs: What People Also Ask About Mexican Flan
Q: What’s the difference between flan and crème brûlée?
A: Flan has a soft caramel sauce topping, while crème brûlée features a hard, torched sugar crust on top. Flan is baked in a water bath and unmolded; crème brûlée is usually served in the ramekin.
Q: Is Mexican flan gluten-free?
A: Yes! Traditional flan contains no flour or gluten ingredients, making it naturally gluten-free. Just ensure no cross-contamination from flavorings or toppings.
Q: Why is my flan runny or watery?
A: This is often due to underbaking or not chilling long enough. Bake until a knife comes out clean and let it chill for at least 4 hours to fully set.
Q: Can I make flan without a water bath?
A: Technically, yes—but it may result in uneven cooking or rubbery texture. A water bath ensures slow, gentle heat and a smooth, creamy result.
Q: What’s the best pan to use for Mexican flan?
A: A flanera (a lidded metal flan mold) is traditional, but ceramic ramekins or a small round cake pan work well, as long as you use a water bath.
Final Thoughts: Why Flan Deserves a Spot on Every Dessert Table
Mexican flan is the perfect blend of elegance and simplicity—a dessert that impresses without intimidating. Its deep cultural roots, adaptable flavors, and silky-sweet texture make it a favorite across generations and borders.
Whether served in a family kitchen or a high-end restaurant, flan offers a timeless experience of comfort, indulgence, and nostalgia. It’s budget-friendly, make-ahead friendly, and almost impossible to dislike.
Make it once, and it’s bound to become a go-to recipe in your dessert rotation—a reminder that sometimes, the simplest ingredients create the most memorable moments.
Authentic Mexican Flan Recipe
Equipment
- Heavy-bottomed saucepan
- Blender or hand whisk
- Ramekins or flanera (round mold)
- Roasting pan
- Oven-safe foil or lid
- Fine mesh sieve (optional)
- Knife or skewer for testing doneness
Ingredients
For the Caramel:
- ¾ cup granulated sugar
For the Custard:
- 4 large eggs (room temperature)
- 1 (14 oz) can sweetened condensed milk
- 1 (12 oz) can evaporated milk
- 1 tablespoon pure vanilla extract (Mexican vanilla preferred)
Instructions
Make the Caramel:
- In a dry, heavy-bottomed saucepan, melt sugar over medium heat, swirling (not stirring) until it turns golden amber. Quickly pour into the bottom of your mold or ramekins. Tilt to coat evenly. Set aside.
Mix the Custard:
- In a blender, combine eggs, sweetened condensed milk, evaporated milk, and vanilla. Blend until smooth. Optional: strain through a fine mesh sieve for ultra-smooth texture.
Set Up the Water Bath:
- Pour custard into the caramel-coated mold(s). Place into a large roasting pan. Carefully pour hot water into the pan until it reaches halfway up the sides of the mold.
Bake:
- Cover the mold(s) with foil. Bake at 350°F (175°C) for 50–60 minutes. It’s done when a knife inserted comes out clean and the center jiggles slightly.
Cool & Chill:
- Remove from water bath. Let cool at room temp, then refrigerate at least 4 hours or overnight.
Unmold & Serve:
- Run a knife around the edges. Invert onto a plate and let the caramel flow. Slice or serve whole.
Notes
- Caramel tip: Work quickly when pouring caramel—it hardens fast.
- Don’t skip the water bath: It ensures gentle, even cooking.
- Flavor boost: Add orange zest or cinnamon to custard for variety.
- Make-ahead: Best made the day before for optimal texture.
- Storage: Keeps in fridge up to 5 days. Can be frozen but texture may slightly change.