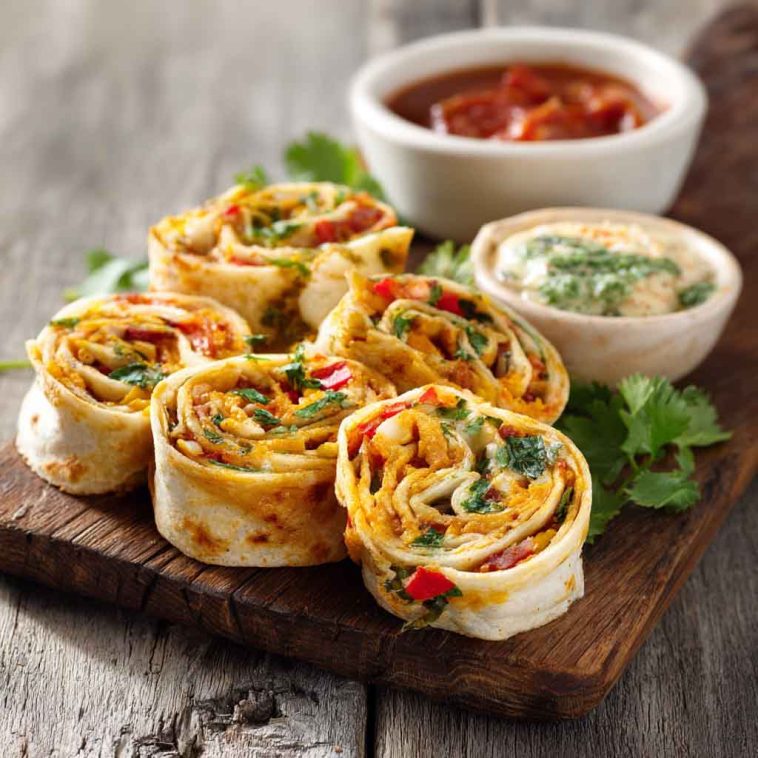
Vegetable Tortilla Roll Ups
There’s something about colorful, bite-sized foods that instantly brightens up snack time, and vegetable tortilla roll-ups are exactly that. Packed with fresh, crunchy veggies wrapped in a soft tortilla with a creamy, flavorful base, they’re the kind of snack that feels both fun and wholesome. Whether you’re prepping a light lunch, a party appetizer, or a quick grab-and-go bite for the kids, these roll-ups deliver on convenience and taste.
What makes them even better is their flexibility—you can easily swap spreads, veggies, or tortillas to suit different preferences, diets, or what you already have on hand. They’re make-ahead friendly, too, so you can whip up a batch the night before and have a ready-to-go option for the next day. In this guide, you’ll learn how to assemble them with ease, flavor combinations that pop, and smart variations to keep things fresh every time.
What Are Vegetable Tortilla Roll-Ups?
At their core, vegetable tortilla roll-ups are a simple yet satisfying recipe: tortillas spread with a creamy base, layered with finely chopped vegetables, then rolled tightly and sliced into pinwheels. The result is a colorful, bite-sized snack that’s perfect for both kids and adults.
The creamy layer usually starts with cream cheese, sour cream, or ranch-style dressing, but dairy-free cream cheese or hummus makes an excellent alternative for plant-based diets. Fillings can include anything from crunchy carrots and cucumbers to sweet bell peppers, broccoli, or olives.
These roll-ups have gained popularity because they strike the perfect balance between flavor, nutrition, and presentation. They’re easy enough for everyday lunches yet impressive enough for party platters and potlucks. Portable, customizable, and endlessly versatile, vegetable tortilla roll-ups prove that healthy eating doesn’t have to be boring or complicated.
Why They’re a Smart Choice (Health + Convenience)
Vegetable tortilla roll-ups aren’t just tasty—they’re a smart, balanced choice for any occasion. Fresh vegetables pack in fiber, vitamins, and minerals, giving each bite a nutritional boost. Pair them with whole-wheat tortillas, and you add complex carbs that provide steady energy, making them a better alternative to processed snacks or fast food.
From a practical standpoint, roll-ups are a lifesaver for busy families. They can be made ahead of time, stored in the fridge, and pulled out when you need a quick bite. This make-ahead advantage reduces daily food prep stress and ensures you always have something nourishing within reach.
Their handheld, portion-controlled size makes them especially convenient for lunchboxes, after-school snacks, or office lunches. You can slice them into bite-sized pinwheels for a party platter, or keep them whole for a hearty wrap. In short, they’re the perfect blend of convenience and nutrition—healthy enough to enjoy regularly, and simple enough for anyone to prepare.
Core Recipe Elements
4.1 Base Spread Options
The spread is what holds everything together. Cream cheese mixed with ranch or sour cream is a classic base, but for lighter or dairy-free versions, try hummus, dairy-free cream cheese, or Greek yogurt.
4.2 Vegetable Fillings
The stars of the roll-ups are the veggies. Popular picks include finely chopped broccoli, carrots, bell peppers, cauliflower, cucumbers, spinach, and olives. The trick is chopping everything small for even rolling and balanced bites.
4.3 Cheese & Seasoning
Shredded cheddar or colby jack adds creaminess and richness. For extra flavor, season the spread with dried dill, garlic powder, or onion powder—little touches that make a big difference.
4.4 Tortilla Choices
Flour tortillas are the classic go-to, but whole-wheat versions add fiber and nuttiness. For low-carb or gluten-free diets, use lavash or gluten-free wraps. The key is choosing a flexible tortilla that won’t crack when rolled.
Step-By-Step Assembly Guide
-
Prep the Ingredients – Start by softening your spread (cream cheese, hummus, or dairy-free base) at room temperature so it’s easy to work with. Finely chop your vegetables into small, uniform pieces. Warm tortillas slightly to make them more pliable.
-
Mix the Filling – In a bowl, combine the creamy base with shredded cheese and seasonings. Add your finely chopped vegetables and stir until evenly mixed. This ensures every bite has balanced flavor.
-
Assemble the Roll-Ups – Lay out a tortilla on a flat surface. Spread the mixture evenly, leaving about ½ inch around the edges to prevent overflow when rolling.
-
Roll Tightly – Starting from one edge, roll the tortilla snugly into a log. Place seam side down to keep it from unrolling.
-
Chill Before Slicing – Wrap the rolled tortillas in plastic wrap and refrigerate for at least 2 hours (or overnight). Chilling helps them firm up, making them easier to slice cleanly.
-
Slice & Serve – Use a sharp knife to cut the roll into ½–1-inch pinwheels. For neat cuts, wipe the knife between slices. Arrange on a platter and serve immediately, or refrigerate until needed.
Flavor Variations & Customization Ideas
One of the best parts about vegetable tortilla roll-ups is how easy they are to customize:
-
Mediterranean Twist: Use hummus or olive tapenade as the base, then layer spinach, sun-dried tomatoes, olives, and fresh basil.
-
Anti-Inflammatory Boost: Opt for a whole-wheat tortilla filled with veggie cream cheese, bell peppers, and baby spinach. Bright, colorful, and nutrient-packed.
-
Vegan/Dairy-Free: Choose a dairy-free cream cheese or hummus base, then add arugula, cucumbers, shredded carrots, and radishes for a crisp, refreshing bite.
-
Southwest Style: Mix cream cheese with taco seasoning and fill with corn, black beans, peppers, and cilantro.
-
Kid-Friendly: Keep it simple with mild cheese, carrots, cucumbers, and ranch-flavored spread.
These variations allow you to tailor the recipe for different occasions—healthy lunch prep, party appetizers, or fun after-school snacks.
How to Keep Rolls Fresh & Avoid Sogginess
One of the biggest challenges with veggie roll-ups is keeping them fresh and preventing sogginess. The key is to create a moisture barrier. A simple yet effective trick is to line your tortilla with a layer of lettuce, spinach, or another leafy green before adding spreads and fillings. This prevents watery vegetables, like cucumbers or tomatoes, from soaking through.
Once rolled, wrap them tightly in plastic wrap or store in airtight containers to lock in freshness. If making them ahead, refrigerate for a few hours before slicing—this helps the rolls firm up and hold their shape.
While these roll-ups are excellent for short-term fridge storage, avoid freezing assembled rolls for long periods, as the texture will suffer once thawed. Instead, freeze fillings like cooked proteins or spreads separately and assemble fresh when needed. With these simple steps, your rolls will stay crisp, colorful, and delicious.
Serving Occasions & Pairing Suggestions
Veggie roll-ups are versatile and perfect for almost any occasion. They make excellent party appetizers, colorful lunchbox additions, or quick, satisfying snacks on busy days. For family gatherings, you can prepare a platter of different varieties to suit all tastes, from creamy avocado and black bean to light hummus and cucumber.
Pair your roll-ups with flavorful dips such as salsa, guacamole, or ranch dressing for added flair. They also go well with light side salads, fruit cups, or a refreshing iced tea or lemonade.
For presentation, slice the rolls into even rounds and arrange them in eye-catching patterns on a platter. Garnish with fresh herbs like parsley, cilantro, or basil for a bright finishing touch. This not only enhances the visual appeal but also adds a pop of fresh flavor. Whether casual or elegant, these rolls adapt beautifully to the setting.
Storage & Leftover Strategy
Veggie roll-ups can be made ahead and stored in the refrigerator for up to 4 days without losing quality, as long as they’re wrapped tightly. The key is to slice them just before serving, which keeps the edges from drying out and ensures they look freshly made.
If you’re planning for the week, consider prepping spreads and veggies separately, then assembling when needed. This approach keeps ingredients fresh and avoids sogginess.
Freezing isn’t ideal for already-assembled rolls, but you can freeze fillings like cooked chicken, turkey, or beans, then defrost and use them later in fresh wraps. This strategy minimizes waste while keeping meal prep efficient.
FAQ
Can I make them ahead for a party?
Yes! Assemble the rolls a few hours in advance, wrap tightly, refrigerate, and slice right before serving. This ensures clean cuts and fresh taste.
How long do they last in the fridge?
Properly wrapped roll-ups will stay fresh for up to 4 days. For best results, eat them within the first 2–3 days.
Can I prep fillings in advance?
Absolutely. Store spreads, proteins, and veggies separately in airtight containers. Assemble the rolls the next day for maximum freshness.
How do I prevent sogginess?
Use lettuce or spinach as a barrier between the tortilla and wetter fillings. Also, pat vegetables dry before layering them inside.
Troubleshooting Tips
If your rolls are too loose, you may not be rolling tightly enough. Apply gentle pressure as you roll and chill them before slicing—this helps them set.
If watery veggies like tomatoes or cucumbers make the wrap soggy, pat them dry with paper towels. Adding a moisture-absorbing barrier such as lettuce also helps.
If your tortilla cracks, it may be too cold. Warm it briefly in the microwave or on a skillet for 10–15 seconds to soften and increase flexibility. With these quick fixes, your roll-ups will look and taste perfect every time.
Conclusion & Encouragement
Veggie roll-ups are a fun, customizable, and family-friendly dish that fits into almost any occasion. With fresh vegetables, flavorful spreads, and creative combinations, they strike the perfect balance between healthy and delicious.
The best part? They’re endlessly adaptable. You can make them vegan, gluten-free, protein-packed, or kid-friendly with just a few tweaks. Once you master the basics, you’ll discover your own favorite flavor pairings.
So go ahead—roll, slice, and serve with confidence! These veggie roll-ups are proof that fresh food doesn’t have to be complicated. Share your creations, experiment with new ingredients, and enjoy the smiles they bring to your table.

Vegetable Tortilla Roll Ups – Easy, Colorful & Perfect for Parties
Equipment
- Cutting board & sharp knife
- Mixing bowl & spoon
- Offset spatula or butter knife (for spreading)
- Plastic wrap or airtight container
- Serrated knife (for slicing chilled rolls)
Ingredients
- 4 large flour tortillas (10-inch, regular or spinach/tomato flavored)
- 8 oz (225 g) cream cheese, softened (or hummus for dairy-free option)
- 1 tbsp ranch seasoning or fresh herbs (optional flavor boost)
- 1 small red bell pepper, thinly sliced
- 1 small cucumber, seeded & julienned
- 1 medium carrot, peeled & grated or matchstick-cut
- 1 cup baby spinach or leafy greens (moisture barrier layer)
- ½ cup shredded cheddar cheese (optional)
- Salt & pepper to taste
Instructions
- Prepare the Spread – In a bowl, mix cream cheese with ranch seasoning or herbs. (Use hummus or flavored spread if preferred.)
- Assemble – Lay a tortilla flat. Spread 2–3 tbsp of the mixture evenly across, leaving ½-inch border.
- Layer Vegetables – Place spinach leaves first to act as a barrier, then add peppers, cucumber, carrot, and cheese (if using).
- Roll Tightly – Starting from one side, roll tortilla snugly into a log. Wrap tightly in plastic wrap.
- Chill – Refrigerate for at least 1 hour (up to 24 hours) to firm up.
- Slice & Serve – Using a serrated knife, trim ends and slice into 1-inch pinwheels. Arrange on platter, garnish with fresh herbs if desired.
Notes
- For extra crunch: add shredded lettuce or red cabbage.
- To avoid sogginess: always layer leafy greens first.
- Make-ahead: rolls can be chilled up to 24 hours before slicing.
- Freezer tip: don’t freeze assembled roll-ups; instead, freeze tortillas and spreads separately.
- Variations: swap cream cheese for guacamole, Greek yogurt, or hummus; add turkey or chicken for protein.