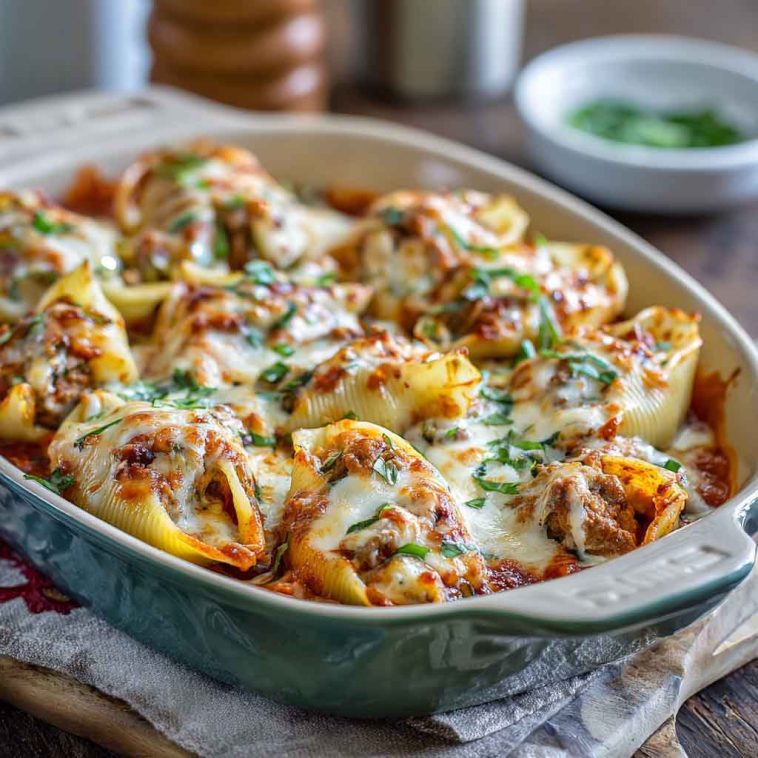
The Comfort and Charm of Sausage Stuffed Shells
There’s something truly comforting about a dish that brings together hearty sausage, creamy cheeses, and tender pasta in one glorious bite. Sausage stuffed shells are one such crowd-pleaser — a perfect blend of rich flavors and satisfying textures that feels like a warm hug from the inside out. Whether it’s a busy weeknight dinner, a weekend family gathering, or even meal prep for the week ahead, this dish checks all the boxes for ease, flavor, and satisfying comfort food vibes.
The beauty of sausage stuffed shells lies in their simplicity and versatility. With just a handful of ingredients, you get a baked casserole packed with cheesy, meaty goodness that pleases everyone at the table. In this article, we’ll guide you through an easy-to-follow recipe that delivers irresistibly cheesy, flavorful stuffed shells — guaranteed to become a staple in your kitchen.
What Are Stuffed Shells? History and Basics
Stuffed shells, or conchiglioni ripieni, originated from Italian cuisine but have become a beloved staple in Italian-American households. These large pasta shells are designed to cradle delicious fillings, making them a delightful vessel for combining savory ingredients. While pasta filled with cheese or meat isn’t unique, stuffed shells are distinctive because of their shape — large, ridged, and perfectly suited to hold generous portions of filling.
What sets sausage stuffed shells apart from other stuffed pastas like manicotti and cannelloni? Manicotti are tubular and typically filled with cheese mixtures, whereas cannelloni are smooth tubes often baked with meat sauces. Stuffed shells, with their cup-like shape, are easier to fill and allow the filling to peek out, creating a visually appealing dish with crispy edges and gooey centers.
This dish’s versatility is part of its charm. You can easily customize the filling and sauce to suit your taste—be it spicy Italian sausage with marinara or a creamy Alfredo base with vegetables. Stuffed shells are great for family dinners, potlucks, or any occasion where comfort food is welcome.
Key Ingredients Breakdown: Choosing the Best Components
Pasta Shells:
Start with large pasta shells — ideally conchiglioni. Their ridged surface helps hold the filling better, and their generous size makes stuffing easier. Cook the shells until al dente; overcooked shells will tear and become mushy. After boiling, rinse them gently with cold water and drain well to prevent sticking and sogginess.
Sausage Options:
Italian pork sausage is the classic choice, available in sweet or spicy varieties. Both add great depth and flavor. For a lighter option, ground turkey or chicken sausage works beautifully. Vegetarian or vegan sausages can also be used for a meatless twist. When preparing the sausage, remove it from its casing if using links, crumble, and brown it thoroughly with garlic and onions for enhanced flavor.
Cheese Selection:
The cheese filling is where creaminess meets meltability. Ricotta is the traditional base, offering a mild, creamy texture that balances the sausage’s boldness. Mozzarella adds gooey stretchiness and a mild flavor, while parmesan contributes a nutty sharpness. For extra richness, a bit of cream cheese can be folded in, making the filling decadently smooth.
Sauce Choices:
Tomato-based marinara is the tried-and-true classic, but don’t shy away from making your own for a fresher taste. Store-bought marinara works well too for convenience. For a change, try Alfredo or a spicy arrabbiata sauce to bring creaminess or heat to the dish.
Fresh Herbs and Aromatics:
Garlic and onions sautéed with the sausage build a fragrant base. Fresh basil, parsley, or oregano sprinkled into the filling or sauce brighten the dish with herbal notes. These aromatics elevate simple ingredients into something spectacular.
Optional Add-ins:
Spinach, mushrooms, or diced bell peppers can be mixed into the cheese filling for extra texture, flavor, and a nutritional boost.
Pro Tip:
Drain the ricotta or any fresh cheeses well to avoid a watery filling. Excess moisture can cause the shells to become soggy during baking, so wrapping the cheese in a clean kitchen towel or straining in a fine mesh sieve is highly recommended.
Essential Equipment and Preparation Tips
For best results, use a glass or ceramic baking dish that distributes heat evenly and allows for beautiful presentation. Cast iron skillets also work well and keep the dish warm longer.
You’ll need a large pot to boil the pasta shells, ensuring plenty of space so they don’t stick together. Mixing bowls, a spatula, and measuring cups are essential for preparing the filling and assembling the dish.
When prepping the sausage, remove the casing for loose crumbles and brown it well to develop deep flavor. Avoid overcrowding the pan to ensure even cooking.
To prevent sticking during assembly, lightly grease your baking dish or spread a thin layer of sauce on the bottom. This also helps keep the shells moist while baking.
Step-by-Step Recipe Walkthrough
Step 1: Cook the Pasta
Bring a large pot of salted water to a boil. Add the pasta shells and cook until just al dente (usually 8–10 minutes). Avoid overcooking to prevent tearing. Drain and rinse shells under cold water to stop cooking and cool them for handling. Arrange them on a baking sheet to prevent sticking.
Step 2: Prepare the Sausage Filling
In a skillet over medium heat, crumble the sausage and cook until browned and cooked through, about 6–8 minutes. Add finely chopped onions and minced garlic halfway through cooking for extra aroma. Drain any excess fat.
Transfer the cooked sausage mixture to a bowl and let cool slightly. Stir in ricotta, shredded mozzarella, parmesan, and fresh herbs like parsley or basil. Season with salt, pepper, and a pinch of red pepper flakes if you like a little heat. Mix until creamy and well combined.
Step 3: Stuff the Shells
Using a spoon or small cookie scoop, carefully fill each cooked shell with the sausage and cheese mixture. Be generous but avoid overstuffing to prevent shells from bursting.
Arrange the filled shells snugly in your prepared baking dish, open side up.
Step 4: Layer the Sauce
Spread a thin layer of marinara sauce on the bottom of the dish before placing the shells to prevent sticking. Once arranged, pour or spoon more sauce evenly over the shells. This keeps them moist and adds flavor.
Step 5: Add Cheese Topping
Sprinkle shredded mozzarella and parmesan generously over the top for a golden, bubbly crust after baking.
Step 6: Bake
Preheat your oven to 350°F (175°C). Cover the baking dish loosely with foil and bake for 25 minutes. Remove the foil and bake for an additional 10 minutes or until cheese is bubbly and starting to brown.
Step 7: Rest and Serve
Let the stuffed shells rest for 5–10 minutes after baking. This allows the filling to set and makes serving easier.
Serve with a crisp green salad, garlic bread, and a glass of your favorite red wine or sparkling water to round out the meal.
Delicious Variations and Flavor Twists
Sausage stuffed shells are wonderfully versatile, making it easy to customize the recipe to fit your tastes or dietary needs.
Protein Swaps: If you’re not a fan of pork sausage, try ground beef, turkey, or chicken sausage for a leaner option. For a vegetarian take, Italian-seasoned tofu or plant-based meat crumbles offer satisfying texture and flavor without meat.
Veggie Boost: Add sautéed spinach, kale, roasted red peppers, or mushrooms to the cheese and sausage filling for extra nutrition and depth. These veggies meld beautifully with the creamy cheese and savory sausage.
Sauce Swaps: While classic marinara is timeless, creamy Alfredo sauce adds richness, pesto brings fresh herbaceous notes, and spicy tomato sauces like arrabbiata deliver a little kick. Feel free to mix sauces or swirl in some cream for added complexity.
Cheese Twists: Experiment with goat cheese for tang, fontina for buttery meltiness, or smoked mozzarella for a subtle smoky flavor. Mixing cheeses can elevate your stuffed shells from everyday to gourmet.
Gluten-Free Adaptations: Use gluten-free pasta shells and gluten-free breadcrumbs or almond flour in the filling. Many grocery stores offer gluten-free pasta that cooks similarly to traditional shells.
Pro Tip: Fresh herbs and spices layered into the filling — think fresh basil, oregano, or red pepper flakes — can take your stuffed shells from good to unforgettable.
Serving & Presentation Ideas
Presentation is half the joy of serving sausage stuffed shells! Here are some ideas to make your dish shine:
Garnish: Sprinkle chopped fresh basil or parsley right before serving for a pop of color and brightness. A few red pepper flakes add a dash of heat and visual appeal.
Family-style or Individual: Serve directly from the baking dish for a cozy family-style meal, or plate individual portions on warm plates with a drizzle of extra sauce.
Pairings: A crisp green salad or roasted vegetables complement the richness perfectly. For drinks, light-bodied red wines like Pinot Noir or a sparkling water with lemon work well to refresh the palate.
Kid-friendly: Make mini versions by using smaller pasta shells or serve a “deconstructed” bowl where kids can build their own stuffed shell bites, making mealtime fun and interactive.
Storage, Reheating & Make-Ahead Tips
Storage: Leftovers store beautifully in airtight containers in the refrigerator for up to 3-4 days.
Freezing: Stuffed shells can be frozen both before and after baking. To freeze uncooked, assemble in a freezer-safe dish, cover tightly with foil, and freeze for up to 3 months. To freeze cooked leftovers, cool completely and store in airtight containers or freezer bags.
Thawing & Reheating: Thaw frozen stuffed shells overnight in the fridge. Reheat covered in a 350°F oven for about 20-25 minutes until warmed through. Microwaving works too but may dry the pasta if overheated — add a splash of water or sauce to keep moist.
Make-Ahead: Prepare the filling and stuff the shells a day ahead, cover, and refrigerate before baking. This is perfect for busy weeknights or entertaining guests without last-minute stress.
Troubleshooting Common Issues
Watery Filling: Often caused by excess moisture in ricotta or veggies. Drain cheese well and sauté or squeeze out water from veggies before mixing.
Pasta Shells Breaking: Avoid overcooking pasta; cook until just al dente. Handle gently when stuffing and use a spoon or small scoop.
Dry or Tough Baked Shells: Overbaking or insufficient sauce can dry out the dish. Cover with foil during baking and ensure enough sauce to keep shells moist.
Bland Filling: Taste and season the sausage-cheese mixture before stuffing. Add salt, pepper, and herbs to brighten flavors.
Soggy Bottom: Too much sauce or a baking dish that doesn’t distribute heat evenly can cause this. Use moderate sauce amounts and consider baking in a metal or ceramic dish for better heat conduction.
FAQs: What People Also Ask About Sausage Stuffed Shells
Q: Can I use frozen pasta shells?
A: It’s best to cook fresh shells; frozen pasta shells are rare and may affect texture. If using frozen cooked shells, thaw completely before stuffing.
Q: How do I make stuffed shells ahead of time?
A: Assemble the shells the day before and refrigerate covered. Bake fresh when ready to serve.
Q: Can I freeze stuffed shells before baking?
A: Yes! Freeze assembled shells in a freezer-safe dish, covered tightly. Bake from frozen by adding extra baking time.
Q: What’s the best sausage to use for stuffed shells?
A: Italian pork sausage (sweet or spicy) is classic, but ground turkey or chicken sausage work well too.
Q: Are stuffed shells gluten-free or can they be made so?
A: Traditional shells contain gluten, but you can use gluten-free pasta shells and gluten-free breadcrumbs for a safe alternative.
Q: How long do stuffed shells keep in the fridge?
A: Store leftovers in an airtight container for up to 3-4 days.

Sausage Stuffed Shells
Equipment
- Large pot for boiling pasta
- Strainer/colander
- Mixing bowl
- Baking dish (9x13 inch recommended)
- Spoon or small scoop (for stuffing shells)
- Aluminum foil (optional, for covering during baking)
Ingredients
- Jumbo pasta shells (about 20–25 shells)
- Italian sausage (1 lb, casing removed)
- Ricotta cheese (15 oz)
- Shredded mozzarella cheese (1 ½ cups)
- Grated Parmesan cheese (½ cup)
- Egg (1 large, for binding)
- Garlic (2 cloves, minced)
- Italian seasoning (1 tsp)
- Salt and freshly ground black pepper, to taste
- Marinara sauce (3 cups)
- Fresh basil or parsley, for garnish (optional)
Instructions
- Cook the pasta shells: Boil salted water, cook shells according to package directions until al dente. Drain and rinse with cold water to prevent sticking. Set aside.
- Prepare the filling: In a skillet over medium heat, cook Italian sausage until browned and cooked through, breaking it apart with a spoon. Drain excess fat.
- Mix the filling: In a large bowl, combine cooked sausage, ricotta, half the mozzarella, Parmesan, minced garlic, egg, Italian seasoning, salt, and pepper. Stir well to combine.
- Assemble: Preheat oven to 375°F (190°C). Spread about 1 cup of marinara sauce on the bottom of a greased baking dish. Stuff each shell generously with the sausage-cheese mixture and arrange in the dish.
- Top and bake: Pour remaining marinara sauce over the stuffed shells. Sprinkle remaining mozzarella on top. Cover with foil and bake for 25 minutes. Remove foil and bake an additional 10-15 minutes until cheese is melted and bubbly.
- Serve: Garnish with fresh basil or parsley if desired. Let cool for 5 minutes before serving.
Notes
- Drain cheeses and sausage well to avoid watery filling.
- Use fresh herbs for best flavor or dried Italian seasoning as a convenient alternative.
- Substitute turkey or chicken sausage for a leaner dish.
- For gluten-free, use gluten-free pasta shells and breadcrumbs.
- To reheat leftovers, cover with foil and warm in a 350°F oven until heated through.
- Make ahead by assembling stuffed shells a day in advance and refrigerate before baking.