Introduction to Olive Garden Copycat Breadsticks
Few things spark joy like a warm basket of Olive Garden breadsticks — soft, buttery, and kissed with garlic. These iconic breadsticks are the ultimate comfort food, and now you can recreate them at home with ease. Whether you’re serving them alongside pasta, dunking them into soup, or pairing with a crisp salad, they elevate any meal into something special.
Recreating restaurant favorites at home is not only satisfying, but it also lets you control the ingredients and enjoy that “unlimited basket” feeling anytime. These copycat breadsticks capture everything you love about the original: the fluffy interior, the golden crust, and the addictive garlic butter finish.
Perfect for weeknight dinners, gatherings, or just because, this recipe brings the magic of Olive Garden to your kitchen — no reservations required.
What Makes Olive Garden Breadsticks So Special?
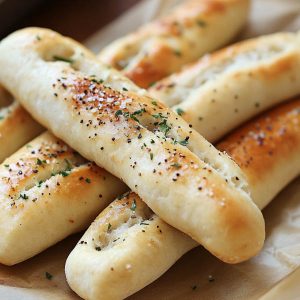
What sets Olive Garden’s breadsticks apart is their perfect balance of texture and flavor. The inside is pillowy and tender, while the outside has just enough golden crust to hold its shape and soak up that irresistible garlic butter.
The topping is what seals the deal — a buttery glaze infused with garlic and a hint of salt that makes each bite crave-worthy. It’s simple, but it hits all the right notes.
And let’s not forget the experience: the warm basket, the endless refills, the anticipation of that first bite. Now, you can recreate that magic at home.
Tip: Use bread flour instead of all-purpose for extra chewiness and structure. It gives the breadsticks that signature bite while keeping the inside soft and airy.
The Origins of the Copycat Craze
Olive Garden’s breadsticks have long been a cult favorite — so much so that they’ve inspired a wave of copycat recipes across the internet. Their comforting flavor and nostalgic appeal make them a top contender for home cooks looking to replicate restaurant magic.
As the popularity of DIY dining grew, so did the demand for reliable copycat recipes. From blogs to cookbooks, recreating iconic dishes became a way to bring the restaurant experience into everyday kitchens.
This version stands out for its simplicity, accuracy, and delicious results. It nails the texture, flavor, and aroma of the original — without complicated ingredients or techniques. Whether you’re a seasoned baker or a beginner, this recipe delivers that warm, buttery satisfaction every time.
Step-by-Step Preparation Guide
Step 1: Make the Dough In a large bowl, combine 1 cup warm water (about 110°F), 2¼ tsp active dry yeast, and 1 tbsp sugar. Let sit for 5–10 minutes until foamy. Add 2½–3 cups bread flour, 1½ tsp salt, and 2 tbsp olive oil. Mix until a soft dough forms.
Step 2: Knead and First Rise Knead the dough on a floured surface for 8–10 minutes until smooth and elastic. Place in a greased bowl, cover with a towel or plastic wrap, and let rise in a warm spot for 1 hour or until doubled in size.
Step 3: Shape the Breadsticks Punch down the dough and divide into 12 equal pieces. Roll each piece into a 7-inch rope and place on a parchment-lined baking sheet. Cover and let rise again for 30–45 minutes.
Step 4: Bake Preheat oven to 400°F (200°C). Bake breadsticks for 12–15 minutes or until golden brown.
Step 5: Make Garlic Butter While baking, melt ¼ cup unsalted butter and stir in ½ tsp garlic powder and a pinch of salt.
Step 6: Brush and Serve Immediately brush hot breadsticks with garlic butter using a pastry brush for even coverage.
Pro Tip: For extra flavor, sprinkle with a touch of grated Parmesan or Italian seasoning after brushing with butter.
Common Mistakes to Avoid
Over-Kneading the Dough Kneading is essential, but too much can make the breadsticks dense and chewy instead of soft. Stop once the dough is smooth and elastic.
Skipping the Second Rise The second proofing is crucial for light, fluffy breadsticks. It allows the dough to relax and expand, creating that signature airy texture.
Using Cold Butter Brushing with cold or semi-solid butter won’t coat the breadsticks evenly. Always melt the butter fully and apply while the breadsticks are still hot for maximum absorption.
Not Covering Dough While Proofing Uncovered dough can dry out, forming a crust that prevents proper rising. Always cover with a damp towel or plastic wrap during both rises.
Tip: Let the breadsticks cool for 5–10 minutes before serving. This allows the flavors to settle and the texture to finish setting — plus, it prevents burned fingers from eager hands!
Olive Garden Copycat Breadsticks Recipe – Soft Garlic Breadsticks Made from Scratch
Equipment
- Mixing bowl
- Measuring Cups and Spoons
- stand mixer (optional)
- Baking sheet
- Parchment paper
- Pastry brush
- Kitchen towel or plastic wrap
Ingredients
For the Dough:
- 1 cup warm water (110°F / 43°C)
- 2¼ tsp active dry yeast (1 packet)
- 1 tbsp granulated sugar
- 2½–3 cups bread flour (or all-purpose)
- 1½ tsp salt
- 2 tbsp olive oil
For the Garlic Butter Topping:
- ¼ cup unsalted butter, melted
- ½ tsp garlic powder
- Pinch of salt
- Optional: grated Parmesan or Italian seasoning
Instructions
- Activate Yeast In a large bowl, combine warm water, yeast, and sugar. Let sit for 5–10 minutes until foamy.
- Make the Dough Add 2½ cups flour, salt, and olive oil. Mix until a soft dough forms. Add more flour as needed.
- Knead and First Rise Knead for 8–10 minutes until smooth. Place in a greased bowl, cover, and let rise for 1 hour or until doubled.
- Shape Breadsticks Punch down dough and divide into 12 equal pieces. Roll into 7-inch ropes. Place on a parchment-lined baking sheet.
- Second Rise Cover and let rise for 30–45 minutes until puffy.
- Bake Preheat oven to 400°F (200°C). Bake for 12–15 minutes until golden brown.
- Brush with Garlic Butter Mix melted butter with garlic powder and salt. Brush over hot breadsticks.
Notes
- Use bread flour for a chewier texture, or all-purpose for a softer bite.
- Don’t skip the second rise — it ensures light, fluffy breadsticks.
- For extra flavor, sprinkle Parmesan or herbs after brushing with butter.
- Store leftovers in an airtight container for up to 3 days. Reheat in the oven for best results.
- Freeze shaped, unbaked dough for future use — just thaw, rise, and bake.