Why Garlic Parmesan Cheeseburger Bombs Are a Game-Changer
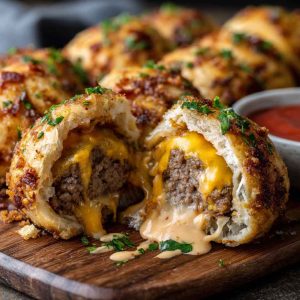
Imagine biting into a golden, crispy pocket bursting with juicy, savory cheeseburger filling, all elevated by the irresistible flavors of fresh garlic and nutty parmesan cheese. That’s exactly what Garlic Parmesan Cheeseburger Bombs bring to your table — a bite-sized explosion of classic cheeseburger goodness wrapped in a flaky, buttery crust.
Perfect for game days, family dinners, potlucks, or casual parties, these bombs are the ultimate crowd-pleasers that deliver maximum flavor with minimal effort. Whether you’re feeding a hungry crowd or treating your family to something special, this recipe is incredibly easy to make and endlessly customizable.
In this article, I’ll walk you through everything you need to know — from choosing the best ingredients to perfecting your technique — so you can master these tasty, garlicky, cheesy bites at home. Let’s get started!
What Are Cheeseburger Bombs? Understanding the Concept
Cheeseburger bombs are essentially mini dough pockets stuffed with seasoned ground beef, gooey melted cheese, and the classic flavors of a cheeseburger, all baked to golden perfection. Think of them as a portable, handheld version of your favorite burger, wrapped up in a crispy, buttery dough that’s just begging to be dunked in your favorite sauce.
The idea of “bomb” recipes has exploded in popularity because they’re fun, flavorful, and super convenient to eat — no forks or plates required. What sets garlic parmesan cheeseburger bombs apart is the addition of fresh garlic and parmesan cheese, which add an aromatic depth and savory richness that take this appetizer to the next level.
Compared to similar dishes like sliders, stuffed meatballs, or calzones, cheeseburger bombs stand out because of their size and versatility. They’re the perfect finger food for casual gatherings and kid-friendly enough for family dinners, yet sophisticated enough to impress guests at your next party.
Key Ingredients Breakdown & Selection Tips
The secret to truly delicious garlic parmesan cheeseburger bombs starts with picking the right ingredients. Here’s what you need to know:
Ground Beef: Choose 80/20 ground beef — that’s 80% lean, 20% fat. This ratio ensures juicy, flavorful filling without excess grease. Too lean, and your bombs will be dry; too fatty, and they’ll be greasy.
Cheese: Use a combination for the best melt and flavor. Mozzarella provides gooey stretchiness, sharp cheddar adds bold flavor, and parmesan brings a nutty, salty umami kick that complements the garlic perfectly. Balance is key to avoid overpowering the beef or dough.
Garlic: Fresh garlic is best for vibrant, aromatic flavor. Mince it finely or use a garlic press to release all those delicious oils. If you’re short on fresh garlic, garlic powder can be a handy substitute, but use sparingly.
Dough Options: You have a few choices here — store-bought pizza dough is convenient and reliable, crescent roll dough makes assembly quicker with its buttery layers, and homemade biscuit dough offers a tender, flaky texture. Each has its pros and cons:
Pizza dough gives a chewy, classic crust.
Crescent roll dough is buttery and flaky but can be delicate.
Biscuit dough adds richness but can be crumbly if overworked.
Seasonings & Extras: Worcestershire sauce adds a savory depth; yellow mustard brings a subtle tang; diced onions and pickles add crunch and acidity. Fresh herbs like parsley or chives lift the flavor with brightness. Don’t forget salt and pepper to season everything perfectly.
Pro Tip: Use freshly grated parmesan instead of pre-grated for better texture and maximum flavor impact — it melts beautifully and doesn’t clump.
Essential Tools & Prep Tips
To make the process smooth and stress-free, have these tools on hand:
A baking sheet lined with parchment paper or a silicone baking mat to prevent sticking.
Mixing bowls for your beef and cheese mixtures.
Cheese grater for fresh parmesan and cheddar.
Garlic press or fine knife for mincing fresh garlic.
Oven thermometer to ensure your oven is at the perfect baking temperature.
Prep Hacks: Dice your onions and pickles finely for even distribution and quick cooking. Drain any excess moisture from the beef filling thoroughly — this is key to avoiding soggy dough pockets. When sealing your bombs, pinch the dough edges tightly and crimp if needed to keep all that delicious filling inside during baking.
Plan your prep timeline so you make the filling first, chill your dough if it’s homemade, and assemble the bombs just before they go into the oven to keep everything fresh.
Step-by-Step Recipe Instructions
Ready to get cooking? Follow these steps for perfectly golden, juicy cheeseburger bombs every time.
Preheat your oven to 375°F (190°C). Line a baking sheet with parchment paper or a silicone baking mat.
Prepare the filling: In a skillet over medium heat, brown the ground beef with diced onions and minced garlic until just cooked through but still juicy. Stir in Worcestershire sauce, yellow mustard, salt, and pepper. Drain any excess fat carefully and transfer the filling to a bowl to cool slightly.
Mix the cheese: In another bowl, combine shredded mozzarella, cheddar, and freshly grated parmesan. Add finely minced garlic and chopped fresh herbs like parsley or chives for an extra punch of flavor.
Prepare the dough: Lightly flour your work surface and roll out your dough to about 1/4 inch thick. Cut it into squares roughly 3 inches by 3 inches — this size makes the perfect handheld bomb.
Assemble the bombs: Spoon a generous tablespoon of the beef mixture onto the center of each dough square, then sprinkle with a good handful of the cheese blend.
Seal each bomb: Fold the dough over the filling to create a pocket, pinching the edges firmly to seal. If you want, crimp the edges with a fork or your fingers to ensure they’re tight and to add a decorative touch.
Add the finishing touch: For a beautiful golden crust, brush each bomb with melted garlic butter and sprinkle with extra parmesan cheese.
Bake: Place the bombs on your prepared baking sheet, spacing them about an inch apart. Bake for 18 to 22 minutes, until golden brown and puffed, with melted cheese oozing inside.
Rest: Remove from the oven and let the bombs rest for at least 5 minutes. This crucial step locks in the juices and prevents anyone from burning their mouth on molten cheese.
Serve: Offer these delicious bombs alongside ketchup, mustard, or your favorite burger sauces for dipping. They’re best enjoyed warm but still fantastic at room temperature.
Bold Tip: Don’t skip the resting! Letting these bombs cool briefly means juicy, safe-to-eat bites every time.
6. Flavorful Variations on Garlic Parmesan Cheeseburger Bombs
One of the best things about cheeseburger bombs is how adaptable they are. You can tweak the filling and dough to fit your taste or dietary needs while keeping that irresistible garlic-parmesan essence.
Lean protein swaps: For a lighter option, try ground turkey or chicken. They soak up the seasonings beautifully and keep the bombs juicy without excess fat. Just be mindful to not overcook, as they can dry out faster than beef.
Add richness: Mix in crispy cooked bacon or sweet caramelized onions to deepen the flavor profile. These add layers of savory and sweetness that complement the sharp parmesan perfectly.
Turn up the heat: Spice lovers can add diced jalapeños, a dash of hot sauce, or swap in pepper jack cheese for a melty, spicy kick. These bombs become little flavor explosions with every bite.
Vegetarian options: Substitute the beef with sautéed mushrooms, seasoned lentils, or your favorite plant-based “meat.” Pair with vegan cheese and a garlic butter made from olive oil and herbs for a meatless version that still satisfies.
Cheese variety: Don’t be afraid to experiment with different cheeses like smoked gouda, provolone, or even a tangy feta crumble inside the bombs for a new twist.
Herb-infused dough and glazes: Add fresh rosemary or thyme to your dough or garlic butter glaze for an aromatic upgrade.
Pro Tip: For that authentic cheeseburger tang, add a small slice of pickle inside each bomb before sealing — it’s a little surprise that makes a big difference.
Serving Suggestions & Pairings
Garlic Parmesan Cheeseburger Bombs are naturally finger-friendly and perfect for sharing, but pairing them thoughtfully can elevate your meal or party spread.
Dips: Serve alongside garlicky aioli, spicy ketchup, ranch dressing, or creamy blue cheese dip for delicious dipping options that complement the bombs’ flavors.
Sides: Round out your meal with a crisp green salad dressed simply or pile on some crispy fries or oven-baked potato wedges for a classic burger combo.
Presentation: For parties, try skewering the bombs on toothpicks or placing them in mini baskets lined with parchment paper for easy serving and a rustic look.
Make-ahead entertaining: These bombs can be assembled in advance and baked right before guests arrive, making them a stress-free crowd-pleaser.
Storage, Reheating & Make-Ahead Tips
Leftovers? No problem!
Storage: Keep leftover bombs in an airtight container in the refrigerator for up to 3 days. Make sure they’re completely cooled before storing to avoid condensation.
Freezing: You can freeze the bombs either before baking (place assembled bombs on a tray, freeze until firm, then transfer to a freezer bag) or after baking once cooled. Frozen bombs last up to 2 months.
Reheating: To maintain crispness, reheat in a 350°F (175°C) oven or air fryer until warmed through and the crust regains its crunch. Avoid microwaving, which tends to make the dough soggy.
Make-ahead assembly: Prepare filling and dough ahead, then assemble bombs the day of baking for fresh, hot snacks with minimal effort.
Troubleshooting Common Issues
Bombs bursting open: Often caused by under-sealing. Make sure to pinch and crimp dough edges tightly to keep fillings inside. Chill dough slightly before assembling for easier handling.
Soggy bottoms: Drain excess moisture from the beef mixture thoroughly and avoid overfilling. Baking on parchment or a silicone mat helps prevent sticking but a wire rack can improve airflow for a crisp crust.
Dry or tough filling: Use beef with sufficient fat content (80/20), avoid overcooking the meat before stuffing, and season well for juiciness and flavor.
Cheese leakage: Don’t overstuff with cheese. Balance the amount and use cheeses that melt well but don’t separate or release too much oil, like mozzarella and cheddar.
Undercooked dough: Verify your oven temperature with an oven thermometer, and bake long enough for a golden crust—rotate the pan midway for even cooking.
FAQs — What People Also Ask About Garlic Parmesan Cheeseburger Bombs
Q: Can I use pre-made pizza dough or crescent rolls?
A: Absolutely! Store-bought pizza dough gives a classic chewy crust, while crescent rolls offer buttery flakiness and faster prep.
Q: What’s the best cheese combo for gooey filling?
A: Mozzarella for meltiness, cheddar for flavor, and parmesan for a savory punch work best together.
Q: How do I make these gluten-free or keto-friendly?
A: Use gluten-free pizza dough or almond flour-based doughs for gluten-free. For keto, opt for low-carb dough recipes and swap in high-fat cheeses and meats.
Q: Can I prepare these ahead and freeze them?
A: Yes! Freeze assembled bombs before baking for up to 2 months. Bake directly from frozen, adding a few extra minutes.
Q: How long do these bombs stay fresh?
A: Stored in the fridge, they last 3 days. For longer storage, freeze as described.
Q: Are there vegetarian or vegan versions?
A: Definitely! Use sautéed mushrooms, lentils, or plant-based meats and vegan cheeses for tasty alternatives.
Garlic Parmesan Cheeseburger Bombs
Equipment
- Baking sheet
- Mixing bowls
- Cheese grater
- Garlic press or fine mincer
- Spoon and spatula
- Oven thermometer (optional but recommended)
- Rolling pin (optional, depending on dough)
Ingredients
- 1 lb ground beef (80/20 recommended)
- 1 cup shredded mozzarella cheese
- ½ cup grated Parmesan cheese, plus extra for topping
- ½ cup shredded cheddar cheese
- 3 cloves garlic, minced (or 1½ tsp garlic powder)
- 1 tsp Worcestershire sauce
- ½ tsp onion powder
- Salt and pepper, to taste
- 1 package refrigerated pizza dough or crescent roll dough (approx. 13–16 oz)
- 3 tbsp unsalted butter, melted
- Optional: chopped pickles, mustard, or ketchup for stuffing or serving
Instructions
- Preheat your oven to 375°F (190°C). Line a baking sheet with parchment paper or a silicone mat.
- In a skillet over medium heat, cook the ground beef until browned and cooked through. Drain excess fat.
- Stir in minced garlic, Worcestershire sauce, onion powder, salt, and pepper. Remove from heat and let cool slightly.
- In a large bowl, combine the cooled beef mixture with mozzarella, cheddar, and ½ cup Parmesan cheese. Mix well.
- Roll out dough on a floured surface into a large rectangle (if needed). Cut into 12–15 equal squares.
- Place a generous spoonful of the beef and cheese filling in the center of each square. Add optional pickles or condiments if desired.
- Fold the dough over the filling and pinch edges firmly to seal, shaping into a ball. Place seam-side down on the baking sheet.
- Brush each bomb with melted butter and sprinkle with additional Parmesan cheese.
- Bake for 20–25 minutes, or until golden brown and cooked through.
- Let bombs cool for 5 minutes before serving. Serve warm with your favorite dipping sauces.
Notes
- Use 80/20 ground beef for juiciness; leaner beef can make bombs dry.
- Fresh garlic gives the best flavor, but garlic powder works well in a pinch.
- Ensure dough edges are well sealed to prevent filling leakage during baking.
- For a crispier crust, brush with garlic butter (melted butter mixed with minced garlic) instead of plain melted butter.
- Leftovers store well in the fridge for 3 days or freeze baked bombs for up to 1 month.
- Customize with extra fillings like caramelized onions, jalapeños, or different cheeses for variety.