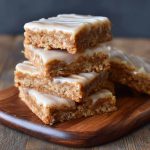
Cheeseburger Pretzel Bombs (The Ultimate Party Snack!)
Imagine biting into a warm, golden-brown pretzel roll with that signature chewy crust… only to discover a juicy, cheesy cheeseburger center waiting inside. That’s exactly what cheeseburger pretzel bombs deliver.
They combine everything we love about a classic burger — seasoned beef, melty cheddar, savory flavor — wrapped in soft pretzel dough and baked until beautifully browned. They’re portable, less messy than traditional burgers, and absolutely perfect for game day, parties, potlucks, or family snack nights.
In this guide, I’ll walk you through exactly how to make them from scratch, including expert tips to prevent leaks, get that deep pretzel color, and keep the centers juicy. If you’ve never made homemade pretzel dough before, don’t worry — I’ll make it simple and approachable.
Let’s get started.
What Are Cheeseburger Pretzel Bombs?
Cheeseburger pretzel bombs are stuffed soft pretzel dough balls filled with seasoned ground beef and cheese. Think of them as a cross between a soft pretzel roll and a mini cheeseburger — compact, handheld, and packed with flavor.
Unlike sliders, which use traditional buns, these are wrapped in enriched pretzel dough and dipped briefly in a baking soda bath before baking. That quick dip is what creates the classic pretzel texture and deep golden crust.
Here’s what makes them special:
-
Chewy, slightly crisp exterior
-
Salty pretzel crust
-
Juicy, savory beef center
-
Gooey melted cheese core
They’re different from stuffed dinner rolls because the pretzel bath changes the entire flavor profile. You get that unmistakable pretzel taste and glossy brown finish that makes them irresistible.
Why You’ll Love This Recipe
There’s a reason these are always one of the first things to disappear at parties.
-
They’re crowd-pleasing — adults and kids both love them.
-
Perfect for game day spreads and football watch parties.
-
Freezer-friendly and great for meal prep.
-
Easier to serve than traditional burgers.
-
Completely customizable.
You can make them spicy, smoky, cheesy, or even swap the meat entirely. Once you master the base method, the variations are endless.
And unlike deep-fried snacks, these are baked — so they feel just a little more manageable.
Ingredients You’ll Need
Let’s break this down clearly so you understand why each component matters.
For the Filling
-
Ground beef (80/20 works best for juicy results)
-
Cheddar cheese cubes (block cheese melts better than shredded)
-
Finely diced onion (optional but recommended)
-
Minced garlic
-
Salt and black pepper
-
Worcestershire sauce
-
Yellow mustard (optional, for classic burger flavor)
Pro Tip: Use cheese cubes instead of shredded cheese. Shredded cheese tends to leak out more easily during baking.
For the Pretzel Dough
-
Warm water
-
Active dry yeast
-
Sugar
-
All-purpose flour
-
Salt
-
Melted butter
This dough is soft, elastic, and easy to work with — even for beginners.
For the Baking Soda Bath
This step is non-negotiable if you want authentic pretzel texture and color. The alkaline bath changes the surface of the dough, creating that chewy crust and deep brown finish.
For Topping
-
Egg wash
-
Coarse pretzel salt
-
Optional sesame seeds
Equipment Needed
You don’t need anything fancy:
That’s it.
Step-by-Step Instructions
Let’s walk through this carefully so you get perfect results.
Step 1: Make the Dough
Start by activating the yeast in warm water with a little sugar. Let it sit until foamy — about 5 minutes.
Add flour, salt, and melted butter. Mix until combined, then knead for 5–7 minutes until the dough is smooth and elastic. If using a stand mixer, knead with the dough hook on medium speed.
Form into a ball, place in a lightly greased bowl, cover, and let rise for about 1 hour or until doubled in size.
Don’t rush this step. Proper rise equals fluffy interior.
Step 2: Prepare the Cheeseburger Filling
While the dough rises, cook the ground beef in a skillet over medium heat.
Break it up finely as it browns. Add onion, garlic, salt, pepper, Worcestershire sauce, and mustard. Cook until fully browned.
Drain excess grease and let the mixture cool slightly before assembling.
Important: If the filling is too hot, it can tear the dough and cause leaks.
Step 3: Assemble the Pretzel Bombs
Punch down the risen dough and divide into equal portions (about golf-ball size for standard bombs).
Flatten each piece into a circle in your palm.
Add a spoonful of cooled beef mixture and one cube of cheddar in the center.
Carefully pull the dough edges up and over the filling. Pinch tightly to seal, then gently roll into a smooth ball.
Seal very well. Any weak seam will open during baking.
Place seam-side down on parchment-lined baking sheets.
Step 4: The Baking Soda Bath
Bring a large pot of water to a gentle boil. Carefully add baking soda (it will bubble).
Using a slotted spoon, lower each dough ball into the water for 20–30 seconds.
Remove and return to the baking sheet.
This is what gives you that signature pretzel crust and dark golden color.
Skipping this step will give you a soft roll — not a pretzel.
Step 5: Bake
Brush each bomb with egg wash and sprinkle with coarse salt.
Bake at 425°F (220°C) for 15–18 minutes, or until deep golden brown.
Let them rest 5–10 minutes before serving so the cheese sets slightly.
Serve warm for maximum gooey goodness.
Pro Tips for Perfect Pretzel Bombs
Here’s what makes the difference between good and amazing:
-
Don’t overfill. Too much filling causes bursting.
-
Seal tightly. Pinch seams firmly.
-
Let the filling cool before assembling.
-
Don’t skip the baking soda bath.
-
Bake until deeply golden — pale bombs lack flavor.
-
Use block cheddar for better melt control.
Quick Troubleshooting
Cheese leaking out?
You likely overfilled or didn’t seal tightly.
Dense texture?
Dough may not have risen fully or too much flour was added.
Pale color?
Increase baking time slightly or ensure baking soda bath was done correctly.
Delicious Variations to Try