Why Baked Teriyaki Chicken Is a Weeknight Favorite
There’s something comforting about having a go-to dinner that’s both delicious and low-effort. For me, that’s this Baked Teriyaki Chicken recipe. I first made it on a busy Wednesday when I had zero energy but still wanted something homemade. The result? Tender chicken coated in a sticky, savory-sweet glaze that tasted like it came from a restaurant—but with minimal cleanup. This dish is perfect for weeknights: it uses pantry staples, comes together quickly, and bakes in one pan. The teriyaki sauce caramelizes beautifully in the oven, creating a glossy coating that clings to every bite. Serve it over rice or with steamed veggies, and you’ve got a balanced, crowd-pleasing meal. Whether you’re cooking for family or just yourself, this recipe delivers bold flavor with very little fuss. It’s the kind of dish you’ll make once and then crave again and again.
What Is Teriyaki Chicken?
Teriyaki is a classic Japanese cooking technique that involves grilling or broiling meat with a glaze made from soy sauce, sugar, and mirin. The word “teriyaki” comes from “teri” (shine) and “yaki” (grill), referring to the glossy finish of the sauce. In Western kitchens, teriyaki has evolved into a versatile marinade and sauce used for everything from stir-fries to baked dishes. Teriyaki chicken is especially popular for its balance of sweet and savory flavors. While traditional versions are grilled, baked teriyaki chicken offers a simpler, hands-off approach. Baking allows the sauce to thicken and caramelize around the chicken, creating a rich glaze without the need for constant attention. It’s a delicious fusion of tradition and convenience.
Choosing the Right Cut of Chicken
The cut of chicken you choose can make a big difference in flavor and texture. Boneless, skinless chicken thighs are ideal for baked teriyaki—they stay juicy, cook evenly, and absorb the sauce beautifully. They’re also forgiving if slightly overcooked. Chicken breasts work too, especially if you prefer leaner meat, but they can dry out more easily. To prevent this, slice them into even pieces and monitor the bake time closely. If you’re using bone-in thighs or drumsticks, adjust the cooking time—add 10–15 minutes and check for doneness with a meat thermometer (165°F/74°C). Pro tip: Thighs are your best bet for flavor and moisture. Their higher fat content helps them stay tender, and they soak up the teriyaki glaze like a sponge. Whatever cut you choose, consistency in size ensures even cooking and perfect results.
Homemade Teriyaki Sauce: Flavor Profile & Key Ingredients
The magic of teriyaki lies in its sweet, salty, and umami-rich balance. Making it from scratch is easy and far more flavorful than store-bought versions. Start with soy sauce for depth and saltiness, then add brown sugar or honey for sweetness. Garlic and ginger bring warmth and complexity, while a splash of rice vinegar or mirin adds brightness. Optional add-ins include sesame oil for nuttiness, orange juice for citrusy zing, or chili flakes for a gentle kick. Combine all ingredients in a saucepan and simmer until thickened—this step is key. A glossy, slightly syrupy sauce clings better to the chicken and intensifies in flavor as it bakes. Expert tip: Don’t rush the simmer. Let it reduce gently until it coats the back of a spoon. You can make the sauce ahead and store it in the fridge for up to a week. Homemade teriyaki sauce elevates this dish from simple to sensational.
Marinating vs. Baking in Sauce
Marinating the chicken in teriyaki sauce before baking adds deeper flavor and tenderness. Even 30 minutes in the fridge can make a noticeable difference. For best results, marinate for 2–4 hours. However, if you’re short on time, you can bake the chicken directly in the sauce. It’s faster and still delicious, especially if you reduce the sauce beforehand. To avoid a watery sauce in the oven, make sure your chicken isn’t overly wet and use a thickened glaze. Bake uncovered for part of the time to help the sauce caramelize. Whether you marinate or not, the key is letting the sauce concentrate and cling to the chicken. Both methods work—choose based on your schedule and how bold you want the flavor.
Step-by-Step Baking Method
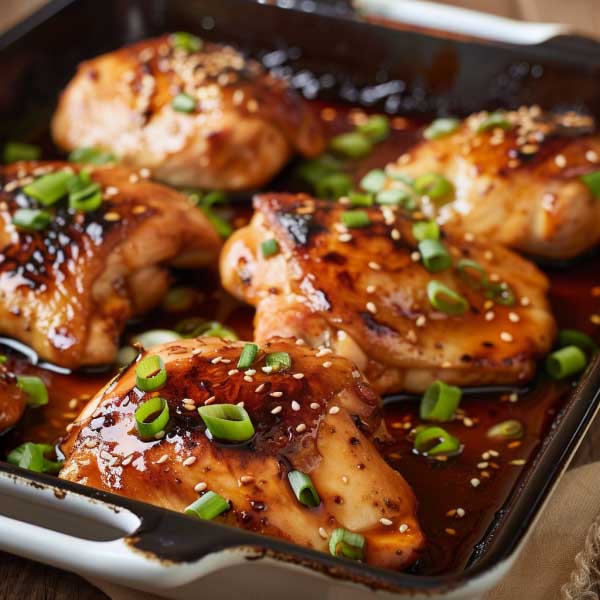
Start by preheating your oven to 375°F (190°C). Lightly grease a baking dish and arrange your chicken pieces in a single layer. Pour the teriyaki sauce over the chicken, making sure each piece is coated. For juicier results, cover the dish with foil for the first half of baking. This traps steam and keeps the chicken moist. After 20 minutes, remove the foil and turn the chicken to ensure even caramelization. Continue baking uncovered for another 15–20 minutes, or until the chicken is cooked through and the sauce is bubbling and thick. Baking tip: If the sauce starts to brown too quickly, tent loosely with foil to prevent burning. Use a meat thermometer to check doneness—165°F (74°C) is the safe internal temperature. Once baked, let the chicken rest for 5 minutes before serving. This helps the juices redistribute and keeps the meat tender. The result is sticky, savory-sweet chicken with a glossy glaze that’s perfect over rice or noodles.
Sauce Reduction & Finishing Touches
After baking, you may want to reduce the leftover sauce in the pan for extra richness. Transfer it to a small saucepan and simmer until thick and glossy. Brush or spoon the reduced sauce over the chicken just before serving for a final glaze. This adds shine and intensifies the flavor. For a finishing touch, sprinkle with toasted sesame seeds, sliced green onions, or a bit of citrus zest. These garnishes add texture, freshness, and visual appeal. If you’re serving with rice, drizzle some sauce over the top—it ties everything together. This final step turns a simple baked dish into something special. It’s all about layering flavor and making the meal feel complete.

Baked Teriyaki Chicken Recipe – Easy Oven-Baked Chicken with Soy Ginger Glaze
Equipment
- Baking dish or sheet pan
- Small saucepan
- Whisk
- Measuring Cups and Spoons
- Foil (optional)
- Meat thermometer (recommended)
Ingredients
- 1½ lbs boneless skinless chicken thighs or breasts
- ½ cup soy sauce (low-sodium preferred)
- ¼ cup brown sugar or honey
- 2 tbsp rice vinegar
- 2 cloves garlic, minced
- 1 tsp fresh ginger, grated
- 1 tbsp cornstarch + 2 tbsp water (for thickening)
- Optional: 1 tsp sesame oil, 1 tbsp orange juice, pinch of chili flakes
- Garnishes: sesame seeds, sliced green onions
Instructions
- Make the sauce: In a saucepan, combine soy sauce, sugar, vinegar, garlic, ginger, and optional add-ins. Simmer until slightly reduced.
- Thicken: Stir in cornstarch slurry and cook until glossy and thick.
- Marinate (optional): Pour cooled sauce over chicken and marinate for 30 minutes to 2 hours.
- Bake: Preheat oven to 375°F (190°C). Arrange chicken in a baking dish and pour sauce over. Cover with foil for first 20 minutes.
- Finish uncovered: Remove foil, turn chicken, and bake another 15–20 minutes until caramelized and cooked through (165°F internal temp).
- Glaze and garnish: Brush with extra sauce, sprinkle with sesame seeds and green onions. Serve warm.
Notes
- Thighs stay juicier and absorb sauce better than breasts
- Make ahead: Sauce can be prepared up to 1 week in advance
- Flavor twist: Add pineapple, sriracha, or swap sugar for honey
- Storage: Keeps 4 days in fridge; freezes well with sauce
- Reheat gently with a splash of water to loosen glaze