Introduction to Garlic Aioli Sauce
Garlic aioli is the creamy, garlicky condiment that transforms ordinary dishes into something extraordinary. Whether you’re dipping crispy fries, drizzling it over grilled meats, or spreading it on sandwiches, aioli adds bold flavor and silky richness that elevates every bite.
Homemade aioli far surpasses store-bought versions in taste and texture. Fresh garlic, quality oil, and a touch of acid come together in a luscious emulsion that’s both versatile and addictive. Unlike mass-produced varieties, homemade aioli lets you control the intensity, balance, and freshness of each ingredient.
Its appeal lies in its simplicity and adaptability. You can make it rustic and robust or smooth and mellow, depending on your method and garlic choice. From backyard barbecues to elegant dinner plates, garlic aioli is the secret weapon that brings depth and flair to your cooking.
What Is Aioli?
Aioli, derived from the Mediterranean words for “garlic” and “oil,” is a traditional sauce made by emulsifying garlic and olive oil—often with the help of an emulsifier like egg yolk. Originating in regions like Provence and Catalonia, it was historically made using a mortar and pestle to crush garlic and slowly incorporate oil.
While classic aioli contains no egg, modern versions often include egg yolks or mayonnaise for ease and stability. This adaptation makes it quicker to prepare and more forgiving, especially for home cooks.
The key difference between aioli and garlic mayonnaise lies in technique and ingredients. Aioli starts with garlic and oil, while garlic mayo begins with mayonnaise and adds garlic flavor.
Tip: For a more authentic experience, try making aioli with a mortar and pestle. But if you’re short on time, a blender or food processor delivers delicious results with minimal effort.
Flavor Profile & Key Ingredients
Garlic aioli is all about bold, balanced flavor and creamy texture. Here’s what makes it shine:
- Garlic: The star ingredient—raw garlic gives a sharp, pungent kick, while roasted garlic offers a mellow, sweet depth. Adjust based on your preference.
- Oil: Traditional aioli uses olive oil for a fruity, peppery note. Neutral oils like canola or grapeseed yield a milder flavor and smoother texture.
- Egg yolk or mayonnaise: Acts as an emulsifier, binding oil and garlic into a creamy sauce. Egg yolk adds richness, while mayo simplifies the process.
- Acid (lemon juice or vinegar): Brightens the flavor and balances the richness. It also helps stabilize the emulsion.
Pro Tip: Roast your garlic cloves before blending for a softer, sweeter flavor that’s perfect for dipping and spreading.
The result is a sauce that’s creamy, tangy, and deeply savory—ideal for everything from burgers to roasted vegetables. Customize the intensity and texture to suit your dish and palate.
Step-by-Step Preparation Guide
1. Prepare the garlic Peel and crush 2–3 garlic cloves. For a milder flavor, roast them in foil at 375°F (190°C) for 20 minutes until soft and golden.
2. Choose your method
- Traditional: Use a mortar and pestle to mash garlic into a paste.
- Modern: Use a blender or food processor for speed and smoothness.
3. Add emulsifier If using egg yolk, separate one yolk and add it to the garlic paste. If using mayonnaise, start with ½ cup.
4. Emulsify the oil Slowly drizzle in ¾ to 1 cup of oil while blending or whisking continuously. Add it gradually to prevent the mixture from breaking. The sauce should thicken and become creamy.
5. Add acid and season Stir in 1–2 teaspoons of lemon juice or white wine vinegar. Season with salt and pepper to taste. Optional: add a pinch of mustard or herbs for extra flavor.
6. Adjust consistency If the aioli is too thick, add a few drops of water or lemon juice. If too thin, blend in more oil slowly.
7. Chill and store Transfer to a container and refrigerate for at least 30 minutes to let flavors meld. Use within 3–5 days.
Tip: Use room temperature ingredients to help the emulsion form smoothly and prevent separation.
Common Mistakes to Avoid
Making aioli is simple, but a few missteps can ruin the texture or flavor. Here’s what to watch out for:
- Adding oil too fast: Emulsification requires patience. Pour oil slowly in a thin stream while blending or whisking. Rushing can cause the mixture to break and separate.
- Using cold ingredients: Cold eggs or oil can prevent proper emulsification. Let all ingredients come to room temperature before starting.
- Overpowering with raw garlic: Too much raw garlic can make the aioli harsh and bitter. Start with a small amount and adjust to taste. Roasting garlic is a great way to mellow the flavor.
- Skipping acid: Lemon juice or vinegar isn’t just for taste—it helps stabilize the emulsion and balances the richness. Without it, the aioli may taste flat or greasy.
Tip: If your aioli breaks, try blending a fresh egg yolk in a clean bowl and slowly whisking in the broken mixture to rescue it.
Avoiding these pitfalls ensures your garlic aioli turns out smooth, flavorful, and ready to elevate any dish.
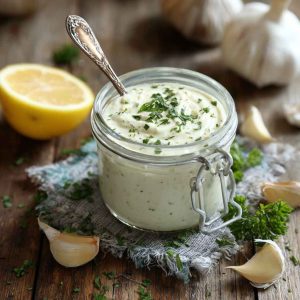
Garlic Aioli Sauce Recipe – Creamy Homemade Dip with Fresh Garlic & Lemon
Equipment
- Blender, food processor, or whisk
- Mixing bowl
- Measuring spoons
- Garlic press or knife
- Airtight container (for storage)
Ingredients
- 2–3 garlic cloves (raw or roasted)
- 1 egg yolk (or ½ cup mayonnaise for shortcut version)
- ¾ to 1 cup olive oil or neutral oil
- 1–2 tsp lemon juice or white wine vinegar
- Salt to taste
- Optional: mustard, herbs, or spices
Instructions
- Prepare garlic: Peel and crush garlic. Roast if you prefer a milder flavor.
- Blend base: In a bowl or blender, combine garlic, egg yolk (or mayo), and acid.
- Emulsify: Slowly drizzle in oil while whisking or blending continuously until thick and creamy.
- Season: Add salt and optional flavorings like mustard or herbs.
- Adjust: Thin with lemon juice or water if needed.
- Store: Transfer to an airtight container and refrigerate for up to 5 days.
Notes
- Room temperature ingredients help emulsify better.
- Roasted garlic offers a sweeter, mellow flavor.
- Use pasteurized eggs for safety if consuming raw.
- Flavor variations: Add chipotle, lemon zest, herbs, or truffle oil.
- Not freezer-friendly: Emulsion may break when frozen.