Ultimate Cookie Dough Ice Cream
Why Ultimate Cookie Dough Ice Cream Is a Dessert Dream
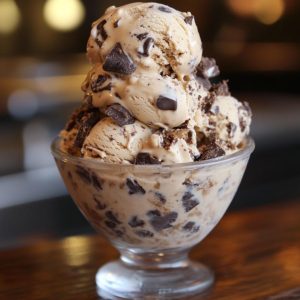
Is there anything more indulgently satisfying than a scoop of cookie dough ice cream? This dreamy dessert captures everything we love about homemade cookies and classic vanilla ice cream in one creamy, chewy bite. The contrast of cold, smooth ice cream with rich chunks of edible cookie dough makes it a freezer staple and fan-favorite across all ages.
This article walks you through exactly how to make bakery-quality cookie dough ice cream at home—complete with a safe-to-eat dough, luscious vanilla base, and foolproof freezing techniques. Whether you’re a churner or a no-churn devotee, you’ll get a full guide to a scoop-worthy finish every time.
What Is Cookie Dough Ice Cream?
At its heart, cookie dough ice cream is a sweet cream or vanilla-based frozen dessert speckled with nuggets of unbaked chocolate chip cookie dough. The contrast of creamy and chewy textures is what makes it so craveable.
Unlike cookies & cream (which uses crushed baked cookies) or cookies ‘n’ dough (which might mix both baked and unbaked elements), this variety leans entirely on the nostalgia of raw cookie dough—made safe by eliminating raw eggs and treating the flour to kill bacteria.
It gained traction in the late ‘80s and ’90s, becoming a staple in supermarket pints and ice cream shops. Now, thanks to easy methods and a growing love for DIY frozen treats, making it at home is just as fun as eating it.
Key Ingredients Breakdown: What Makes It the Ultimate
Ice Cream Base:
- Heavy Cream + Whole Milk: These create the rich, creamy texture we want in every bite.
- Sugar: Balances the richness and helps achieve a smooth scoop.
- Vanilla Extract or Vanilla Bean Paste: Deepens the flavor with warm, aromatic notes.
- Optional Egg Yolks (Custard-Style): For those going traditional with a cooked base, yolks create an ultra-smooth, luxurious mouthfeel.
- OR Sweetened Condensed Milk: Ideal for no-churn versions—adds sweetness and structure without eggs or stovetop prep.
Edible Cookie Dough:
- All-Purpose Flour (Heat-Treated): Must be baked at 350°F for 5 minutes to kill bacteria and ensure safety.
- Brown Sugar + Granulated Sugar: For that signature cookie flavor and chewiness.
- Butter: Softened, for easy blending and rich flavor.
- Vanilla + Salt: To mimic traditional cookie dough flavor.
- Mini Chocolate Chips: The bite-sized crunch adds that classic chocolatey touch.
- Optional Add-Ins: Rolled oats, chopped nuts, peanut butter, or white chocolate chips make fun variations.
Pro Tip: Always heat-treat your flour before making edible dough. Just 5 minutes in a 350°F oven makes it safe to enjoy raw.
Equipment Essentials
Whether you’re going traditional or no-churn, here’s what you’ll need:
- Ice Cream Maker (optional): Compressor-style or freezer bowl types both work well.
- Mixing Bowls: At least two for wet and dry ingredients.
- Loaf Pan or Airtight Container: For freezing your final ice cream.
- Hand or Stand Mixer: Makes whipping cream or blending dough easier.
- Spatulas + Cookie Scoop: For folding and portioning dough.
- Food Thermometer (if using eggs): Ensures custard is safely cooked.
Step-by-Step Instructions: From Dough to Creamy Dream
Step 1: Make the Cookie Dough
- Heat-treat your flour on a baking sheet at 350°F for 5 minutes.
- Cream butter and sugars until light and fluffy. Add vanilla and salt.
- Mix in cooled flour, then stir in mini chocolate chips.
- Scoop into small balls and freeze on a parchment-lined tray.
Step 2: Prepare the Ice Cream Base
- Custard Base: Whisk egg yolks and sugar. Heat milk and cream until warm, then temper yolks with a bit of the hot liquid. Return everything to the pot and cook until thickened (170–175°F).
- No-Churn Base: Whip cold heavy cream until soft peaks form. Fold in sweetened condensed milk and vanilla.
Step 3: Chill the Base
- Refrigerate the mixture for 3–4 hours, or overnight, until fully chilled.
Step 4: Churn or Mix
- Churn according to your machine’s instructions, or for no-churn, transfer to a container and stir every 30 minutes for the first 2 hours.
Step 5: Add Cookie Dough
- Fold frozen cookie dough pieces into the ice cream base evenly.
Step 6: Final Freeze
- Freeze the assembled ice cream for at least 4–6 hours, or overnight, for scoopable perfection.
Creative Variations & Add-In Ideas
One of the best things about homemade cookie dough ice cream is how easily you can customize it to suit your taste buds or get creative in the kitchen. Start by switching up the ice cream base itself—try a brown sugar ice cream for a deeper caramel flavor or swirl in cookie butter or peanut butter for extra richness. For chocolate lovers, a chocolate ice cream base paired with cookie dough chunks is pure indulgence.
When it comes to the cookie dough chunks, the possibilities are endless. Instead of classic chocolate chip dough, consider oatmeal raisin dough for a chewy, spiced bite or snickerdoodle dough with its signature cinnamon-sugar warmth. You can also accommodate dietary needs with gluten-free or vegan dough options using alternative flours and plant-based fats.
Add texture and complexity by mixing in crushed Oreos, fudge ribbons, or chopped nuts like pecans or walnuts. A sprinkle of flaky sea salt on top can perfectly balance sweetness. For a “half-baked” vibe, fold in brownie chunks alongside the cookie dough.
Fun Tip: Before the final freeze, press a few extra cookie dough bits onto the surface of the ice cream. This gives it that irresistible bakery-style look and makes for a show-stopping presentation.
Serving & Pairing Suggestions
Serve your homemade cookie dough ice cream in a classic waffle cone or elevate the experience with edible cookie bowls for double the cookie goodness. For a nostalgic treat, sandwich scoops between homemade cookies or brownies.
Top it off with warm sauces like hot fudge, caramel drizzle, or a dollop of freshly whipped cream. A light sprinkle of crushed nuts or colorful sprinkles can add both texture and visual appeal.
Pair cookie dough ice cream with warm skillet cookies, blondies, or even a simple fruit cobbler for a dessert combo that’s both cozy and crowd-pleasing. This dessert is perfect for birthday parties, summer BBQs, or a comforting night in with family and friends.
Storage & Make-Ahead Tips
To maintain the creamy texture and fresh flavor of your ice cream, store it in an airtight container in the freezer. For best results, consume within two weeks. To prevent ice crystals and freezer burn, press a piece of plastic wrap directly onto the ice cream surface before sealing the container.
For batch preparation, freeze your cookie dough chunks separately on a parchment-lined tray. Once frozen, transfer them to a sealed bag or container. This way, you can easily add fresh chunks to ice cream bases as you make them.
Before serving, let the ice cream sit at room temperature for 5 to 10 minutes. This softens it just enough to scoop effortlessly without melting too quickly.
Nutrition Snapshot & Healthier Options
A typical scoop of cookie dough ice cream ranges from 250 to 350 calories, depending on the base and mix-ins. To enjoy this treat with fewer calories or less sugar, try swapping regular sugar for natural sweeteners like monk fruit or stevia.
For those who prefer dairy-free options, use a coconut milk base and vegan cookie dough recipes made with plant-based ingredients. To add a nutritional boost, consider folding in collagen powder or using Greek yogurt instead of heavy cream for a protein-rich version.
FAQs: People Also Ask
Can you eat cookie dough in cookie dough ice cream?
Yes! The cookie dough used in ice cream is specially made to be safe to eat raw. It’s egg-free, and the flour is heat-treated to eliminate harmful bacteria, making it perfectly safe and delicious.
What brand makes the best cookie dough ice cream?
Popular brands like Ben & Jerry’s and Häagen-Dazs have perfected the art, but homemade versions often beat store-bought in creaminess and customization. Making your own means you can control ingredients, chunk sizes, and flavors.
What makes it “ultimate”?
It’s all about the quality and quantity of ingredients: extra-large chunks of cookie dough, premium vanilla bean in the ice cream base, and a perfect balance between creamy ice cream and chewy dough. That contrast in texture and flavor is what makes it a standout dessert.
Can I make it without an ice cream machine?
Absolutely! Use the no-churn method by whipping heavy cream and folding in sweetened condensed milk and vanilla. Freeze in a container, stirring occasionally to maintain smoothness.
Can you use store-bought cookie dough?
Only if it’s labeled safe to eat raw, like Nestlé’s edible cookie dough. Regular dough made with raw eggs and untreated flour should be avoided for safety reasons.
Why is my dough hard in the ice cream?
If your cookie dough chunks are too large or lack enough fat, they can become hard and icy in the freezer. Keep dough pieces small and buttery for soft, chewy bites every time.
Ultimate Cookie Dough Ice Cream
Equipment
- Ice cream maker (optional, for churned version)
- Mixing bowls
- Hand mixer or stand mixer
- Baking sheet (for chilling dough balls)
- Parchment paper
- Spatulas
- Loaf pan or airtight container (for freezing)
- Measuring Cups and Spoons
- Food thermometer (if making custard base)
- Cookie scoop or spoon
Ingredients
For the Ice Cream Base (Custard version):
- 2 cups heavy cream
- 1 cup whole milk
- ¾ cup granulated sugar
- 1 tbsp vanilla extract or 1 vanilla bean (split and scraped)
- 4 large egg yolks
For the Ice Cream Base (No-Churn version):
- 2 cups heavy cream
- 1 (14 oz) can sweetened condensed milk
- 1 tbsp vanilla extract
For the Edible Cookie Dough:
- 1 cup all-purpose flour (heat-treated)
- ½ cup unsalted butter, softened
- ½ cup packed brown sugar
- ¼ cup granulated sugar
- 1 tsp vanilla extract
- ¼ tsp salt
- ½ cup mini chocolate chips
Instructions
Heat-treat the flour:
- Preheat oven to 350°F (175°C). Spread flour on a baking sheet and bake for 5 minutes. Let cool completely.
2. Make the cookie dough:
- In a bowl, cream butter and sugars until fluffy. Add vanilla and salt. Gradually mix in the cooled flour until just combined. Fold in mini chocolate chips. Shape into small dough balls and chill on a parchment-lined baking sheet for at least 30 minutes.
3. Prepare the ice cream base:
- Custard base: In a saucepan, heat cream, milk, and half the sugar until steaming. In a separate bowl, whisk yolks and remaining sugar. Slowly temper yolks with hot milk mixture, then return to saucepan and cook over low heat, stirring until thick enough to coat the back of a spoon (about 170–175°F). Remove from heat and stir in vanilla. Cool completely.No-churn base: Whip heavy cream to soft peaks. Fold in sweetened condensed milk and vanilla extract gently.
4. Chill the base:
- Refrigerate the custard or no-churn base for 3–4 hours or overnight until very cold.
Churn or mix:
- If using an ice cream maker, churn the cold base according to manufacturer’s instructions (about 20–30 minutes).If no churn, pour base into a freezer-safe container and freeze, stirring every 30 minutes for 2 hours to maintain creaminess.
Add cookie dough chunks:
- Fold frozen cookie dough balls (chopped into bite-size pieces) into the ice cream just before the final freeze.
Final freeze:
- Transfer the mixture to an airtight container and freeze for at least 4–6 hours or overnight until firm.
Serve:
- Scoop and enjoy! For easier scooping, let sit at room temperature for 5–10 minutes before serving.
Notes
- Heat-treating flour is essential for safe edible cookie dough; do not skip this step.
- For a richer ice cream, use the custard base; for simplicity and less fuss, the no-churn method works beautifully.
- Store leftover cookie dough chunks separately in the freezer to maintain freshness.
- Customize by swapping mini chocolate chips for nuts, white chocolate chips, or dried fruit.
- To avoid hard dough chunks, keep cookie dough balls small and buttery.
- For vegan or dairy-free options, substitute with coconut milk and vegan butter, and use vegan chocolate chips.
- Press some cookie dough bits on top of the ice cream before final freezing for a bakery-style finish.