Why Dump Cakes Are the Easiest Dessert You’ll Ever Make
Imagine pulling a warm, bubbly dessert out of the oven, layers of juicy strawberries, creamy cheesecake filling, and golden buttery cake topping melting together into a spoonable masterpiece. That’s the magic of a dump cake—it looks and tastes like you spent hours baking, but in reality, it takes just minutes to put together.
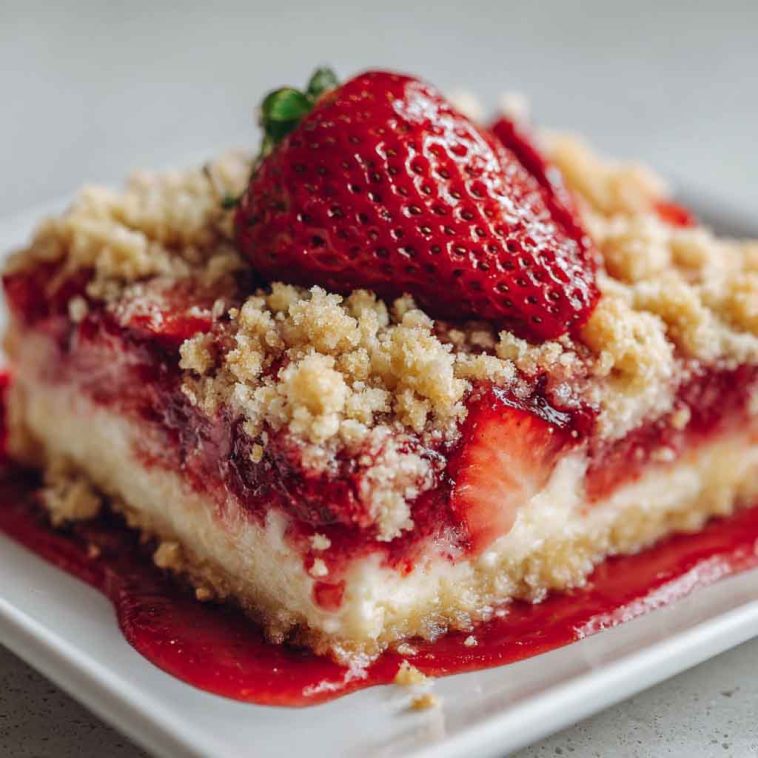
This Strawberry Cheesecake Dump Cake combines the sweetness of fruit, the richness of cheesecake, and the comforting simplicity of cake mix. No need for fancy skills or complicated steps—the ingredients are literally “dumped” into the baking dish and transformed by the oven’s heat into something spectacular.
It’s the ultimate no-fuss dessert: budget-friendly, quick to assemble, and always a crowd-pleaser. Whether you’re feeding last-minute guests, prepping for a holiday potluck, or just satisfying a weeknight sweet tooth, this recipe delivers every time.
Best of all, it’s endlessly adaptable—you can swap in seasonal fruits, add extra flavor twists, or make it ahead. By the end of this guide, you’ll see why dump cakes aren’t just easy; they’re one of the most reliable desserts in your recipe box.
What is a Dump Cake?
A dump cake is one of the simplest desserts you can make. Unlike traditional cakes that require careful mixing, creaming butter, or whipping eggs, dump cakes earn their name from the method—you literally dump layers of ingredients into the baking dish and let the oven do the work.
Most dump cakes follow a pattern: fruit filling on the bottom, a dry cake mix sprinkled on top, and butter layered across the surface to create that irresistible golden crust. The result is a hybrid dessert—part cobbler, part cake—that feels homemade with minimal effort.
Because of their simplicity, dump cakes are ideal for beginner bakers, busy parents, or anyone who needs a quick dessert for gatherings. You don’t need precision for success, just the right layering. Think of it as rustic baking—charming, forgiving, and always delicious.
Why Add Cheesecake to a Dump Cake?
The beauty of a dump cake is its ease, but adding a cheesecake layer takes this dessert to an entirely new level. Cheesecake filling—made from softened cream cheese, sugar, and vanilla—adds a creamy, decadent richness that balances the sweetness of the strawberries and cake mix.
Instead of a single-note fruity cake, you get three textures in one bite: juicy strawberries, smooth cheesecake, and tender, buttery cake. The cheesecake layer also creates a beautiful contrast in flavor, adding a subtle tang that cuts through the sweetness.
This twist transforms a humble dump cake into a dessert showstopper perfect for holidays, potlucks, birthdays, or even Valentine’s Day. While still ridiculously easy to make, it feels gourmet—like a cross between strawberry cheesecake and strawberry shortcake, but without all the extra work.
Ingredient Breakdown & Pro Tips
-
Strawberries – You can use canned strawberry pie filling for convenience, or fresh strawberries tossed with sugar and cornstarch for a slightly fresher, tarter flavor. If using fresh, make sure they’re ripe and juicy for best results.
-
Cheesecake Layer – A mixture of cream cheese, granulated sugar, and vanilla extract. Pro tip: soften the cream cheese fully before mixing to avoid lumps. You can also add a spoonful of sour cream for extra tang.
-
Cake Mix – Yellow, white, or vanilla cake mix works best. Yellow cake mix adds a richer flavor, while white cake keeps things light. For best results, don’t stir the cake mix into the filling—sprinkle it evenly on top for that signature rustic texture.
-
Butter – Sliced into thin pats and layered over the cake mix to ensure even browning. Make sure your butter is cold for easier slicing. Some bakers prefer to melt the butter and drizzle it, but patting it on top gives a more even golden crust.
-
Optional Add-ins – Try lemon zest for brightness, a sprinkle of cinnamon for warmth, or a streusel topping for extra crunch.
-
Substitutions – Gluten-free cake mixes work wonderfully, sugar-free pie fillings make it diabetic-friendly, and dairy-free cream cheese substitutes allow everyone to enjoy this dessert.
Pro tip: Resist the urge to overmix—dump cakes shine because of their layered, imperfect textures.
Tools You’ll Need
You don’t need any fancy tools to make this dump cake—just kitchen basics:
-
9×13 baking dish – the perfect size for layering and baking evenly.
-
Mixing bowl & spatula – for preparing the cheesecake filling.
-
Electric mixer (optional) – speeds up blending the cream cheese mixture but isn’t essential.
-
Sharp knife – for slicing butter into thin pats.
-
Storage containers – airtight containers for keeping leftovers fresh in the fridge.
This is truly a beginner-friendly dessert, and most likely, you already have everything you need on hand.
Step-by-Step Preparation Guide
-
Preheat the oven – Set your oven to 350°F (175°C) and lightly grease your 9×13 baking dish.
-
Prepare the cheesecake filling – In a mixing bowl, beat softened cream cheese with sugar and vanilla until smooth and creamy. This layer should be spreadable but not too runny.
-
Layer the strawberries – Spread the canned strawberry pie filling (or fresh strawberry mixture) evenly on the bottom of the baking dish. This will be your fruity base.
-
Add the cheesecake layer – Dollop spoonfuls of the cheesecake mixture over the strawberries, then gently spread it out. It doesn’t need to be perfect—some swirls are part of the charm.
-
Sprinkle the cake mix – Take your dry cake mix straight from the box and sprinkle it evenly over the cheesecake layer. Do not stir or press down—the magic of dump cake is in the loose layering.
-
Add the butter – Slice cold butter into thin pats and place them across the entire surface of the cake mix. This ensures every inch browns beautifully while baking.
-
Bake to perfection – Place the dish in the oven and bake for 40–45 minutes, or until the top is golden brown and the edges are bubbling.
-
Cool slightly before serving – Let the cake rest for at least 15 minutes before serving. This allows the layers to set while still staying warm and gooey.
Expert Tip: Don’t worry if the top looks uneven or rustic—that’s the hallmark of a true dump cake. The messier it looks, the more delicious it tastes!
Flavor Variations You’ll Love
One of the best things about dump cakes is how endlessly customizable they are. While the classic Strawberry Cheesecake Dump Cake is hard to beat, you can easily switch things up to match the season, your cravings, or what’s in your pantry. Here are a few ideas to spark inspiration:
-
Classic Strawberry Cheesecake Dump Cake – The original: strawberry pie filling, cream cheese, cake mix, and butter. Simple and perfect.
-
Berry Mix Version – Add in blueberries, raspberries, or blackberries along with strawberries for a mixed-berry cheesecake delight.
-
Chocolate Strawberry Twist – Swap the vanilla or yellow cake mix with chocolate cake mix for a rich, chocolate-covered-strawberry vibe.
-
Lemon Strawberry Cheesecake Cake – Add fresh lemon zest or a splash of lemon juice to the cream cheese layer for brightness and balance.
-
Summer Peach-Cheesecake Dump Cake – Replace the strawberry pie filling with canned or fresh peaches for a sunny summertime dessert.
The beauty here is that the method doesn’t change—just the flavor profile. That’s why dump cakes are such a great beginner-friendly recipe with endless possibilities for creativity.
How to Serve Strawberry Cheesecake Dump Cake
This cake is as versatile in serving as it is in flavor. Depending on the occasion, you can dress it up or keep it casual:
-
Warm with vanilla ice cream – The most indulgent way. The hot, bubbly fruit filling with melting ice cream is pure comfort.
-
Chilled for a firmer cheesecake bite – Let the cake cool completely and refrigerate for a cheesecake-bar-like texture. Perfect for slicing neatly.
-
With whipped cream and fresh berries – Add a dollop of whipped cream and garnish with sliced strawberries or mint leaves for a fresh, light finish.
-
As a potluck or picnic dessert – Bake it in a disposable pan and serve straight from the dish. It’s crowd-friendly, fuss-free, and always gets rave reviews.
Whether you’re serving it family-style in the pan or plated individually, this dessert has the flexibility to feel casual or elegant.
Storage, Freezing & Make-Ahead Tips
Because this recipe includes cream cheese, storing it properly is important for food safety and best flavor:
-
Refrigeration – Cover and refrigerate leftovers for up to 4 days. The cream cheese layer sets nicely when chilled.
-
Freezing – Cut into individual portions and freeze in airtight containers for up to 2 months. Thaw in the fridge overnight before reheating.
-
Reheating – For the best texture, warm in the oven at 325°F for 10–12 minutes. The microwave works too, but the topping won’t be as crisp.
-
Make-ahead – Assemble everything in the baking dish (except the butter slices) up to 24 hours ahead. When ready to bake, add the butter, and bake fresh for the best results.
These tips make this dessert even more convenient for parties, holidays, or busy weeks.
Nutrition Snapshot
This is definitely a treat, but knowing the nutrition can help balance it into your menu. A typical serving (about 1/12 of the pan) is approximately:
-
Calories: 330–370
-
Carbs: 40g
-
Fat: 18g
-
Protein: 3g
To lighten things up, try these swaps:
-
Low-fat cream cheese for fewer calories and fat.
-
Sugar-free pie filling to reduce added sugar.
-
Light butter or margarine for a slightly leaner topping.
While this dessert is indulgent, portion control and a few adjustments can make it fit different lifestyles.
Expert Tips for Success
Even though dump cakes are simple, a few tricks can make yours turn out bakery-worthy:
-
Spread cream cheese evenly – Use a spoon or offset spatula to dot and smooth the cream cheese for consistent bites in every slice.
-
Slice butter thinly – Cover as much surface as possible so the cake mix browns evenly.
-
Bake uncovered – This ensures the top gets golden and crisp without steaming.
-
Let it rest before serving – Allow at least 15 minutes for the layers to set and slice more neatly.
These little steps make a big difference in texture and presentation.
Troubleshooting Common Mistakes
If your dump cake didn’t turn out picture-perfect, here’s what might have happened:
-
Cake too dry → Not enough butter on top. Make sure the slices fully cover the cake mix.
-
Cheesecake layer curdled → Baked too long or at too high a temperature. Stick to the recipe timing.
-
Runny texture → Underbaked or excess liquid from overly juicy fruit. Bake until bubbling and golden.
-
Uneven browning → Butter wasn’t evenly distributed. Spread slices to cover the entire surface.
Don’t worry—dump cakes are forgiving. Even the “mistakes” usually taste delicious!
FAQs: Easy Strawberry Cheesecake Dump Cake
Can I use fresh strawberries instead of pie filling?
Yes! If using fresh strawberries, mix them with sugar and cornstarch to create a pie-filling consistency before layering.
Do I have to refrigerate dump cake with cream cheese?
Yes. Any dessert containing cream cheese should be stored in the fridge for safety and best texture.
Can I make this in a slow cooker or Instant Pot?
Yes. In a slow cooker, cook on high for about 2–2½ hours. For Instant Pot, use the baking function or a pot-in-pot method.
What’s the best cake mix for dump cakes?
Yellow or white cake mix is classic, but chocolate, lemon, or even strawberry mix work beautifully for creative twists.
Can I double this recipe for a crowd?
Absolutely. Use a 9×13 pan for one batch or two pans for double. Just don’t overcrowd, or it won’t bake evenly.
How long does strawberry cheesecake dump cake last?
Up to 4 days in the refrigerator. Freeze for longer storage.
Can I make it dairy-free or vegan?
Yes! Use vegan cream cheese, dairy-free butter, and a vegan-friendly cake mix. Many pie fillings are naturally vegan.
Final Thoughts: A Dessert Worth Dumping Into Your Baking Rotation
Strawberry Cheesecake Dump Cake combines the creamy indulgence of cheesecake, the fruity brightness of strawberries, and the buttery crispness of cake—all in one effortless dessert. It’s proof that simple recipes can deliver bakery-style results without fuss.
Perfect for weeknights, holidays, or potlucks, this is a dessert you’ll come back to again and again. Try it warm, chilled, or with your favorite twist—each version is irresistible.
So grab a box of cake mix, a can of strawberry filling, and some cream cheese, and make this easy crowd-pleaser. One bite, and you’ll see why it disappears fast at every gathering!
The Easy Strawberry Cheesecake Dump Cake – Sweet, Creamy & Irresistible
Equipment
- 9x13-inch baking dish
- Mixing bowls
- Hand mixer (for softening cream cheese, optional)
- Rubber spatula
- Knife for slicing butter
Ingredients
- 2 cans (21 oz each) strawberry pie filling
- 8 oz cream cheese, softened
- ½ cup powdered sugar
- 1 box (15.25 oz) vanilla or yellow cake mix
- ½ cup unsalted butter (1 stick), cold and thinly sliced
- Optional garnish: fresh strawberries, whipped cream, vanilla ice cream
Instructions
- Preheat oven to 350°F (175°C). Lightly grease a 9x13-inch baking dish.
- Spread filling – Add strawberry pie filling evenly across the bottom of the baking dish.
- Prepare cheesecake layer – In a mixing bowl, beat cream cheese with powdered sugar until smooth. Dollop and spread over the strawberry layer.
- Add dry cake mix – Sprinkle cake mix evenly on top (do not stir).
- Top with butter – Arrange thin butter slices across the surface, covering as much as possible.
- Bake uncovered for 40–45 minutes, until the top is golden brown and bubbly.
- Cool slightly before serving to help layers set.
- Serve warm with vanilla ice cream or chilled for a firmer cheesecake bite.
Notes
- Fresh strawberries option: Swap one can of pie filling with 3 cups fresh sliced strawberries mixed with 2 tbsp sugar.
- Butter tip: Slice butter thinly so it melts evenly across the topping.
- Make-ahead: Assemble up to 24 hours in advance; cover and refrigerate. Bake when ready.
- Storage: Refrigerate leftovers for up to 5 days. Freeze portions up to 2 months.