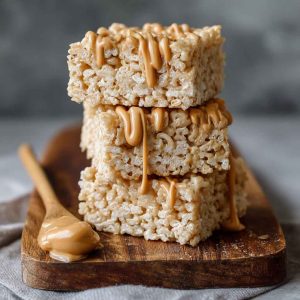
Why Peanut Butter Rice Krispie Treats Are a No-Bake Classic
Gooey, chewy, nutty, and crispy — Peanut Butter Rice Krispie Treats are everything you crave in one irresistible bite. They strike the perfect balance of sweet and salty, with the nostalgic crunch of crispy rice cereal wrapped in a smooth, peanut butter-marshmallow hug.
These no-bake bars are ideal for:
-
After-school snacks
-
Bake sale favorites
-
Party platters
-
Sweet cravings that demand instant gratification
Best of all? You can whip up a batch in under 15 minutes with just a few pantry staples and no oven required.
In this guide, you’ll get a foolproof step-by-step recipe, plus:
-
Flavor tips (creamy vs crunchy peanut butter)
-
Easy variations (chocolate drizzle, mix-ins, or vegan swaps)
-
Smart storage methods for long-lasting freshness
Whether you’re a first-time maker or a seasoned treat-lover, these bars deliver the kind of comfort and satisfaction that keeps people coming back for “just one more.”
Let’s dig into the chewy magic.
What Are Peanut Butter Rice Krispie Treats?
Peanut Butter Rice Krispie Treats are a flavorful twist on the beloved classic — marshmallow cereal bars made with crisped rice cereal, butter, and gooey melted marshmallows.
What sets them apart? Peanut butter adds rich, nutty depth and a touch of saltiness that balances the sweetness, turning a childhood favorite into a more grown-up indulgence. The texture is still familiar — soft, chewy, and crisp — but the flavor is bolder, slightly savory, and more satisfying.
This variation is especially popular for those who want:
-
A more flavor-packed version of the original
-
A no-bake treat that feels homemade and nostalgic
-
A crowd-pleaser for peanut butter lovers
They’re easy to customize, freeze well, and disappear fast at parties, lunchboxes, or late-night snack runs.
A Quick History of Rice Krispie Treats
The Rice Krispie treat was born in 1939 when Kellogg’s home economists, Malitta Jensen and Mildred Day, created the recipe as a fundraiser for the Camp Fire Girls.
Originally just butter, marshmallows, and Kellogg’s Rice Krispies cereal, the bars were an instant hit for their simplicity, affordability, and kid-friendly texture. They became a staple in American households, lunchboxes, and school bake sales throughout the 20th century.
As time passed, variations began to appear—chocolate, butterscotch, M&M’s, peanut butter, and even vegan or gluten-free versions. Today, Rice Krispie treats are more than just a retro snack — they’re a canvas for creativity and flavor mashups.
Peanut butter, with its natural creaminess and salty-sweet profile, became one of the most beloved variations, giving this treat a little more depth and grown-up appeal while keeping its childhood charm.
Ingredient Breakdown & Flavor Roles
Each component of Peanut Butter Rice Krispie Treats plays a key role in texture and flavor. Here’s what you need and why it matters:
Crisped Rice Cereal
This is the base structure — providing that signature light crunch. You can use the classic Kellogg’s Rice Krispies, or any brand of puffed rice cereal.
Tip: Fresh cereal = crispier treats. Stale cereal leads to chewy, soggy bars.
Peanut Butter
The heart of this recipe. It adds creaminess, flavor depth, and a satisfying salty note.
-
Creamy peanut butter gives a smooth texture.
-
Crunchy adds little bits of nutty texture.
-
Natural peanut butter (with oil separation) works if stirred well, but may make softer bars.
-
Shelf-stable processed peanut butter (like Jif or Skippy) is more reliable for firm, chewy bars.
Marshmallows
These act as the glue that holds it all together.
-
Mini marshmallows melt faster and evenly.
-
Large marshmallows work too — just chop them up.
-
Vegan marshmallows are a great plant-based swap.
Pro tip: Always use fresh marshmallows for best melt and consistency.
Butter or Coconut Oil
Used for richness, improved texture, and preventing stickiness. Coconut oil adds a subtle tropical note and works well in vegan versions.
Vanilla & Salt
Just a splash of vanilla extract and a pinch of salt round out the flavors, making everything pop.
Optional Toppings
-
Chocolate chips (mini or regular)
-
Peanut butter chips
-
Drizzle of melted chocolate
-
Sprinkles for color and fun
Line your pan with parchment paper for easy removal and no sticking.
Equipment You’ll Need
You don’t need much to make these treats—just basic kitchen tools:
-
Large nonstick saucepan – For melting the butter, peanut butter, and marshmallows
-
Sturdy spatula or wooden spoon – For mixing quickly and evenly
-
8×8-inch pan – For thicker treats
-
9×13-inch pan – For thinner, party-style squares
-
Parchment paper – To line the pan and make cleanup easy
-
Microwave-safe bowl (optional) – If using the microwave method to melt ingredients
Butter your hands or a spatula before pressing the mixture to prevent sticking.
Step-by-Step Method: How to Make the Perfect Batch
Making Peanut Butter Rice Krispie Treats is simple, but timing is key. Here’s how:
Step 1: Melt
In a large saucepan over low to medium heat, melt 2 tablespoons butter and ½ cup peanut butter, stirring frequently until smooth.
Step 2: Add Marshmallows
Add 4 cups mini marshmallows and stir until completely melted and combined into a glossy mixture.
Step 3: Mix In Cereal
Remove from heat and quickly fold in 4½ cups crisped rice cereal. Stir to coat every piece evenly.
Step 4: Press Into Pan
Transfer the mixture into a greased or parchment-lined pan. Press down gently using buttered hands or wax paper to create an even layer.
Step 5: Cool and Slice
Let the bars cool at room temperature for 30–60 minutes, then slice into squares and serve.
Tip: Don’t press too hard or the bars will be overly dense.
Creative Variations & Add-Ins
These no-bake peanut butter Rice Krispie treats are delicious on their own, but a few tweaks can take them to the next level. Here are some popular and fun ways to customize your batch:
Chocolate Peanut Butter
-
Stir in ½ cup mini chocolate chips once the mixture has cooled slightly (so they don’t melt).
-
Or drizzle melted semi-sweet chocolate over the top once cooled.
Butterscotch Twist
-
Melt ¼ cup butterscotch chips with the marshmallows for a nostalgic, buttery flavor.
-
Sprinkle extra chips on top before cooling.
Crunch Explosion
-
Use crunchy peanut butter or stir in chopped peanuts, pretzel pieces, or crushed graham crackers for more texture.
Vegan/Dairy-Free Option
-
Use vegan marshmallows and coconut oil instead of butter.
-
Choose a natural, unsweetened peanut butter without dairy additives.
Kid-Friendly Add-Ins
-
Stir in M&M’s, sprinkles, or peanut butter chips
-
Top with crushed freeze-dried fruit or gummy candies
Sweet & Salty
-
Finish with a light sprinkle of flaky sea salt before the bars cool for a gourmet contrast.
These tweaks are perfect for bake sales, party platters, holiday trays, or just mixing things up from the classic version.
Storage & Freezing Tips
Peanut Butter Rice Krispie Treats store wonderfully if done right. Here’s how to keep them fresh and chewy:
Room Temperature
-
Store in an airtight container at room temperature for up to 4–5 days.
-
Layer with wax or parchment paper to prevent sticking.
Freezing
-
Cut into bars, then wrap individually in plastic wrap.
-
Place in a freezer-safe bag or container and freeze for up to 6 weeks.
-
Thaw at room temperature for about 30 minutes before eating.
Avoid refrigerating — it can make the bars too hard and chewy.
These treats are make-ahead friendly, freezer-safe, and perfect for lunchboxes or emergency sweet cravings.
FAQs About Peanut Butter Rice Krispie Treats
Can I use natural peanut butter?
Yes, but make sure it’s well-stirred and not too oily. Natural varieties may result in slightly softer bars.
Can I make them without marshmallows?
Yes. You can make honey or maple syrup versions using peanut butter, sweetener, and cereal. But the texture will be different — more chewy, less gooey.
Why are my treats too hard?
This usually happens from overheating the marshmallow mixture. Keep the heat low and stir constantly. Also avoid pressing the mixture too firmly into the pan.
Can I use another nut butter?
Absolutely. Try almond butter, cashew butter, or sunflower seed butter for a nut-free version.
How long do they last?
At room temperature: 4–5 days
In the freezer: Up to 6 weeks
Can I double the recipe?
Yes! Use a 9×13-inch pan for thinner bars or a deeper dish for thicker ones. Work quickly when mixing, as the marshmallow mixture sets fast.
Peanut Butter Rice Krispie
Equipment
- Large nonstick saucepan or pot
- Heat-resistant spatula or wooden spoon
- 8x8 or 9x13 inch baking pan (depending on thickness preference)
- Parchment paper or cooking spray
- Measuring Cups and Spoons
- Optional: Microwave-safe bowl (if melting in microwave)
Ingredients
- 3 tablespoons unsalted butter (or coconut oil for dairy-free)
- ½ cup creamy peanut butter (or crunchy if preferred)
- 10 oz (1 bag) mini marshmallows (or 4 cups large marshmallows)
- 6 cups Rice Krispies cereal (or any crisped rice cereal)
- 1 teaspoon vanilla extract
- ⅛ teaspoon salt (optional)
- Optional toppings: mini chocolate chips, peanut butter drizzle, flaky sea salt
Instructions
- Prepare your pan: Lightly grease or line an 8x8 or 9x13 inch pan with parchment paper for easy removal.
- Melt base: In a large nonstick saucepan over low heat, melt the butter and peanut butter together, stirring until smooth.
- Add marshmallows: Stir in the marshmallows and continue to melt, stirring constantly, until fully smooth and combined.
- Add vanilla & salt: Remove from heat and stir in vanilla and salt.
- Mix cereal: Quickly stir in the Rice Krispies cereal until fully coated.
- Transfer to pan: Press the mixture into your prepared pan using a buttered spatula or parchment paper. Don’t press too hard or treats may become too dense.
- Cool & slice: Let cool at room temperature for about 30 minutes before cutting into squares.
- Optional toppings: Sprinkle with chocolate chips, drizzle with melted peanut butter, or add sprinkles before cooling if desired.
Notes
- For softer treats: Use fresh marshmallows and avoid overcooking the mixture.
- Dairy-free version: Swap butter with refined coconut oil and use vegan marshmallows.
- Storage: Store in an airtight container at room temperature for up to 4 days. Avoid refrigeration, which can make them hard.
- Freezing: Freeze cut squares with parchment between layers in a zip-top bag for up to 1 month. Thaw at room temperature.