A Bite-Sized Treat with a Pop of Color
Cheesecake has always held a special place in the world of desserts. Its creamy texture and indulgent flavor make it timeless, whether served at elegant dinners or casual celebrations. But when cheesecake is transformed into bite-sized portions, it becomes even more delightful—easy to share, fun to eat, and perfect for festive occasions.
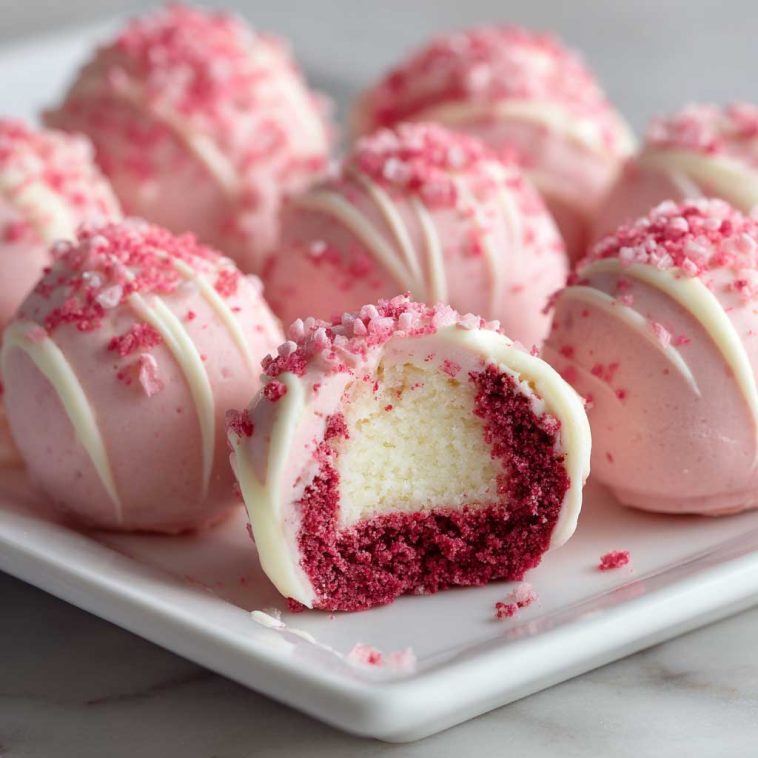
Imagine Valentine’s Day gatherings, birthdays, or holiday parties where trays of colorful cheesecake bites brighten the table. That’s where No-Bake Pink Velvet Cheesecake Bites shine. With their playful hue and velvety smoothness, they bring joy and whimsy to any celebration. The “pink velvet” twist adds a pop of color and a touch of fun, making these little treats stand out among traditional desserts. They’re not just delicious—they’re conversation starters, edible décor, and sweet symbols of love and festivity.
What Are No-Bake Pink Velvet Cheesecake Bites?
No-Bake Pink Velvet Cheesecake Bites are miniature cheesecakes crafted without the need for an oven. Instead, they rely on a chilled cream cheese filling set atop a crumbly base, creating a dessert that’s both simple and indulgent.
What makes them unique is the pink velvet flavor profile—a playful spin on the classic red velvet tradition. With hints of vanilla or cocoa, a creamy texture, and a vibrant pink hue, these bites combine elegance with fun. Unlike traditional cheesecake, which requires careful baking and cooling, these no-bake versions are quick to prepare and foolproof, perfect for busy hosts or beginner bakers.
The balance is key: a buttery crust, a smooth and creamy filling, and a burst of color that makes them visually irresistible. They’re indulgent yet approachable, festive yet versatile, and ideal for occasions where you want to impress without spending hours in the kitchen.
The History of Velvet Desserts
Velvet desserts trace their roots to the iconic red velvet cake, which emerged in American baking during the early 20th century. Known for its tender crumb and striking color, red velvet quickly became a symbol of celebration, often appearing at weddings, holidays, and special events.
Over time, bakers experimented with variations, leading to pink velvet creations. These lighter, more playful versions became popular for Valentine’s Day, baby showers, and birthdays, offering the same luxurious texture with a softer, more whimsical look.
Modern adaptations have expanded velvet flavors beyond cakes. Cheesecakes, cupcakes, cookies, and bite-sized treats now embrace the velvet tradition, blending nostalgia with innovation. No-Bake Pink Velvet Cheesecake Bites are part of this evolution—miniature desserts that capture the essence of velvet while catering to contemporary tastes for convenience and creativity.
Choosing the Right Base
The crust is the foundation of every cheesecake bite, and the choice of base shapes the flavor and texture:
- Graham Cracker Crust: Classic, slightly sweet, and crumbly. Perfect for traditional cheesecake lovers.
- Cookie Crumbs: Vanilla wafers or shortbread add buttery richness, while chocolate cookies bring depth.
- Oreo Base: Bold and indulgent, pairing beautifully with the pink velvet filling.
Texture matters. A finer crumb creates a smooth, compact crust, while coarser crumbs add crunch. Always mix crumbs with melted butter to bind them together.
Tip: Chill the crust before adding the filling. This ensures stability and prevents crumbling when you bite into the cheesecake.
The Role of Cream Cheese & Flavoring
Cream cheese is the heart of cheesecake, providing the creamy, tangy foundation that makes the dessert irresistible. For no-bake versions, softened cream cheese blends seamlessly with sugar and flavorings, creating a smooth filling that sets beautifully in the fridge.
Flavoring options elevate the base:
- Vanilla Extract: Classic and versatile.
- Cocoa Powder: Adds depth, echoing red velvet traditions.
- Strawberry Essence: Enhances the pink hue with fruity notes.
Color is equally important. Gel food coloring is the best choice—it delivers vibrant pink without altering texture or flavor, unlike liquid dyes that can thin the filling.
Expert Tip: Beat cream cheese until fluffy before adding other ingredients. This ensures a light, airy filling that feels indulgent yet balanced.
Step-by-Step Guide: Making No-Bake Pink Velvet Cheesecake Bites
- Prepare the Crust: Crush graham crackers, cookies, or Oreos into fine crumbs. Mix with melted butter and press into bite-sized molds or mini cupcake liners. Chill for 15 minutes.
- Mix the Filling: Beat softened cream cheese until smooth. Add sugar, vanilla or cocoa, and gel food coloring. Blend until creamy and evenly pink.
- Portion the Bites: Spoon filling onto chilled crusts. Smooth tops with a spatula or piping bag for neat presentation.
- Chill Until Set: Refrigerate for at least 4 hours, or overnight for best flavor and texture.
- Garnish: Top with whipped cream, sprinkles, or a drizzle of melted chocolate. Fresh berries also add a beautiful contrast.
Tip: Chill overnight. The flavors deepen, and the texture becomes luxuriously smooth.

No-Bake Pink Velvet Cheesecake Bites Recipe – Easy Party Dessert Idea
Equipment
- Mixing bowls
- Electric mixer or hand whisk
- Mini cupcake pan or silicone molds
- Measuring Cups and Spoons
- Spatula
Ingredients
For the Crust:
- 1½ cups graham cracker crumbs (or cookie/Oreo crumbs)
- 5 tbsp melted butter
- 2 tbsp sugar (optional)
For the Filling:
- 16 oz cream cheese, softened
- ½ cup granulated sugar
- 1 tsp vanilla extract (or cocoa/strawberry essence)
- ½ cup heavy cream, whipped
- Gel food coloring (pink)
Optional Garnishes:
- Whipped cream
- Sprinkles or edible glitter
- Melted chocolate drizzle
- Fresh berries
Instructions
- Prepare Crust: Mix crumbs with melted butter and sugar. Press into mini cupcake liners or molds. Chill for 15 minutes.
- Make Filling: Beat cream cheese until smooth. Add sugar, vanilla (or chosen flavor), and gel food coloring. Fold in whipped cream until fluffy.
- Assemble Bites: Spoon filling onto chilled crusts. Smooth tops or pipe for neat presentation.
- Chill: Refrigerate for at least 4–6 hours, preferably overnight, until firm.
- Garnish & Serve: Top with whipped cream, sprinkles, or fruit just before serving.
Notes
- Crust Options: Use Oreos for a richer base or gluten-free cookies for dietary needs.
- Coloring Tip: Gel food coloring ensures vibrant pink without thinning the filling.
- Make-Ahead: Freeze bites individually wrapped for up to 1 month. Thaw overnight in the fridge.
- Flavor Variations: Add strawberry puree, swirl in white chocolate, or use dairy-free cream cheese for vegan versions.