Introduction to Loaf Pan Basque Cheesecake
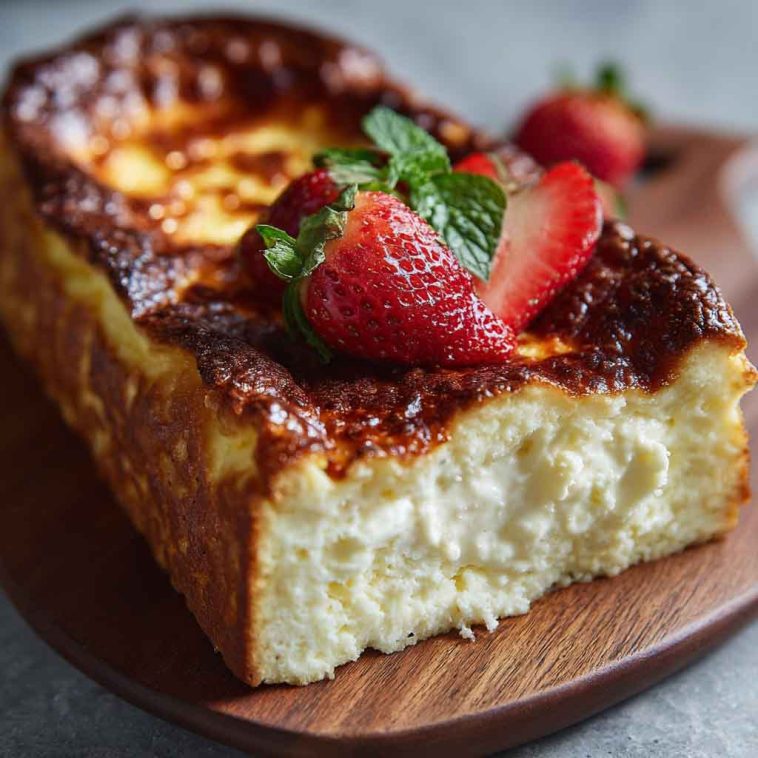
Basque cheesecake, originating from San Sebastián, Spain, is known for its deeply caramelized top and irresistibly creamy center. Unlike traditional cheesecakes, it’s intentionally burnt on top, giving it a rich, smoky flavor that contrasts beautifully with its custardy interior.
Recently, the loaf pan version has gained popularity among home bakers. Its rectangular shape offers easier portioning and fits perfectly in smaller ovens, making it more accessible for casual baking. Social media has also embraced this trend, showcasing its rustic charm and versatility.
What sets the loaf pan Basque cheesecake apart from the classic round version is its bake dynamics. The narrower pan allows for a taller cake with a more pronounced gooey center and deeper browning on the edges. It’s a modern twist on a beloved dessert—perfect for intimate gatherings or indulgent solo treats.
What Makes Basque Cheesecake Unique?
Basque cheesecake stands out for its dramatic burnt top and ultra-creamy center. The high baking temperature caramelizes the surface, creating a bittersweet crust that complements the rich filling.
Unlike traditional cheesecakes, it skips the crust entirely. There’s no graham cracker base or cookie layer—just pure, unadulterated cheesecake. It also doesn’t require a water bath, which simplifies the baking process and contributes to its rustic appearance.
The flavor profile is bold and complex. The caramelized exterior adds depth, while the interior remains silky and slightly tangy from the cream cheese. Its imperfections—cracks, uneven browning, and puffed edges—are part of its charm. Basque cheesecake celebrates simplicity and flavor over finesse, making it a favorite among both novice and seasoned bakers.
Why Use a Loaf Pan?
Using a loaf pan for Basque cheesecake offers several advantages. Its compact size is ideal for small batches, reducing waste and making it perfect for weeknight baking or solo indulgence. The rectangular shape also allows for cleaner slices and easier portion control.
Loaf pans are more common in home kitchens than springform pans, making this version more accessible. They fit easily in standard ovens and require less parchment paper to line, streamlining prep time.
The shape affects texture too. A deeper pan means the cheesecake bakes taller, resulting in a gooier center and more dramatic contrast between the burnt top and creamy interior. Bake time may be slightly longer, but the payoff is a luscious, custard-like middle with beautifully caramelized edges. It’s a practical and delicious twist on the classic.
Choosing the Right Ingredients
For the best Basque cheesecake, full-fat cream cheese is essential—it provides richness and structure. Avoid low-fat versions, which can lead to a watery texture.
Eggs and heavy cream should be at room temperature to ensure a smooth, lump-free batter. Cold ingredients can cause curdling or uneven mixing.
Flavor additions are optional but delightful. A splash of vanilla extract adds warmth, while citrus zest (lemon or orange) brightens the richness. Spices like cinnamon or cardamom can introduce a subtle twist. Keep additions minimal to preserve the signature flavor profile of Basque cheesecake: creamy, caramelized, and slightly tangy.
Step-by-Step Baking Guide
1. Prepare the Pan: Line a standard loaf pan with parchment paper, leaving overhang on all sides for easy removal. Crumpling the paper first helps it mold to the pan’s shape.
2. Mix the Batter: In a large bowl, beat full-fat cream cheese until smooth. Add sugar and continue mixing until creamy. Incorporate room temperature eggs one at a time, mixing gently to avoid air bubbles. Add heavy cream and a touch of flour (optional for structure), then mix until silky. Avoid overmixing to maintain a custardy texture.
3. Bake: Preheat your oven to 400°F (200°C). Pour the batter into the lined pan and tap gently to release air pockets. Bake for 45–55 minutes, depending on your oven. The top should be deeply browned, even slightly burnt, while the center remains jiggly.
4. Cool and Unmold: Let the cheesecake cool in the pan for 30 minutes. Then lift it out using the parchment overhang and transfer to a wire rack. Once fully cooled, refrigerate for at least 4 hours.
Pro Tip: Let it rest overnight. The flavors deepen, and the texture becomes even creamier. Slice with a warm knife for clean cuts.
Troubleshooting Common Issues
Cracks or Sinking: These are often caused by overmixing or rapid temperature changes. Mix gently and avoid opening the oven door during baking.
Underbaking or Overbaking: A jiggly center is ideal. If it’s too firm, it’s overbaked; too runny, it’s underbaked. Use visual cues: a burnt top and puffed edges signal readiness.
Uneven Browning: This can result from uneven oven heat or incorrect rack placement. Bake in the center of the oven and rotate the pan halfway through if needed.
Texture Troubles: If the cheesecake is grainy, the cream cheese may not have been fully softened. Always use room temperature ingredients and mix until just combined.

Loaf Pan Basque Cheesecake Recipe – Small-Batch Creamy Cheesecake with Caramelized Top
Equipment
- 9x5-inch loaf pan
- Parchment paper
- Mixing bowls
- Electric mixer or whisk
- Rubber spatula
- Oven
Ingredients
- 16 oz (450 g) full-fat cream cheese, softened
- ¾ cup (150 g) granulated sugar
- 3 large eggs, room temperature
- 1½ cups (360 ml) heavy cream, room temperature
- 1 tbsp all-purpose flour (optional, for structure)
- 1 tsp vanilla extract (optional)
- Zest of 1 lemon or orange (optional)
Instructions
- Preheat Oven: Set oven to 400°F (200°C). Line loaf pan with parchment paper, leaving overhang for easy removal.
- Mix Batter: Beat cream cheese until smooth. Add sugar and mix until creamy. Add eggs one at a time, mixing gently. Stir in cream, flour (if using), vanilla, and zest until silky.
- Bake: Pour batter into pan. Tap gently to release air bubbles. Bake for 45–55 minutes until top is deeply browned and center is jiggly.
- Cool & Chill: Let cool in pan for 30 minutes. Lift out and cool completely on a rack. Refrigerate for at least 4 hours, preferably overnight.
- Serve: Slice with a warm knife. Serve plain or with fruit, whipped cream, or sauce.
Notes
- For a gooier center, bake closer to 45 minutes.
- Flour is optional but helps with structure.
- Letting it rest overnight enhances flavor and texture.
- Try flavor variations like espresso, matcha, or chocolate swirl.
- Store in fridge up to 5 days or freeze for 1 month.