Why Homemade No-Bake Chocolate Hazelnut Truffles Are Irresistible
There’s something truly magical about biting into a rich, creamy chocolate truffle that melts effortlessly on your tongue—and the best part? These no-bake chocolate hazelnut truffles deliver that indulgence without ever turning on the oven. They’re a quick, fuss-free treat that feels both luxurious and comforting.
Perfect as gifts, elegant desserts, or simple snacks, these truffles blend the deep, smooth flavor of chocolate with the nutty warmth of hazelnuts for an unforgettable taste experience. Whether you’re an experienced home cook or just starting out, this recipe is approachable yet impressive.
No baking means less mess and less time, but the result is every bit as decadent as traditional truffles. Plus, the natural richness of hazelnuts adds an extra layer of texture and flavor, elevating this classic treat to new heights. Let’s dive into the basics and learn how to make these irresistible bites at home.
What Are Chocolate Hazelnut Truffles? A Brief Overview
Chocolate truffles trace their roots back to France, inspired by the rich, velvety texture of the fungus they’re named after. Traditionally, they’re made from a smooth ganache—an emulsion of chocolate and cream—rolled into bite-sized spheres and coated with cocoa powder or nuts.
No-bake chocolate hazelnut truffles take this classic a step further by eliminating the baking process entirely, focusing instead on chilling and shaping the luscious mixture. This method preserves the silky texture and rich flavors without heating the mixture extensively.
Hazelnuts have long been cherished in chocolate confections, especially in European desserts, for their buttery flavor and slight crunch. Incorporating hazelnut paste or finely ground hazelnuts into the ganache adds a nutty depth that complements the chocolate perfectly.
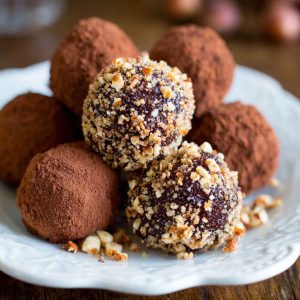
No-bake truffles come in many forms—some rolled in cocoa powder for a rustic look, others dipped in melted chocolate for a glossy finish, or even coated in crushed nuts or coconut for added texture. Their versatility and simplicity make them a favorite for home cooks and chocolatiers alike.
Key Ingredients & Their Roles
Understanding the ingredients is key to mastering these truffles:
-
Chocolate: The heart of the truffle, chocolate provides flavor and structure. Dark, milk, or semi-sweet varieties all work, depending on your sweetness preference. High-quality chocolate with at least 60% cocoa solids will yield a richer, smoother result.
-
Hazelnut Paste or Ground Hazelnuts: Adds nutty richness and a slightly crunchy texture. Hazelnut paste is smooth and blends seamlessly into the ganache, while finely ground toasted hazelnuts offer delightful specks of texture.
-
Cream or Dairy Alternatives: Heavy cream traditionally softens and binds the chocolate and nuts, creating the silky ganache base. For dairy-free options, coconut cream or nut milks can be substituted to maintain creaminess.
-
Sweeteners: Powdered sugar, honey, or maple syrup help balance the natural bitterness of dark chocolate. The choice affects the flavor profile and texture subtly; powdered sugar keeps the mixture dry and firm, while honey or syrup add moisture.
-
Flavor Enhancers: Vanilla extract lends warmth, sea salt enhances the chocolate’s complexity, and liqueurs like Frangelico or Amaretto can infuse the truffles with an elegant, adult twist.
-
Coatings: To finish, truffles can be rolled in cocoa powder for a classic look, crushed nuts for crunch, shredded coconut for tropical flair, or dipped in melted chocolate for a glossy shell.
Pro tip: Invest in good-quality chocolate and fresh hazelnuts. Their superior flavor will elevate your truffles from ordinary to extraordinary.
Step-by-Step Guide to Making Homemade No-Bake Chocolate Hazelnut Truffles
Preparing the Hazelnuts:
Begin by toasting raw hazelnuts in a dry skillet or oven until fragrant and slightly browned. This step unlocks their rich aroma and flavor. Once cooled, grind them finely in a food processor or spice grinder, or use smooth hazelnut paste for a creamier texture.
Melting the Chocolate:
Gently melt your chosen chocolate using a double boiler or microwave in short bursts to avoid burning or seizing. Stir frequently to ensure smooth, even melting.
Mixing the Ganache:
In a mixing bowl, combine the melted chocolate with cream or your dairy alternative. Stir in the hazelnut paste or ground nuts, sweetener of choice, and flavor enhancers like vanilla or a splash of liqueur. Mix thoroughly until smooth and homogeneous.
Chilling the Mixture:
Cover the ganache and refrigerate for at least 2 hours, or until firm enough to scoop and shape. This chilling step is crucial for manageable texture and clean shaping.
Shaping the Truffles:
Use a small cookie scoop or melon baller to portion out the mixture. Roll each portion quickly between your palms to form smooth, uniform spheres. If the ganache softens too much while shaping, chill again to firm up.
Coating the Truffles:
Roll truffles in cocoa powder, crushed hazelnuts, shredded coconut, or dip them in melted chocolate for a glossy finish. Place finished truffles on parchment-lined trays.
Storing Your Truffles:
Store in airtight containers in the refrigerator. They typically keep fresh for up to two weeks. For longer storage, freeze the truffles and thaw in the fridge before serving.
Essential Tools for Perfect No-Bake Truffles
Making these truffles is simple, but having the right tools makes the process smoother and the results prettier:
-
Mixing bowls and spatula for combining ingredients without mess
-
Food processor or nut grinder to finely chop or grind hazelnuts
-
Double boiler or microwave-safe bowl to melt chocolate gently
-
Baking sheet lined with parchment paper to set and chill the truffles
-
Small cookie scoop or melon baller to portion uniform truffles
-
Storage containers with airtight lids to keep truffles fresh and prevent odors
With these tools in hand, you’ll breeze through each step while producing professional-looking, delicious truffles.
Delicious Variations & Flavor Twists
Once you’ve mastered the classic no-bake chocolate hazelnut truffles, it’s fun to explore creative flavor variations that suit any occasion or mood. Try adding a teaspoon of espresso or finely ground coffee powder to the ganache for a rich mocha flavor that intensifies the chocolate’s depth. For a grown-up treat, infuse the mixture with a splash of nutty liqueurs like Frangelico or Amaretto—their aromatic warmth pairs beautifully with hazelnuts.
For texture and contrast, roll the truffles in crushed toasted hazelnuts or finely chopped dark chocolate instead of the usual cocoa powder. Those coatings add delightful crunch and visual appeal.
If you prefer dairy-free or vegan options, swap heavy cream with coconut cream and use high-quality dairy-free chocolate. The results remain just as creamy and indulgent.
You can also experiment with white chocolate and hazelnut combos for a sweeter, milder flavor or spice things up by adding a pinch of cinnamon or even a dash of chili powder to the ganache, offering a surprising warmth that balances the sweetness.
Storage, Shelf Life & Serving Tips
Proper storage is key to preserving your truffles’ texture and flavor. Keep them in an airtight container in the refrigerator, where they stay fresh for up to two weeks. For longer storage, truffles freeze beautifully—just wrap them tightly and freeze for up to three months.
When ready to enjoy, thaw frozen truffles slowly in the refrigerator overnight to prevent condensation, which can affect their texture. Serve chilled or at room temperature for the best melt-in-your-mouth experience.
These truffles make excellent companions to a freshly brewed cup of coffee or tea. Arrange them on a dessert board alongside fresh berries and nuts for an elegant presentation. They’re also perfect for gifting—just package in pretty boxes or tins with ribbons.
To keep truffles looking glossy and fresh, avoid storing them in humid areas and handle gently to preserve their delicate coatings.
Common Mistakes & How to Avoid Them
Even with simple ingredients, making perfect no-bake truffles requires a few precautions. One common issue is chocolate seizing, which happens if water gets into melted chocolate. To fix, stir in a small amount of warm cream or butter to smooth it out.
Avoid overheating chocolate, which can cause it to become grainy or burnt—melt gently using a double boiler or short microwave bursts.
If your truffle mixture is too soft, chill it longer; if it’s too firm, gently warm it or add a splash more cream to soften. Getting the right ganache texture is crucial for shaping.
For smooth, even coatings, chill the shaped truffles before rolling them in toppings. Use slightly damp hands to prevent sticking but avoid melting the ganache.
Lastly, to prevent grainy or dry textures, use fresh ingredients and avoid overmixing the ganache, which can cause separation.
Presentation & Gift-Wrapping Ideas
Presentation makes a big difference with homemade truffles. For entertaining, arrange truffles on a beautiful plate or tiered dessert stand. Sprinkle with edible gold dust or finely chopped nuts for a festive touch.
When gifting, package truffles in small boxes or tins lined with parchment paper. Tie with a satin ribbon and add a personalized note or tag explaining the flavors. Clear cellophane bags with decorative ties also work well for smaller batches.
Add variety by including different coatings or shapes, like heart-shaped molds for Valentine’s or holiday-themed sprinkles for festive seasons.
Using natural elements like cinnamon sticks or sprigs of rosemary tied with twine adds a rustic, charming touch. Remember, a thoughtful presentation shows extra care and makes your homemade treats feel truly special.
Frequently Asked Questions (FAQs)
Can I use store-bought hazelnut spread like Nutella instead of hazelnuts?
Yes, but fresh ground hazelnuts provide better texture and more natural nut flavor. Nutella works in a pinch but may add extra sweetness and change the texture.
How long do no-bake truffles last?
Stored in an airtight container in the fridge, truffles stay fresh for up to 2 weeks. Frozen truffles last about 3 months.
Can I freeze homemade truffles?
Absolutely. Freeze truffles in airtight containers or wrapped tightly in parchment and foil. Thaw overnight in the fridge before serving.
What’s the best chocolate to use?
High-quality couverture or baking chocolate with at least 60% cocoa solids is ideal for rich flavor and smooth texture.
Can I make these truffles nut-free?
Yes! Substitute hazelnuts with toasted sunflower seeds or omit nuts altogether. You can also roll truffles in seeds or coconut for texture.
How do I prevent truffles from melting while shaping?
Keep your hands cool, work quickly, and chill the ganache mixture well before shaping. You can also shape truffles using a small scoop and chill immediately.
Homemade No-Bake Chocolate Hazelnut Truffles
Equipment
- Mixing bowls
- Food processor or nut grinder
- Double boiler or microwave-safe bowl
- Baking sheet lined with parchment paper
- Small cookie scoop or melon baller
- Airtight storage containers
Ingredients
- 8 oz high-quality dark or semi-sweet chocolate, chopped
- 1/2 cup heavy cream or coconut cream for dairy-free
- 1/3 cup toasted hazelnuts, finely ground or 1/4 cup hazelnut paste
- 2 tbsp powdered sugar or preferred sweetener
- 1 tsp vanilla extract
- Pinch of sea salt
- Cocoa powder, crushed toasted hazelnuts, shredded coconut, or melted chocolate for coating
Instructions
- Toast and grind hazelnuts: Toast hazelnuts in a dry skillet until fragrant, cool, and pulse to a fine crumb in a food processor, or use hazelnut paste.
- Melt chocolate: Gently melt chopped chocolate using a double boiler or microwave in 20-second bursts, stirring until smooth.
- Make ganache: Warm cream just until simmering and pour over melted chocolate. Let sit 1 minute, then stir gently until smooth.
- Add hazelnuts and flavor: Stir in ground hazelnuts (or paste), powdered sugar, vanilla, and salt until fully incorporated.
- Chill: Cover the mixture and refrigerate for at least 2 hours, or until firm enough to scoop.
- Shape truffles: Using a small scoop, portion out ganache and roll quickly into balls.
- Coat: Roll truffles in cocoa powder, nuts, coconut, or dip in melted chocolate.
- Store: Refrigerate in an airtight container until ready to serve.
Notes
- Use the best quality chocolate you can find for the richest flavor.
- Chilling time is crucial for easy shaping; don’t rush it.
- For dairy-free versions, substitute heavy cream with coconut cream and use dairy-free chocolate.
- Truffles can be stored refrigerated for up to 2 weeks or frozen up to 3 months.
- Experiment with coatings and flavor additions like espresso powder or liqueurs for variety.
- Keep hands cool while rolling to prevent melting.