Why Golden & Crispy Garlic Parmesan Pork Chops Are a Dinner Game-Changer
Golden, crispy, and bursting with garlicky Parmesan flavor, these pork chops take weeknight dinners to a whole new level. Imagine a perfectly seared crust that’s crunchy and flavorful, wrapping tender, juicy pork inside — every bite delivers a satisfying contrast of textures and tastes. This recipe is the ideal blend of comfort and elegance, whether you’re cooking for family on a busy weekday or impressing guests at a special occasion.
What makes these pork chops a game-changer is how approachable and foolproof the process is. You don’t need to be a culinary expert to achieve restaurant-quality results at home. Using simple ingredients like fresh garlic, quality Parmesan cheese, and crunchy breadcrumbs, paired with the right cooking technique, guarantees golden crispiness without drying out the meat.
In this guide, you’ll learn the secrets to perfecting this irresistible dish — from selecting the best pork chops and crafting the ideal crust, to mastering cooking methods that lock in flavor and moisture. Prepare to elevate your pork chop game and make these garlic Parmesan beauties a new family favorite.
What Makes These Pork Chops So Special?
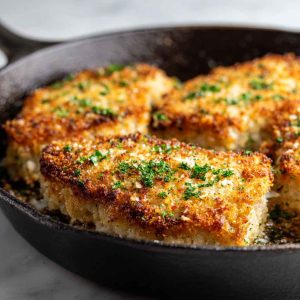
The secret behind these pork chops lies in their garlicky Parmesan crust, which creates a mouthwatering blend of flavor and texture. The fresh garlic infuses every bite with savory depth, while the Parmesan cheese adds nutty richness and helps form that coveted golden crust.
Achieving a perfectly crispy exterior without drying out the pork is the hallmark of this recipe. The crust acts as a flavorful barrier, locking in juices so the meat stays tender and moist.
This delightful contrast — crunchy, flavorful coating on the outside and juicy, tender pork on the inside — is what sets these chops apart from ordinary pan-seared or baked pork. The crust elevates simple pork chops into a standout meal that’s both satisfying and elegant.
Pork Chop Cuts and Thickness Explained
Choosing the right pork chop cut is key to success. Bone-in chops, such as rib or loin chops, are ideal because the bone helps retain moisture and adds flavor during cooking. Boneless chops are also suitable but require careful attention to avoid drying out.
Thickness matters a lot: chops around 1 to 1.5 inches thick work best for getting a crispy crust while keeping the interior juicy. Thinner chops tend to cook too quickly, risking dryness, while thicker cuts may need longer cooking or finishing in the oven.
Understanding your chop’s cut and thickness allows you to adjust cooking times and techniques, ensuring even cooking throughout. For example, thicker bone-in chops benefit from starting on the stove to develop a crust, then finishing in the oven to cook gently without burning the crust.
Key Ingredients Breakdown
Garlic: Fresh garlic shines in this recipe, delivering vibrant, pungent flavor that powdered garlic can’t match. Minced fresh garlic blends perfectly into the crust mixture, providing bursts of savory goodness.
Parmesan Cheese: Quality Parmesan cheese is essential. Freshly grated Parmesan melts slightly during cooking, creating a crispy, golden crust with nutty undertones. Avoid pre-grated varieties with additives for the best texture and flavor.
Breadcrumbs: Panko breadcrumbs offer a light, airy crunch that gives the crust its signature texture. Regular breadcrumbs work but produce a denser coating. You can experiment by mixing the two for balanced crunchiness.
Pork Chops: Opt for high-quality, fresh pork chops. If desired, brine the chops in a simple saltwater solution for 30 minutes to an hour before cooking to boost juiciness and tenderness. Otherwise, a good seasoning with salt and pepper is key.
Additional Flavor Boosters: Herbs like thyme or rosemary complement garlic and Parmesan beautifully. Seasoning blends with smoked paprika or black pepper add complexity. Using olive oil or melted butter helps bind the crust and enhance browning during cooking.
Essential Equipment & Tools
To get that perfect crispy crust, a heavy-bottomed skillet like a cast iron pan is preferred. Cast iron retains heat well and distributes it evenly, ensuring an ideal sear.
If your pork chops are thick, finishing them in a preheated oven helps cook through without burning the crust.
A meat thermometer is invaluable for checking doneness, aiming for an internal temperature of 145°F (63°C) to ensure juicy, safe-to-eat pork.
Mixing bowls for the crust and seasoning, plus tongs for flipping and handling the chops safely, round out the essential tools.
Preparing Your Pork Chops – Step-by-Step
Start by patting the pork chops dry with paper towels; this is crucial for crispiness as excess moisture hinders crust formation.
If brining, soak the chops in a saltwater solution (about ¼ cup salt per 4 cups water) for 30 minutes to an hour, then rinse and dry thoroughly.
Next, season the chops lightly with salt and pepper.
Prepare the garlic Parmesan crust by combining freshly minced garlic, grated Parmesan cheese, and breadcrumbs in a shallow bowl. Add any herbs or seasoning blends to this mixture.
Brush the pork chops lightly with olive oil or melted butter to help the crust stick. Press each chop firmly into the crust mixture, coating evenly on all sides.
For best adhesion, allow the coated chops to rest briefly before cooking.
With these prep steps, you’re set to cook pork chops that are golden, crispy, and bursting with garlicky Parmesan flavor.
Cooking Instructions for Golden & Crispy Garlic Parmesan Pork Chops
Start by heating a heavy skillet—cast iron is ideal—over medium-high heat. Add about 2 tablespoons of olive oil or a mix of olive oil and butter for flavor and browning. The oil should shimmer but not smoke.
Place the coated pork chops gently in the hot skillet, making sure not to overcrowd the pan. Overcrowding traps steam and prevents crisping. Cook the chops for about 3 to 4 minutes on the first side without moving them; this helps the crust set firmly.
When ready to flip, use tongs to carefully turn each chop. To avoid losing any of the crispy crust, lift gently and flip with confidence in one smooth motion. Cook the second side for another 3 to 4 minutes, adjusting heat as needed to prevent burning.
For thicker chops (1.25 inches or more), once both sides are golden, transfer the skillet to a preheated 375°F (190°C) oven to finish cooking for 5–8 minutes. This ensures the interior reaches a safe temperature without overcooking the crust.
Check doneness with an instant-read thermometer inserted into the thickest part of the chop. The USDA recommends 145°F (63°C) for juicy, safe pork. Once reached, remove chops from the pan and let rest for 5 minutes to allow juices to redistribute.
Tips for Achieving Maximum Crispiness
To get that irresistible crunch, start with dry pork chops—pat them thoroughly with paper towels before seasoning and coating. Moisture is the enemy of crispiness.
Use panko breadcrumbs for the coating; their larger flakes create a lighter, crunchier crust compared to regular breadcrumbs.
Avoid overcrowding the pan. Give each chop room to breathe so the heat can evenly crisp the crust rather than steam it.
Cook over medium to medium-high heat; too high and the crust burns before the pork cooks, too low and the crust sogs up.
After cooking, let the chops rest on a wire rack instead of a plate to prevent steam from making the crust soggy. This keeps your chops perfectly crispy right to the last bite.
Serving Suggestions & Side Dish Ideas
Golden garlic Parmesan pork chops pair beautifully with classic comfort sides like creamy mashed potatoes, steamed green beans, or roasted seasonal vegetables such as carrots and Brussels sprouts.
For something a bit different, try garlic butter rice or creamy polenta to soak up any pan juices. Sautéed spinach or kale with a squeeze of lemon adds a fresh, vibrant touch.
Complement the dish with a simple sauce—lemon butter sauce brightens the flavors, mushroom gravy adds earthiness, or a fresh tomato salsa brings a tangy contrast.
Finish with a sprinkle of fresh parsley or basil for color and aroma, creating a restaurant-quality plate you can serve any night of the week.
Flavor Variations to Experiment With
Experiment by swapping or adding herbs to the crust: rosemary, thyme, or oregano bring different aromatic profiles that work beautifully with garlic and Parmesan.
Add a little heat with cayenne pepper, smoked paprika, or chili flakes to spice up the flavor without overpowering the dish.
Try using other hard cheeses like Asiago or Pecorino Romano in place of or alongside Parmesan for subtle flavor twists.
For gluten-free or keto versions, substitute panko breadcrumbs with almond flour or crushed pork rinds. These alternatives maintain texture while fitting specific dietary needs.
Feel free to customize seasonings and crusts to suit your taste or dietary preferences and make this recipe your own.
Storing, Reheating & Leftover Tips
Store cooked pork chops in an airtight container in the refrigerator for up to 3 days. To maintain the crust’s crispiness, reheat them in a skillet over medium heat or in a toaster oven rather than a microwave, which can make the crust soggy.
Leftover chops make fantastic additions to sandwiches, wraps, or salads. Thinly slice the pork and pair with fresh greens, avocado, and your favorite dressing for a quick, tasty meal.
For freezer storage, wrap cooked chops tightly and freeze for up to 2 months. Thaw overnight in the fridge before reheating gently in a skillet.
Frequently Asked Questions (FAQs)
Can I bake the pork chops instead of frying?
Yes! Coat the chops as usual, place on a baking sheet, and bake at 400°F (200°C) for about 20–25 minutes, flipping halfway through. Finish under the broiler if you want extra crispiness.
How do I know when pork chops are done?
Use an instant-read thermometer; the safe internal temperature is 145°F (63°C). The meat should be juicy with just a slight blush of pink.
Can I use frozen pork chops?
It’s best to thaw completely before cooking for even crust formation and safe cooking.
What if I don’t have Parmesan cheese?
Try Asiago or Pecorino Romano as a substitute, or increase the garlic and breadcrumb ratio slightly.
How to make this recipe gluten-free?
Swap regular or panko breadcrumbs for almond flour, crushed gluten-free crackers, or crushed pork rinds.
Conclusion – Takeaway and Encouragement to Try This Recipe
Golden and crispy garlic Parmesan pork chops are a surefire way to elevate your dinner game with minimal effort. The perfect combination of crunchy, flavorful crust and juicy, tender pork inside makes every bite unforgettable. Whether you stick to the classic recipe or experiment with herbs and spices, these chops are versatile and sure to become a family favorite. Don’t hesitate to customize and make the recipe your own — then come back and share your delicious variations. Happy cooking and enjoy every crispy, garlicky bite!
Golden & Crispy Garlic Parmesan Pork Chops
Equipment
- Cast iron or heavy-bottom skillet
- Oven (optional for finishing)
- Instant-read meat thermometer
- Mixing bowls
- Tongs
- Knife and cutting board
Ingredients
- 4 bone-in or boneless pork chops (about 1 to 1.5 inches thick)
- 2 cloves garlic, minced (fresh)
- ½ cup grated Parmesan cheese (freshly grated preferred)
- ¾ cup panko breadcrumbs
- 1 tsp dried herbs (optional: thyme, rosemary, or oregano)
- Salt and pepper, to taste
- 2 tbsp olive oil or butter (for cooking)
- Optional: 1 tbsp fresh chopped parsley (for garnish)
Instructions
- Pat pork chops dry with paper towels. Season both sides with salt and pepper.
- In a shallow bowl, combine minced garlic, Parmesan cheese, panko breadcrumbs, and dried herbs if using.
- Brush pork chops lightly with olive oil or melted butter to help crust adhere. Press each chop firmly into the breadcrumb mixture, coating evenly on all sides.
- Heat olive oil or butter in a cast iron skillet over medium-high heat until shimmering.
- Add pork chops, cooking undisturbed for 3–4 minutes per side until golden brown and crispy. Avoid overcrowding the pan.
- For thicker chops, transfer the skillet to a preheated 375°F (190°C) oven and cook for an additional 5–8 minutes until internal temperature reaches 145°F (63°C).
- Remove chops and let rest for 5 minutes before serving. Garnish with fresh parsley if desired.
Notes
- For extra juiciness, brine pork chops in a saltwater solution for 30–60 minutes before cooking.
- Use panko breadcrumbs for a lighter, crispier crust. Regular breadcrumbs work but yield a denser crust.
- Don’t overcrowd the skillet to prevent sogginess; cook in batches if needed.
- Rest chops on a wire rack after cooking to maintain crispiness.
- Swap panko for almond flour or gluten-free breadcrumbs for gluten-free diets.
- Customize with additional spices or cheese varieties like Asiago or Pecorino Romano.