Why These Garlic Butter Pan-Seared Pork Chops Are So Irresistible
There’s something magical about a perfectly seared pork chop—crisp golden crust, juicy center, and that rich, garlicky butter melt. These garlic butter pan-seared pork chops check all the boxes: quick, delicious, and restaurant-worthy with minimal fuss. Whether it’s a weeknight dinner or a date-night favorite, this recipe delivers big flavor every time.
Why This Recipe Works
At the heart of this recipe is the classic sear-then-baste technique. It’s a method professional chefs swear by, and here’s why: searing locks in juices while building a deep, golden crust on the outside. When you finish with butter-basting, you’re layering on flavor—garlic, herbs, and rich, foamy butter coat the meat, keeping it tender and aromatic.
The secret to juicy pork chops is cooking them to a safe internal temperature of 145°F and then letting them rest. This way, the juices redistribute evenly and don’t spill out the second you slice in. Pair that with the browned, flavorful bits left in the pan (aka the “fond”), and you’ve got a savory base for a buttery pan sauce that pulls it all together. Easy, elegant, and packed with bold, comforting flavor.
Choosing the Best Pork Chops
Great pork chops start at the butcher counter. Your best bet? Bone-in rib or loin chops that are at least 1 to 1½ inches thick. The bone not only adds flavor but helps the meat cook more evenly, preventing overcooked edges while the center finishes.
Boneless chops are fine, especially for quick cooking, but they tend to dry out faster. If using boneless, opt for center-cut and reduce the cooking time slightly.
Look for chops with good marbling—that’s the little streaks of fat that keep the meat moist and flavorful as it cooks. Avoid very lean, thin-cut chops, which are prone to drying out on high heat. A thicker, marbled chop gives you room to develop a flavorful sear without sacrificing tenderness. Always let your butcher know you’re pan-searing—they’ll often help you pick the perfect cut for the job.
Prep Work
Before the pork hits the pan, a little prep work goes a long way toward a juicy, golden crust.
Start by patting the pork chops completely dry with paper towels. Moisture on the surface will steam the meat instead of letting it brown. Dry chops = crisp, caramelized edges.
Next, season generously with kosher salt and freshly cracked black pepper. If you like, add a pinch of Italian seasoning, smoked paprika, or even a touch of brown sugar for extra depth. Keep it simple though—you want the garlic butter to shine.
Here’s a pro tip: score the fat along the edges with a sharp knife. Just make a few shallow cuts through the fat layer. This keeps the chop from curling as it sears, ensuring full contact with the pan and an even sear.
Finally, let the pork chops rest at room temperature for about 30 minutes before cooking. This step helps them cook more evenly from edge to center, avoiding a cold middle and ensuring a beautifully seared exterior.
Prep ahead and you’re halfway to pork chop greatness—this little bit of care sets the stage for everything that follows.
Setting Up the Pan
Your pan is your best friend in this recipe—choose wisely. A cast-iron skillet is ideal for even heat distribution and a deeply golden crust. If you don’t have one, use the heaviest-bottomed pan you own.
Heat matters too. You’ll want to use medium-high heat to get a beautiful sear without scorching the butter. Starting with oil helps here: use a neutral oil with a high smoke point like avocado or canola. Once the oil is shimmering, add a couple of tablespoons of butter for flavor and richness.
Why the combo? The oil keeps the butter from burning too fast, while the butter adds depth and nuttiness. As soon as the butter starts foaming, it’s time for the pork chops.
Don’t overcrowd the pan—if you’re cooking more than two chops, work in batches. Crowding lowers the heat and results in pale, soggy meat. Give each chop plenty of space to sizzle.
Searing & Basting Technique
Time to cook! Carefully lay the seasoned pork chops into the hot pan. You should hear an instant sizzle—that’s how you know the sear has begun.
Let the chops cook undisturbed for 3 to 5 minutes. Don’t move them around—this is how you get that gorgeous, golden crust. When they release easily, flip and sear the other side. If your chops are thick, use tongs to briefly sear the sides as well, especially the fatty edge.
Now the magic: add a few smashed garlic cloves and a couple of sprigs of fresh thyme or rosemary to the pan. Then toss in a generous knob of butter. As it melts and foams, tilt the pan slightly and begin basting—spooning the melted butter and garlic over the pork chops repeatedly.
This step builds layer after layer of flavor and helps the pork cook gently to a target internal temperature of around 140°F. It’ll rise to the perfect 145°F as it rests.
Safety tip: If your butter begins to brown too quickly, briefly lift the pan off the heat or lower the flame. This method takes a bit of finesse, but once you master it, you’ll be butter-basting everything.
Resting & Internal Temp
Once your pork chops are golden and beautifully basted, the final step is crucial: let them rest for 5 to 10 minutes under a loose foil tent. This resting period allows the juices to redistribute evenly through the meat—so you don’t lose all that moisture the moment you slice in.
Thanks to carryover cooking, the internal temperature will rise a few degrees during rest. You want to pull the chops from the heat at around 140°F, allowing them to climb to the perfect 145°F. A slight blush of pink in the center is totally safe—and keeps them mouthwateringly juicy.
Pan-Sauce Mastery
Don’t waste those flavorful brown bits stuck to the pan—this is culinary gold, also known as fond.
Once your pork chops are resting, return the pan to medium heat. Deglaze it by pouring in a splash of chicken broth, white wine, or even lemon water. Scrape the bottom of the pan gently with a wooden spoon to lift all those flavorful bits.
Now stir in the leftover garlic and herbs from earlier, and let the liquid reduce slightly. Finish with a tablespoon or two of cold butter for a silky, glossy texture.
Want to get fancy? Strain the sauce through a fine mesh sieve for a smooth finish. Then drizzle over the pork chops or serve in a small ramekin on the side. This little step adds a big wow factor—perfect for impressing dinner guests or treating yourself.
Serving Suggestions & Sides
Garlic butter pan-seared pork chops are versatile and pair well with a wide variety of side dishes. Whether you want comfort food or something lighter, there’s a pairing for every mood.
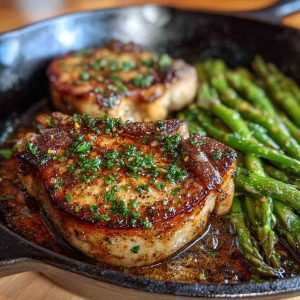
For a classic, hearty plate, serve your pork chops with creamy mashed potatoes, roasted green beans, or pan-seared zucchini. If you want to keep it simple, you can even sauté the zucchini in the same pan for a quick one-skillet meal.
Looking for something brighter? Try a crisp salad. A fennel and herb salad adds a light, aromatic touch. Or go with a peppery arugula salad dressed in lemon vinaigrette, or a chilled green bean salad with garlic and lemon for freshness that cuts through the richness of the butter.
And don’t forget the bread! A slice of buttery garlic bread, fluffy cornbread, or even a rustic baguette is great for soaking up every drop of pan sauce.
Pro tip: If you’re serving a crowd, slice the pork and fan it out over a platter with your sides and sauce—it looks stunning and makes serving a breeze.
Variations & Flavor Twists
Want to put your own spin on these pork chops? The base recipe is super flexible—here are some delicious ways to switch things up.
For a sweet-and-savory vibe, add a touch of Dijon mustard, a splash of Worcestershire sauce, or a teaspoon of brown sugar to the butter sauce. This combo deepens the flavor and adds a subtle tang that’s absolutely irresistible.
In terms of herbs, don’t feel stuck with thyme or rosemary. Fresh sage, oregano, or even crushed coriander seeds can lend different dimensions of flavor. A pinch of Italian seasoning also works beautifully if that’s what you have on hand.
If you’re working with extra-thick pork chops, consider finishing them in the oven. After searing both sides, transfer the skillet to a preheated 425°F oven for 5 to 10 minutes, depending on thickness. This method ensures the chops cook evenly without burning the crust.
Want to turn this into a one-pan meal? After searing, push the chops to the side and toss in halved cherry tomatoes, sliced zucchini, or mushrooms to cook in that luscious garlic butter. It’s an easy, complete dinner with just one skillet to clean.
Storage & Reheating Tips
Got leftovers? Great! These pork chops store and reheat beautifully when handled with care.
Let the chops cool completely before storing. Keep them in an airtight container in the fridge for up to 4 days, or freeze for up to 3 months.
To reheat, avoid the microwave—it can dry them out. Instead, warm them in a low oven (300°F) or gently in a covered skillet with a splash of broth to keep things moist.
If you made extra sauce, freeze it separately in ice cube trays and pop out a cube when you want a quick burst of flavor on any weeknight dish.
Troubleshooting Common Issues
Even a simple recipe like this can have hiccups. Here’s how to fix common pork chop pitfalls:
-
Dry chops? This usually means they were overcooked or too thin. Aim for 1–1½ inches thick and remove them from heat at 140°F.
-
Butter burned? Butter alone burns quickly. That’s why we use a combo of oil and butter—oil raises the smoke point and protects the flavor.
-
No crust? A cold pan or overcrowded skillet is often to blame. Always use a hot pan and give your chops space.
-
Still undercooked inside? That’s common with thick chops. Use a meat thermometer, and don’t forget the carryover cooking during rest.
With these tips, your pork chops will come out consistently juicy and flavorful every single time.
FAQs
Can I use boneless chops?
Yes! Boneless pork chops cook faster but are a bit leaner. Just reduce the searing time by a minute or two per side.
What internal temp should I aim for?
Pork is perfectly safe and juicy at 145°F. A little pink is okay—and preferred!
How long should I let them rest?
5 to 10 minutes under foil is ideal. This helps juices settle and keeps the meat tender.
Can I finish them in the oven?
Absolutely. For thick chops, sear both sides, then pop the pan into a 425°F oven to finish.
Can I change the herbs?
Yes! Try sage, thyme, rosemary, or Italian seasoning—whatever you enjoy most or have on hand.
Conclusion & Call to Action
And there you have it—tender, flavorful, garlic butter pan-seared pork chops that feel like a treat but are easy enough for any night of the week.
With a golden crust, juicy interior, and endless ways to customize, this recipe is a keeper. Whether you’re serving it solo, paired with cozy sides, or dolled up with a pan sauce, these chops deliver every time.
Tried it? Share your results in the comments or tag me on social!
And if you’re hungry for more no-fuss dinner magic, sign up for my weekly recipe newsletter—you’ll get fresh ideas, seasonal picks, and tasty tips straight to your inbox.
Garlic Butter Pan-Seared Pork Chops
Equipment
- Cast iron skillet or heavy-bottomed pan
- Tongs
- Spoon (for basting)
- Instant-read thermometer
- Aluminum foil (for resting)
Ingredients
- 2 thick-cut pork chops (1–1½" thick, bone-in preferred)
- Salt and freshly ground black pepper
- 1–2 tsp Italian seasoning (optional)
- 1 tbsp neutral oil (like canola or avocado oil)
- 3 tbsp unsalted butter
- 3–4 garlic cloves, smashed
- Fresh thyme or rosemary sprigs
Optional for Pan Sauce:
- ¼ cup chicken broth or white wine
- 1 tbsp cold butter (to finish sauce)
Instructions
- Prep Pork Chops:Pat pork chops dry with paper towels. Season generously with salt, pepper, and optional Italian seasoning. Let rest at room temp for 30 minutes to ensure even cooking.
- Heat Pan:Preheat a cast iron skillet over medium-high heat. Add oil and let it shimmer.
- Sear Chops:Place pork chops in the hot pan. Sear 3–5 minutes on each side, depending on thickness, until a golden crust forms. Sear the fat edges for 1–2 minutes if thick.
- Add Flavor:Reduce heat slightly. Add butter, smashed garlic, and herbs. Once butter foams, tilt the pan and begin spooning the melted garlic butter over the chops continuously.
- Check Temp:Continue basting until the internal temp reaches 140°F. Remove from heat and tent loosely with foil—rest 5–10 minutes to allow temp to reach 145°F.
- (Optional) Make Sauce:Return skillet to medium heat. Deglaze with broth or wine, scraping up brown bits. Simmer 1–2 minutes, stir in cold butter to finish. Strain if desired.
- Slice chops against the grain and serve drizzled with pan sauce. Pair with your favorite sides!
Notes
- Bone-In vs Boneless: Boneless chops cook faster but tend to dry out more easily. Adjust time accordingly.
- Pan Temperature: Make sure your pan is hot enough to sear but not smoking—medium-high is ideal.
- Don't Skip Resting: Resting the meat is key for a juicy interior.
- Butter Tip: Always combine butter with oil to prevent it from burning.
- Storage: Keep leftovers in an airtight container for 3–4 days. Reheat gently in a skillet or oven.
- Freezing: Freeze cooked chops with sauce separated in ice cube trays if storing longer-term.