Introduction
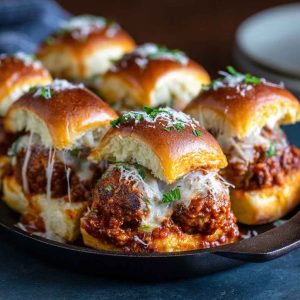
If you’re looking for a crowd-pleasing recipe that disappears fast, these Easy Pull-Apart Meatball Sliders are exactly what you need. Soft, buttery rolls layered with saucy meatballs and gooey melted cheese create the ultimate comfort food bite.
These sliders are perfect for game day spreads, family movie nights, potlucks, or even an easy weeknight dinner. The best part? Everything bakes together in one dish, making prep and cleanup incredibly simple.
The pull-apart style makes serving effortless — guests can grab one (or three!) without any slicing or mess. Plus, you can customize them with different cheeses, sauces, and meatball options to match your taste.
Tip: This recipe is especially great when you need a make-ahead party appetizer that still tastes fresh and delicious straight from the oven.
What Are Pull-Apart Meatball Sliders?
Pull-apart meatball sliders are mini baked sandwiches assembled in a single pan using connected rolls. Instead of building individual sandwiches, the rolls stay attached, creating a tray of cheesy, saucy sliders that can be pulled apart easily after baking.
Think of them as a fun twist on classic meatball subs — smaller, softer, and perfect for sharing. The combination of fluffy rolls, savory marinara, juicy meatballs, and melted cheese makes every bite comforting and satisfying.
Hawaiian rolls are often used because their slight sweetness balances the rich sauce and cheese beautifully. Once baked with a buttery garlic topping, the sliders become golden, fragrant, and irresistibly soft.
Why You’ll Love This Recipe
There are so many reasons this recipe earns a regular spot in meal rotation.
First, it’s incredibly easy. Using pre-cooked or frozen meatballs cuts prep time dramatically. Everything layers into one dish and bakes together.
Second, these sliders are guaranteed to please a crowd. Kids love the cheesy pull-apart texture, while adults appreciate the bold, comforting flavors.
They’re also highly customizable. You can swap sauces, cheeses, or even use turkey or plant-based meatballs without sacrificing flavor.
Finally, this recipe is perfect for meal prep. You can assemble the sliders ahead of time and bake just before serving.
Bonus: Leftovers reheat beautifully, making them just as tasty the next day.
Ingredients Overview
This recipe uses simple, easy-to-find ingredients that come together for maximum flavor.
Main Ingredients
Slider Rolls: Soft Hawaiian rolls or dinner rolls work best. Their fluffy texture creates the signature pull-apart effect.
Meatballs: Fully cooked meatballs save time and ensure even baking. Homemade meatballs add extra flavor, but frozen meatballs are a great shortcut.
Marinara Sauce: A rich marinara keeps the sliders juicy and flavorful. Use your favorite store-bought brand or homemade sauce.
Cheese: Mozzarella is the classic choice for its meltability, but provolone or an Italian cheese blend also works beautifully.
Butter: Melted butter brushed on top adds flavor and helps create golden, slightly crisp buns.
Flavor Boosters
-
Garlic (fresh or powdered)
-
Parmesan cheese
-
Italian seasoning
-
Fresh parsley or basil
-
Red pepper flakes for heat (optional)
Tip: If your marinara is very thin, simmer it briefly to thicken — this helps prevent soggy sliders.
Best Bread for Pull-Apart Sliders
The bread you choose can make or break your sliders.
Hawaiian rolls are the most popular option thanks to their soft texture and subtle sweetness. That hint of sweetness pairs perfectly with savory meatballs and tangy marinara.
Brioche rolls are another excellent choice. They’re rich, buttery, and hold up well to sauce without falling apart.
Classic dinner rolls work too, especially if you prefer a more neutral flavor.
The key is to keep the rolls connected when slicing. Use a serrated knife to cut horizontally through the entire slab, creating a top and bottom layer without separating individual rolls. This ensures the sliders bake evenly and pull apart cleanly when served.
Step-by-Step Instructions
Step 1: Prep the Rolls
Preheat your oven and lightly grease a baking dish. Using a serrated knife, slice the entire slab of rolls horizontally while keeping them connected. Place the bottom half into the baking dish.
Step 2: Add Sauce and Meatballs
Spread a thin, even layer of marinara over the bottom buns. Arrange the meatballs in rows so each slider will have one portion. Spoon a little extra sauce over the meatballs for moisture and flavor.
Step 3: Add Cheese Layer
Cover the meatballs with shredded or sliced mozzarella. Make sure the cheese reaches the edges so every slider gets that irresistible cheesy pull.
For extra indulgence, you can add a second light layer of cheese beneath the meatballs as well.
Step 4: Add Top Buns
Place the top half of the rolls over the cheese, aligning them with the bottom layer.
Step 5: Garlic Butter Topping
Melt butter and mix in garlic, Parmesan, and Italian seasoning. Brush generously over the tops of the rolls, letting it drip into the crevices for maximum flavor.
Step 6: Bake
Cover the dish loosely with foil and bake until the meatballs are heated through and the cheese is melted. Remove the foil and bake a few more minutes until the tops are golden and slightly crisp.
Let the sliders rest for a few minutes before serving so the cheese sets slightly and the sliders pull apart neatly.
Important Tip: Avoid adding too much sauce, as excess moisture can make the bottom buns soggy.
Expert Tips for Perfect Sliders
A few simple tricks can take your sliders from good to unforgettable.
Use thawed meatballs whenever possible. This helps them heat evenly and prevents overbaking the bread while waiting for the centers to warm.
Lightly toasting the bottom buns for a few minutes before assembling creates a barrier against sauce and keeps the sliders from becoming soggy.
Don’t skip the butter topping. It adds flavor, encourages browning, and gives the sliders that bakery-style finish.
Bake covered first so the cheese melts thoroughly without drying out the rolls. Then uncover briefly to create a golden, slightly crisp top.
Finally, allow the sliders to rest for about five minutes after baking. This small step makes them easier to separate and keeps the fillings intact.
Variations and Customizations
One of the best things about pull-apart sliders is how easy they are to customize.
Flavor Variations
For a smoky twist, swap marinara for BBQ sauce and use cheddar cheese to create BBQ meatball sliders.
If you love heat, try Buffalo meatball sliders with spicy sauce and a drizzle of ranch or blue cheese dressing.
Garlic parmesan sliders offer a rich, savory option using white sauce and extra Parmesan. Meanwhile, pesto mozzarella sliders bring a fresh, herby flavor that feels lighter but still indulgent.
Ingredient Swaps
Turkey or chicken meatballs provide a leaner alternative while keeping the dish hearty. Plant-based meatballs work wonderfully for a vegetarian version.
Cheese choices can also transform the flavor. Pepper jack adds spice, cheddar brings sharpness, and provolone creates a classic Italian sandwich vibe.
You can even experiment with sauces like vodka sauce, arrabbiata, or creamy Alfredo for unique variations that keep this recipe exciting every time you make it.
Make-Ahead, Storage, and Reheating
One of the biggest advantages of these sliders is how well they work for meal prep and entertaining.
Make-Ahead Tips
You can assemble the sliders up to 24 hours in advance. Simply layer everything in the baking dish, cover tightly with foil or plastic wrap, and refrigerate. When ready to bake, let the dish sit at room temperature for about 15 minutes before placing it in the oven.
This makes party hosting much less stressful since most of the work is already done.
Storage
Leftover sliders store beautifully. Place them in an airtight container and refrigerate for up to 3–4 days. The flavors often deepen overnight, making them just as delicious the next day.
Reheating
For best results, reheat sliders in the oven at a low temperature, covered with foil to prevent drying. An air fryer works well for smaller portions, giving the tops a slight crisp. The microwave is the fastest option, though the bread may become softer.
Tip: Add a light brush of butter before reheating to refresh flavor and texture.
Freezing Instructions
These sliders are freezer-friendly, making them perfect for future meals.
You can freeze them either before or after baking. For unbaked sliders, assemble the dish, wrap tightly in foil and plastic wrap, and freeze for up to 2 months. Thaw overnight in the refrigerator before baking.
If freezing baked sliders, allow them to cool completely first. Wrap individual portions or the whole tray tightly to prevent freezer burn.
When reheating from frozen, bake covered until warmed through, then uncover briefly to crisp the tops. Expect to add a few extra minutes to the baking time.
Freezing is a great way to keep easy comfort food ready whenever cravings strike.
What to Serve with Meatball Sliders
These sliders pair beautifully with a variety of sides, whether you’re planning a casual dinner or a party spread.
Side Dish Ideas
A crisp Caesar salad or simple green salad balances the richness of the sliders. Coleslaw adds a refreshing crunch, while garlic fries or roasted potatoes create a hearty, satisfying meal.
Roasted vegetables like broccoli, zucchini, or carrots also complement the cheesy flavors nicely. For summer gatherings, pasta salad is always a crowd favorite.
Party Pairings
If serving sliders as an appetizer, round out your spread with chips and dip, veggie platters, or wings. The pull-apart format makes them a natural fit for finger-food buffets and game day tables.
Tip: Offer extra marinara on the side for dipping — guests always appreciate the option.
Serving Suggestions and Occasions
Pull-apart meatball sliders shine at nearly any gathering.
They’re perfect for game day parties, birthday celebrations, potlucks, and holiday appetizer tables. Their grab-and-go style makes them ideal for casual entertaining, while their comforting flavors make them just as suitable for family dinners.
You can even serve them as a fun alternative to traditional sandwiches at lunch gatherings or picnics.
For a cozy night in, pair them with a simple salad and enjoy a comforting, low-effort meal that feels indulgent without requiring hours in the kitchen.
Common Mistakes to Avoid
Avoiding a few common pitfalls will guarantee perfect sliders every time.
Using too much sauce is the biggest mistake. While it’s tempting to add extra marinara, excess moisture can make the buns soggy. Stick to a thin, even layer.
Overbaking is another issue. Baking too long can dry out both the rolls and meatballs, so keep an eye on them once the cheese melts.
Cold meatballs can also lead to uneven heating. Thaw frozen meatballs beforehand for best results.
Skipping the foil step may cause the tops to brown too quickly before the cheese melts. Finally, cutting the sliders immediately after baking can cause the fillings to slide out — letting them rest briefly makes serving much easier.
FAQs
Can I use frozen meatballs for sliders?
Yes, frozen meatballs work perfectly. For best results, thaw them first so they heat evenly and don’t overcook the bread during baking.
How do I keep sliders from getting soggy?
Use a moderate amount of sauce and consider lightly toasting the bottom buns before assembling. This creates a barrier that helps maintain texture.
What cheese melts best for meatball sliders?
Mozzarella is the classic choice because of its stretch and mild flavor. Provolone, Italian blends, and even cheddar also melt well and add delicious flavor.
Can I make meatball sliders ahead of time?
Absolutely. Assemble the sliders up to a day in advance, refrigerate, and bake just before serving. This makes them ideal for parties and gatherings.
How do you reheat sliders without drying them out?
Cover them with foil and warm in the oven at a low temperature. This keeps the bread soft while reheating the filling evenly.
Can these be made in an air fryer?
Yes, air fryers work well for reheating or baking smaller batches. Just be sure not to overcrowd the basket.
What’s the best sauce for meatball sliders?
Traditional marinara is always a hit, but BBQ, pesto, Buffalo, or creamy sauces can create fun variations depending on your flavor preference.
Conclusion
These Easy Pull-Apart Meatball Sliders combine convenience, comfort, and irresistible flavor in one simple dish. With soft rolls, saucy meatballs, and gooey melted cheese, they’re guaranteed to disappear quickly at any gathering.
The flexibility of this recipe makes it even better — you can customize sauces, cheeses, and meatball options to suit your taste or dietary needs. Plus, the make-ahead and freezer-friendly nature means you’ll always have a reliable crowd-pleaser on hand.
Whether you’re hosting a party, feeding a family, or just craving cheesy comfort food, these sliders deliver every single time.
Easy Pull-Apart Meatball Sliders (Cheesy, Crowd-Pleasing & Ready in 30 Minutes)
Equipment
- Baking dish (9x13 recommended)
- Serrated knife
- Small mixing bowl
- Pastry brush
- Aluminum foil
- Oven
Ingredients
- 1 package Hawaiian rolls (12 count)
- 12 fully cooked meatballs (homemade or frozen, thawed)
- 1 cup marinara sauce
- 1 ½ cups shredded mozzarella cheese
- 4 tbsp butter, melted
- 2 cloves garlic, minced (or 1 tsp garlic powder)
- 2 tbsp grated Parmesan cheese
- 1 tsp Italian seasoning
- 1 tbsp chopped parsley (optional garnish)
Instructions
- Preheat oven to 350°F (175°C) and lightly grease a baking dish.
- Slice the rolls horizontally without separating them and place the bottom half into the baking dish.
- Spread marinara evenly across the bottom layer.
- Arrange meatballs over the sauce and spoon a little extra sauce on top.
- Sprinkle mozzarella cheese evenly over the meatballs.
- Place the top half of the rolls over the cheese.
- In a bowl, mix melted butter, garlic, Parmesan, and Italian seasoning.
- Brush the garlic butter generously over the tops of the rolls.
- Cover loosely with foil and bake for 15 minutes.
- Remove foil and bake an additional 5 minutes until tops are golden.
- Rest for 5 minutes, garnish with parsley, and pull apart to serve.
Notes
- Swap marinara for BBQ or pesto
- Try provolone, cheddar, or pepper jack cheese
- Use turkey or plant-based meatballs
#meatballsliders