Why You’ll Love This Easy Espresso Chocolate Mousse
If you love rich chocolate and bold espresso, this Easy Espresso Chocolate Mousse is made for you. It’s the perfect marriage of creamy indulgence and a subtle caffeine kick — all without complicated steps or hours in the kitchen.
What makes this mousse stand out is its effortless elegance. Silky, airy, and deeply flavorful, it delivers a sophisticated dessert experience that’s surprisingly easy to prepare. Whether you’re impressing guests or treating yourself after a long day, this mousse brings both comfort and a touch of luxury.
In this article, you’ll discover the secrets to balancing intense espresso with luscious chocolate, how to choose the best ingredients, and simple step-by-step instructions that anyone can follow. Get ready to whip up a dessert that’s as quick as it is decadent.
What Makes Espresso and Chocolate a Perfect Pair?
Espresso and chocolate have a natural chemistry that makes desserts unforgettable. The bitter, roasted notes of espresso perfectly complement the sweetness and richness of chocolate, enhancing its depth without overpowering. This flavor synergy adds complexity and a delightful balance to the mousse.
The caffeine in espresso not only adds a gentle energy boost but also sharpens the chocolate’s flavor, making each bite more vibrant. For those curious, the caffeine content in this mousse is mild—enough to awaken your palate without overwhelming your senses.
Together, espresso and chocolate create a harmonious duo that feels both indulgent and sophisticated, making this mousse a standout dessert for any occasion.
Ingredient Insights: Choosing the Best Components
Chocolate: The quality of your chocolate is crucial. Aim for dark chocolate with 60–70% cocoa content for the perfect balance of bitterness and sweetness. Avoid lower-quality chocolate or baking bars that contain additives, as they can affect texture and flavor.
Espresso: Freshly brewed espresso is ideal for the richest flavor. If you don’t have an espresso machine, strong brewed coffee or instant espresso powder can work in a pinch. Make sure your espresso is cooled before mixing to avoid melting the chocolate prematurely.
Heavy Cream: Use heavy whipping cream with at least 36% fat to achieve the mousse’s characteristic light and fluffy texture. Cold cream whips better and holds its shape longer.
Eggs: Traditional mousse recipes often use raw egg yolks for richness and structure. If you prefer to avoid raw eggs, consider pasteurized eggs or recipes that use whipped aquafaba or other egg alternatives. Always follow safe handling practices.
Sugar: Granulated sugar dissolves well during chocolate melting, but powdered sugar can add extra smoothness. Adjust sweetness to your taste.
Flavor Boosters: Vanilla extract enhances depth, while a pinch of salt balances sweetness. For a boozy twist, add coffee liqueurs like Kahlua or Baileys.
Choosing fresh, high-quality ingredients will make all the difference in creating a mousse that’s smooth, flavorful, and truly decadent.
Step-by-Step Easy Espresso Chocolate Mousse Recipe
Start by gently melting your chopped dark chocolate using a double boiler or microwave in short bursts. Stir frequently to prevent burning and ensure a smooth texture.
Next, brew your espresso and let it cool completely. Slowly stir the espresso into the melted chocolate until fully combined. Set this mixture aside to cool slightly but not harden.
In a chilled mixing bowl, whip the heavy cream to soft peaks. The cream should be fluffy yet still hold gentle peaks when the whisk is lifted.
If your recipe uses eggs, whisk the yolks separately until pale and creamy. Gently fold the egg yolks into the cooled chocolate-espresso mixture.
Carefully fold one-third of the whipped cream into the chocolate mixture to lighten it, then fold in the remaining cream in two additions. Use gentle folding motions to keep the mousse airy and prevent deflating the cream.
Bold Tip: Use room temperature eggs for easier blending and a smoother mousse texture.
Pour the mousse into serving dishes and chill for at least 2 hours or until set.
If the mousse looks grainy or separates, it may be due to overheating the chocolate or over-whipping the cream. Always melt chocolate slowly and fold ingredients gently to maintain a silky texture.
Variations and Flavor Enhancements
Elevate your mousse by adding a splash of coffee liqueur like Kahlua or Baileys for a boozy, decadent twist. For a more intense espresso flavor, add a teaspoon of espresso powder along with brewed coffee.
For dairy-free or vegan options, swap heavy cream with coconut cream whipped to soft peaks, and replace eggs with whipped aquafaba (chickpea water) for a similar airy texture. Avocado-based mousses are another creamy alternative, though with a different flavor profile.
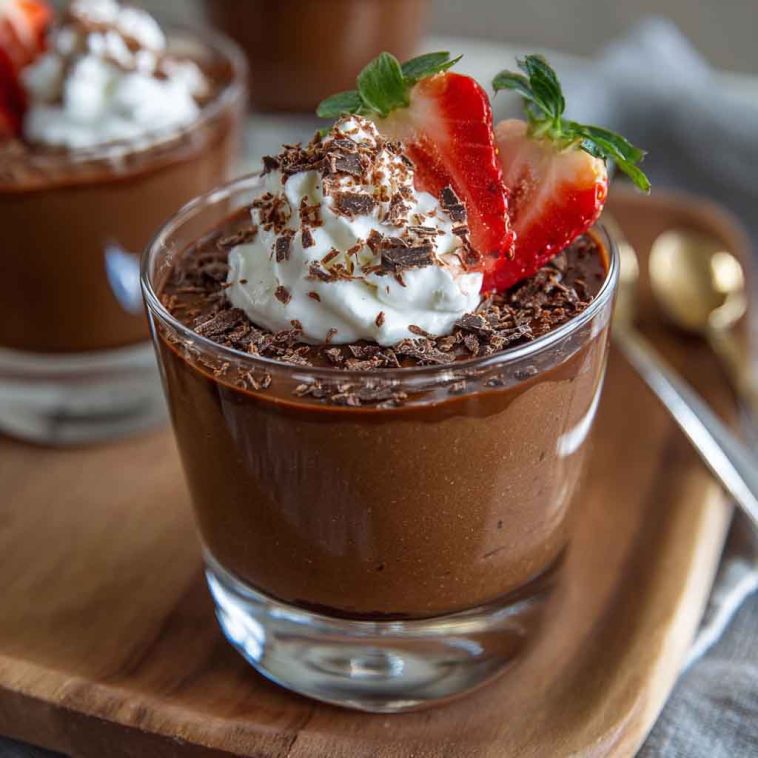
Top your mousse with freshly whipped cream, chocolate shavings, or a dusting of cocoa powder for elegant presentation. Adjust sweetness and caffeine strength to suit your taste by tweaking sugar and espresso amounts.
How to Serve and Store Your Espresso Chocolate Mousse
Serve your espresso chocolate mousse in elegant glasses or ramekins for an impressive presentation. Pair it with crunchy biscotti, fresh berries, or a sprig of mint to add texture and freshness.
Chilling is key — allow the mousse to set in the refrigerator for at least 2 hours, preferably longer, so it develops a silky, firm texture.
Store leftovers in an airtight container in the fridge for up to 3 days. Mousse is best enjoyed fresh but can be frozen for up to a month. To freeze, cover tightly and thaw overnight in the refrigerator before serving.
When serving after freezing, gently stir to restore creaminess if needed. Avoid refreezing to maintain quality.
Troubleshooting Common Espresso Chocolate Mousse Issues
Even the best recipes can run into a few hiccups. Here’s how to avoid common problems and fix them if they occur:
-
Grainy Texture: This often happens if chocolate is overheated or cooled too quickly. Always melt chocolate gently over a double boiler or in short microwave bursts, stirring frequently. Let melted chocolate cool slightly before mixing with other ingredients.
-
Mousse Too Runny: Make sure your heavy cream is cold and whipped to soft peaks—not over-whipped or under-whipped. If eggs are used, ensure they are whisked properly to add structure. Chilling time is crucial—give mousse at least 2 hours to set.
-
Separation or Curds: Folding the whipped cream or egg yolks too aggressively can break the mousse’s airy structure. Use gentle folding motions with a spatula, scraping the sides and bottom carefully to combine ingredients evenly.
-
Overly Bitter Flavor: If espresso or dark chocolate feels too intense, balance it by adjusting sugar levels or adding a splash of vanilla extract or cream to soften the bitterness.
Expert Tips for Making Perfect Espresso Chocolate Mousse
-
Use High-Quality Ingredients: Freshly brewed espresso and premium dark chocolate elevate the flavor immensely. Avoid pre-ground instant coffee or low-quality chocolate.
-
Temperature Control: Let melted chocolate cool to just above room temperature before combining to avoid seizing or curdling.
-
Whip Cream Correctly: Chill your bowl and whisk for the best whipping results. Stop whipping as soon as soft peaks form to keep mousse light.
-
Fold Gently: Use a rubber spatula and fold in thirds, turning the bowl as you mix. This technique preserves air and volume.
-
Patience with Chilling: Don’t rush the chilling process—properly set mousse develops a better texture and flavor melding.
-
Room Temperature Eggs: If using eggs, allow them to come to room temperature before whisking for smoother blending.
Creative Variations to Try
-
Mocha Mousse: Add cocoa powder to deepen chocolate flavor and intensify coffee notes.
-
Spiced Twist: Incorporate cinnamon, nutmeg, or a dash of chili powder for warmth and subtle heat.
-
Nutty Addition: Top with toasted hazelnuts, almonds, or pistachios for crunch and contrast.
-
Vegan Version: Use whipped coconut cream and melted vegan chocolate. Fold in whipped aquafaba for fluffiness.
-
Layered Dessert: Create parfaits by layering mousse with crushed biscotti, whipped cream, and fresh raspberries.
How to Serve Your Espresso Chocolate Mousse
Presentation matters when serving mousse. Use elegant stemmed glasses, small ramekins, or mini mason jars for a classy look. Garnish with chocolate shavings, cocoa powder, or a sprig of fresh mint.
Pair mousse with crunchy biscotti, fresh berries like raspberries or strawberries, or a dollop of lightly sweetened whipped cream to add texture and brighten flavors.
For special occasions, drizzle with caramel or chocolate sauce. Serve chilled, straight from the refrigerator, to keep the mousse perfectly set and refreshing.
Storage Tips for Espresso Chocolate Mousse
Store mousse covered tightly with plastic wrap or in airtight containers in the refrigerator for up to 3 days. This keeps the texture fresh and prevents the mousse from absorbing other fridge odors.
For longer storage, mousse can be frozen for up to a month. Freeze in airtight containers or covered ramekins. Thaw in the refrigerator overnight before serving.
Avoid repeated freeze-thaw cycles as they can cause texture changes. When ready to serve after thawing, gently stir the mousse to restore creaminess if needed.

Easy Espresso Chocolate Mousse
Equipment
- Double boiler or microwave-safe bowl
- Mixing bowls
- Electric mixer or whisk
- Rubber spatula
- Serving glasses or ramekins
- Measuring Cups and Spoons
Ingredients
- 6 oz (170 g) dark chocolate (60–70% cocoa), chopped
- 1/2 cup (120 ml) freshly brewed espresso, cooled
- 1 1/2 cups (360 ml) heavy cream, cold
- 3 large egg yolks, room temperature (optional; for richness and structure)
- 1/4 cup (50 g) granulated sugar (or powdered sugar)
- 1 tsp vanilla extract
- Pinch of salt
- Optional: 1–2 tbsp coffee liqueur (Kahlua or Baileys)
Instructions
- Melt chocolate: Using a double boiler or microwave (in 20-second bursts), gently melt chopped chocolate until smooth. Stir frequently. Set aside to cool slightly.
- Add espresso: Stir cooled espresso and optional coffee liqueur into melted chocolate until combined.
- Whip cream: In a chilled bowl, whip heavy cream with vanilla and salt until soft peaks form.
- Whisk egg yolks and sugar (if using): In a separate bowl, whisk yolks and sugar until pale and creamy. Fold yolks into chocolate mixture.
- Combine mixtures: Fold one-third of whipped cream into chocolate mixture to lighten it. Then gently fold in the remaining whipped cream in two additions until smooth and airy.
- Chill: Spoon mousse into serving dishes and refrigerate for at least 2 hours or until set.
- Serve: Garnish with whipped cream, chocolate shavings, or cocoa powder as desired.
Notes
- For a vegan version, replace heavy cream with whipped coconut cream and use aquafaba instead of eggs.
- Use room temperature eggs for easier blending and smoother texture.
- Don’t overwhip cream; stop at soft peaks for best mousse volume.
- Adjust sweetness to taste—add more sugar if desired.
- Store leftovers covered in the fridge up to 3 days or freeze for longer storage.
- Avoid overheating chocolate to prevent graininess.

