Why Chicken Kiev Is a Timeless Favorite
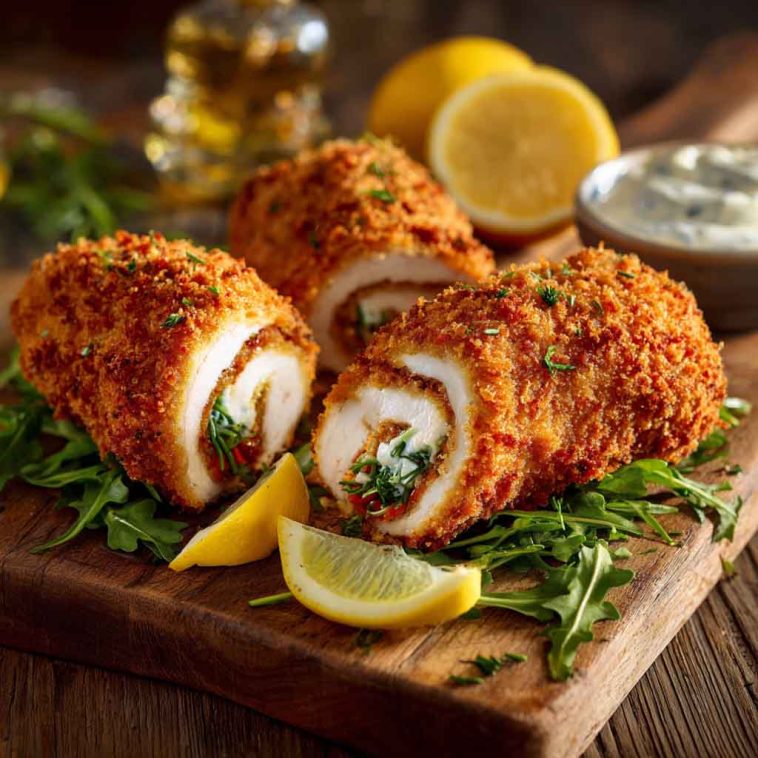
Chicken Kiev is a classic dish that has won hearts across generations with its combination of tender chicken, rich garlic herb butter, and a golden, crispy coating. Each bite delivers a burst of flavorful butter that melts inside the chicken, creating a comforting and indulgent experience. It’s a dish that impresses at weeknight dinners, family gatherings, or special occasions, offering both visual appeal and memorable taste.
The beauty of Chicken Kiev lies in its balance of textures: a crisp exterior that gives way to juicy, flavorful chicken and a molten center of garlic-infused butter. While it may seem sophisticated, with proper preparation it’s an approachable recipe that home cooks can confidently master. Serve it alongside roasted vegetables, mashed potatoes, or a fresh green salad for a complete, elegant meal that feels restaurant-worthy but homemade. Its timeless appeal makes Chicken Kiev a favorite for anyone seeking a classic, flavorful comfort dish.
History & Origins of Chicken Kiev
Chicken Kiev traces its origins to Eastern Europe, particularly Ukraine and Russia, where variations of stuffed and breaded poultry have long been enjoyed. The dish rose to prominence in the early 20th century and eventually became a celebrated classic in international cuisine. Though the exact origin story is debated—some attribute it to French-influenced Russian chefs—the combination of tender chicken and herb-infused butter quickly captured diners’ imaginations.
Chicken Kiev gained popularity in restaurants across Europe and later in North America, becoming a symbol of elegant home cooking and fine dining alike. Its international appeal stems from its simple yet indulgent concept: a juicy chicken breast encasing melted, flavorful butter, coated in a crisp breadcrumb shell. Today, Chicken Kiev remains a beloved dish in both restaurant menus and home kitchens, celebrated for its rich flavor, dramatic presentation, and comforting, buttery interior that delights both kids and adults.
Ingredient Highlights & Flavor Essentials
Perfect Chicken Kiev begins with high-quality ingredients and attention to preparation:
Chicken Breasts: Use boneless, skinless chicken breasts for tender, juicy results. Evenly sized breasts help ensure uniform cooking. Flattening the chicken with a meat mallet or rolling pin creates an ideal canvas for the butter filling.
Garlic Herb Butter: This is the star of the dish. Soften butter slightly, then mix with minced garlic, fresh parsley, dill, or other preferred herbs. Shape the mixture into small logs or cylinders and chill until firm. Chilled butter prevents leakage during cooking and ensures a clean, molten center.
Coating: Achieve the signature crispiness with a traditional three-step coating: flour, egg wash, and breadcrumbs. Season each layer with salt, pepper, and optional paprika to enhance flavor. Panko breadcrumbs provide an extra-crispy texture.
Optional Herbs and Seasonings: Fresh herbs like parsley or dill can be mixed into the butter or sprinkled atop finished chicken. Paprika or black pepper adds a subtle depth to the coating.
Pro Tip: Chilling the butter logs and wrapping them in plastic wrap ensures they maintain shape during stuffing. Secure the chicken well with toothpicks or kitchen twine to avoid leaks.
These carefully chosen ingredients and techniques work together to create the signature combination of crisp exterior, juicy chicken, and luscious garlic herb butter that makes Chicken Kiev unforgettable.
Tools & Prep Essentials
Having the right tools simplifies preparation and ensures consistent results:
-
Baking dish or ovenproof skillet for finishing in the oven.
-
Skillet or frying pan for shallow frying to golden perfection.
-
Mixing bowls for coating and butter preparation.
-
Food thermometer to ensure chicken is cooked safely to 165°F (74°C).
-
Plastic wrap for shaping and chilling garlic herb butter logs.
-
Tongs and slotted spoon for handling chicken during frying or transferring to a baking dish.
Optional tools include a meat mallet for flattening chicken and a pastry brush to lightly oil the coating. Proper preparation and tools prevent butter leakage and help achieve a perfectly crisp crust.
Step-by-Step Easy Chicken Kiev Instructions
Step 1: Flatten Chicken Breasts
Place chicken breasts between two sheets of plastic wrap. Use a meat mallet or rolling pin to gently pound to an even thickness of about 1/2 inch. This ensures even cooking and makes it easier to encase the butter.
Step 2: Prepare Garlic Herb Butter
Soften butter at room temperature and combine with minced garlic, parsley, dill, salt, and pepper. Form the butter into small logs, about 1–1.5 inches long, and wrap in plastic wrap. Chill in the refrigerator for at least 30 minutes until firm.
Step 3: Stuff Chicken
Place a chilled butter log in the center of each flattened chicken breast. Fold edges over the butter and roll or fold the chicken securely. Use toothpicks to seal the seams and prevent butter from escaping during cooking.
Step 4: Coat Chicken
Set up a breading station with three shallow bowls: flour, beaten eggs, and breadcrumbs seasoned with salt, pepper, and paprika. Dredge each stuffed chicken breast first in flour, then dip in egg, and finally coat evenly with breadcrumbs or panko. Press gently to adhere the coating.
Step 5: Cook Chicken
Option 1 – Shallow Fry: Heat oil in a skillet over medium heat. Fry chicken 2–3 minutes per side until golden brown. Transfer to a baking dish to finish in a preheated 350°F (175°C) oven for 10–12 minutes until internal temperature reaches 165°F (74°C).
Option 2 – Oven Bake: Place coated chicken in a greased baking dish, drizzle lightly with oil, and bake at 375°F (190°C) for 25–30 minutes until golden and cooked through.
Step 6: Finish & Serve
Remove toothpicks carefully. Let chicken rest 5 minutes to allow butter to settle. Sprinkle with fresh herbs if desired. Serve with sides like roasted vegetables, mashed potatoes, or a crisp salad.
Expert Tip: Resting before slicing prevents the garlic herb butter from spilling out and ensures each bite has a perfect combination of juicy chicken and molten filling.
Flavor Variations & Creative Twists
Chicken Kiev is a versatile dish that can be customized to suit different tastes or elevate presentation:
Cheese-Stuffed Variation: Add a thin strip of mozzarella or Gruyère alongside the garlic herb butter for a melty, cheesy center.
Herb Infusions: Experiment with fresh thyme, tarragon, or chives in the butter for subtle flavor layers. These herbs pair beautifully with chicken and add aromatic depth.
Spicy Twist: Incorporate a pinch of cayenne or smoked paprika into the butter mixture for a gentle heat that balances richness.
Panko or Nut Crust: Swap standard breadcrumbs for panko for extra crunch, or finely chopped nuts like almonds or hazelnuts for added texture.
Oven-Only Method: For a lighter version, skip frying and bake fully in the oven. Drizzle a little olive oil over the coated chicken to achieve a golden exterior.
These variations allow home cooks to adapt Chicken Kiev to seasonal ingredients, dietary preferences, or special occasions, keeping this classic dish exciting and customizable.
Serving Suggestions & Pairings
Chicken Kiev shines alongside a variety of sides. Roasted or mashed potatoes, creamy polenta, or buttered noodles complement the rich, buttery filling. Pair with steamed or roasted vegetables like green beans, asparagus, or carrots for color and freshness.
For sauces, a simple lemon butter or white wine reduction adds brightness, while a light sprinkle of fresh parsley enhances presentation. Chicken Kiev is ideal for elegant weeknight dinners, family meals, or special occasions, and its dramatic, buttery center makes it visually impressive for guests.
Serve with a crisp green salad and a chilled white wine, such as Sauvignon Blanc or Chardonnay, for a restaurant-quality experience at home. Leftovers can be repurposed in sandwiches or sliced cold for salads, though freshly baked is always best.
Storage & Make-Ahead Tips
Cooked Chicken Kiev can be stored in an airtight container in the refrigerator for 2–3 days. Reheat gently in a 350°F (175°C) oven for 10–12 minutes to restore crispiness without overcooking the chicken or melting out the butter.
For make-ahead preparation, assemble the stuffed and breaded chicken, then refrigerate or freeze before cooking. Chill in the fridge for up to 24 hours or freeze for up to 1 month. If freezing, wrap each portion individually to prevent freezer burn. Bake from frozen, adding extra cooking time as needed.
Avoid microwaving, which can cause the butter to leak prematurely and the coating to become soggy. Proper storage ensures Chicken Kiev maintains its signature buttery center and crisp exterior when served.
Expert Tips for the Best Chicken Kiev
-
Chill the Butter: Ensure garlic herb butter is firm to prevent it from leaking during cooking.
-
Flatten Chicken Evenly: Even thickness guarantees consistent cooking and prevents overcooking thinner areas.
-
Seal Properly: Use toothpicks or kitchen twine to secure the seams and keep butter enclosed.
-
Breading Technique: Flour, egg, and breadcrumb layers should be applied evenly to achieve a golden, crispy crust.
-
Temperature Matters: Preheat the oven or skillet to maintain consistent cooking and avoid under- or overcooked chicken.
-
Rest Before Slicing: Let the chicken rest 5 minutes after cooking so the buttery filling remains inside and juicy.
-
Optional Enhancements: Lightly sprinkle fresh herbs or a squeeze of lemon for brightness before serving.
Following these tips ensures perfectly cooked, flavorful Chicken Kiev every time.
FAQs – People Also Ask
Can I use chicken thighs instead of breasts?
Yes, boneless, skinless thighs can be used. Flatten them gently, but cooking time may need slight adjustment, as thighs are thicker and more forgiving than breasts.
Can Chicken Kiev be baked instead of fried?
Absolutely. Bake in a preheated oven at 375°F (190°C) until golden and cooked through. Drizzle lightly with oil to enhance browning.
How do I prevent butter from leaking?
Chill butter logs before stuffing and seal the chicken tightly with toothpicks. Avoid overfilling and do not overheat the oil during frying.
Can Chicken Kiev be prepared ahead of time?
Yes. Assemble and bread the chicken, then refrigerate or freeze until ready to cook. Bake or fry just before serving.
What is the best way to serve Chicken Kiev?
Serve warm with sides such as mashed potatoes, roasted vegetables, or a crisp salad. Fresh herbs and a lemon wedge add flavor and visual appeal.
Can I make a lighter version?
Yes, bake instead of frying and use minimal oil. Oven-baked Chicken Kiev still delivers a tender chicken breast with a flavorful butter filling.
Conclusion & Reader Invitation
Chicken Kiev is a timeless dish that combines tender chicken with a rich, garlic herb butter center and a golden, crisp crust. Experiment with herbs, spices, or coatings, and share your creations. Perfect for family meals or special occasions, it’s a classic comfort dish worth mastering at home.

Easy Chicken Kiev – Juicy, Crispy & Flavor-Packed
Equipment
- Baking dish or ovenproof skillet
- Skillet or frying pan for shallow frying
- Mixing bowls
- Plastic wrap for butter shaping
- Meat mallet (for flattening chicken)
- Whisk and spatula
- Tongs and slotted spoon
- Food thermometer
Ingredients
For the Garlic Herb Butter:
- 1/2 cup (1 stick) unsalted butter, softened
- 2 cloves garlic, minced
- 2 tbsp fresh parsley, chopped
- 1 tbsp fresh dill, chopped (optional)
- Salt and pepper, to taste
For the Chicken:
- 4 boneless, skinless chicken breasts
- Salt and pepper, to taste
- 1/2 cup all-purpose flour
- 2 large eggs, beaten
- 1 cup breadcrumbs or panko
- Optional: paprika for seasoning breadcrumbs
- Oil for frying or drizzling if baking
Instructions
- Prepare Garlic Herb Butter: Mix softened butter with garlic, parsley, dill, salt, and pepper. Shape into small logs, wrap in plastic wrap, and chill for at least 30 minutes.
- Flatten Chicken: Place chicken breasts between plastic wrap and gently pound to about 1/2-inch thickness using a meat mallet.
- Stuff Chicken: Place a butter log in the center of each breast. Fold and roll chicken to encase butter completely, securing seams with toothpicks.
- Coat Chicken: Set up a breading station: flour, beaten eggs, and seasoned breadcrumbs. Dredge each breast in flour, dip in egg, then coat with breadcrumbs.
Cook Chicken:
- Fry Option: Heat oil over medium heat, fry 2–3 minutes per side until golden. Transfer to a baking dish and finish in a 350°F (175°C) oven for 10–12 minutes until internal temperature reaches 165°F (74°C).
- Bake Option: Place coated chicken in a greased baking dish, drizzle lightly with oil, and bake at 375°F (190°C) for 25–30 minutes until golden and cooked through.
- Rest & Serve: Remove toothpicks, let chicken rest 5 minutes, then garnish with fresh herbs. Serve with mashed potatoes, roasted vegetables, or salad.
Notes
- Butter Logs: Chilling butter logs is essential to prevent leaks during cooking.
- Even Flattening: Ensures consistent cooking and prevents overcooked edges.
- Breadcrumb Options: Panko adds extra crunch; paprika or herbs enhance flavor.
- Make-Ahead: Assemble and refrigerate or freeze before cooking. Bake or fry fresh.
- Optional Variations: Add mozzarella or Gruyère alongside garlic butter for a cheesy center, or incorporate cayenne for mild heat.
- Avoid Microwaving: Reheating in the oven preserves crispy coating and buttery filling.