Why Pancake Poppers Are the New Breakfast Hero
Breakfast has a new star, and it comes in the form of bite-sized, fluffy delights known as pancake poppers. These little gems are warm, fun, and irresistibly family-friendly, making mornings brighter and easier. Imagine the joy of pancakes without the flipping, the mess, or the wait—just pop them out of the oven and enjoy.
So why are pancake poppers trending? The answer lies in their convenience. With quick prep and grab-and-go appeal, they fit seamlessly into busy lifestyles. Parents love them because kids can enjoy a wholesome breakfast without fuss, and adults appreciate that they can be packed for work or eaten on the run. They’re also endlessly customizable, which means you can tailor them to sweet cravings, savory bites, or healthy add-ins.
In this article, you’ll discover everything you need to know about pancake poppers: what they are, how they became popular, their flavor and texture profile, the essential equipment you’ll need, ingredient highlights with smart substitutions, and a step-by-step guide to making them perfectly every time. By the end, you’ll be ready to embrace pancake poppers as your new breakfast hero.
What Are Pancake Poppers?
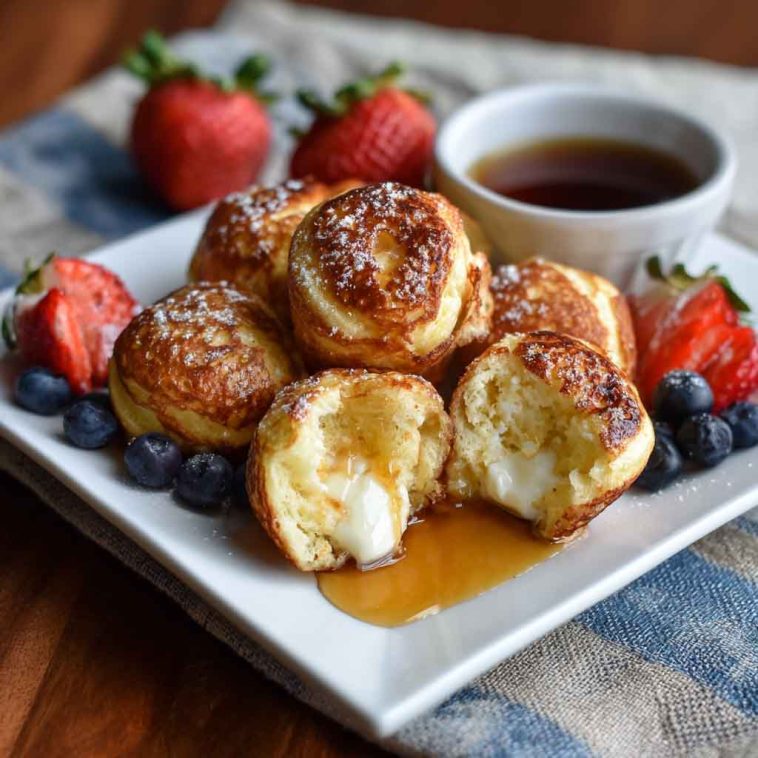
Pancake poppers are mini baked pancakes made in muffin tins, offering all the flavor of traditional pancakes in a fun, bite-sized form. Instead of standing over a griddle flipping one pancake at a time, you simply pour the batter into muffin cups and let the oven do the work.
The difference from regular pancakes is both in shape and convenience. While pancakes are flat and require constant attention, poppers are round, fluffy, and hands-off once they’re in the oven. They’re also easier to portion and serve, making them ideal for families or gatherings.
For busy mornings, pancake poppers are a lifesaver. You can bake a batch ahead of time, store them in the fridge or freezer, and reheat when needed. They’re portable, mess-free, and versatile enough to satisfy both sweet and savory cravings. In short, they’re the perfect modern twist on a breakfast classic.
The Origin & Popularity of Pancake Poppers
Pancake poppers are inspired by the timeless tradition of pancakes but adapted for modern convenience. The idea of baking pancake batter in muffin tins emerged as a way to simplify breakfast prep while still delivering the same beloved flavors.
Their rise in popularity can be traced to social media and food blogs, where creative home cooks began sharing recipes and variations. Platforms like Instagram and TikTok showcased their bite-sized charm, sparking curiosity and enthusiasm among food lovers.
Families adore pancake poppers because they’re easy to make, fun to eat, and customizable for picky eaters. Brunch enthusiasts love them as a playful addition to spreads, offering variety without extra effort. Whether served plain, dusted with powdered sugar, or filled with fruit and chocolate, pancake poppers have quickly become a breakfast trend that blends tradition with innovation.
Flavor & Texture Profile
The magic of pancake poppers lies in their irresistible flavor and texture. Inside, they’re soft and fluffy, with a tender crumb that melts in your mouth. On the outside, they bake to a golden finish, offering just the right amount of crispness for balance.
Sweet variations are the most popular, often enhanced with vanilla, cinnamon, or nutmeg. Add-ins like blueberries, chocolate chips, or even a drizzle of maple syrup elevate them into indulgent little bites. On the savory side, you can fold in cheese, herbs, or bacon bits, creating a hearty option that pairs beautifully with eggs or soup.
Compared to muffins, pancake poppers are lighter and less dense, with a flavor closer to classic pancakes. They also differ from mini donuts, which are sweeter and often fried. Poppers strike the perfect middle ground: fluffy, flavorful, and versatile. Their adaptability makes them suitable for breakfast, brunch, or even snacks, ensuring they appeal to every palate.
Essential Equipment
Making pancake poppers doesn’t require fancy tools, but a few essentials are key. A standard muffin tin is the foundation, giving the batter its signature round shape. Mixing bowls, a whisk, and measuring cups are necessary for preparing the batter with accuracy and ease.
Optional tools can make the process smoother. Silicone liners help prevent sticking and make cleanup effortless, while a piping bag allows for neat and even filling of the muffin cups.
One crucial tip: always use non-stick spray or butter to coat the muffin tin before adding batter. This ensures the poppers release easily after baking and keeps their shape intact. With just these simple tools, you’ll be ready to whip up a batch of pancake poppers that look as good as they taste.
Ingredient Highlights & Smart Substitutions
At their core, pancake poppers rely on the basics: flour, eggs, milk, and baking powder. These ingredients create the fluffy texture and light rise that make them so appealing.
For those with dietary preferences, substitutions are easy. Almond flour or oat flour can replace all-purpose flour for gluten-free versions. Oat milk, almond milk, or soy milk can stand in for dairy, while flax eggs or chia eggs work well as plant-based alternatives.
Flavor boosters take poppers to the next level. Vanilla extract adds warmth, cinnamon and nutmeg bring cozy spice, and a touch of sugar balances the flavors.
Add-ins are where creativity shines. Blueberries, strawberries, or raspberries add bursts of freshness. Chocolate chips or chunks create indulgence, while savory options like shredded cheese, herbs, or bacon bits make them hearty.
The key to success is balancing wet and dry ratios. Too much liquid can make them dense, while too little can dry them out. Aim for a smooth, pourable batter that holds its shape when spooned into the muffin tin. With smart substitutions and creative add-ins, pancake poppers can be tailored to any taste or dietary need.
Step-by-Step Cooking Process
Making pancake poppers is simple but requires a few careful steps to ensure perfect results.
Step 1: Prepare the dry ingredients. In a mixing bowl, whisk together flour, baking powder, sugar, and any spices like cinnamon or nutmeg.
Step 2: Mix the wet ingredients. In a separate bowl, combine milk, eggs, and vanilla extract. Whisk until smooth.
Step 3: Combine gently. Pour the wet mixture into the dry ingredients and stir until just combined. Avoid overmixing, as this can make the poppers tough. The batter should be smooth but slightly thick.
Step 4: Fill the muffin tin. Grease the tin with non-stick spray or butter. Spoon or pipe the batter evenly into each cup, filling about two-thirds full. Add any desired mix-ins like fruit or chocolate chips at this stage.
Step 5: Bake. Place the tin in a preheated oven at 350°F (175°C). Bake for 12–15 minutes, or until the poppers are golden brown and a toothpick inserted in the center comes out clean.
Step 6: Cool and serve. Allow the poppers to cool for a few minutes before removing them from the tin. Serve warm with syrup, powdered sugar, or a dollop of yogurt.
Expert tip: Reserve a small amount of batter to test your oven’s temperature. Bake one popper first to ensure even cooking before committing the whole batch.
With these steps, you’ll have a tray of fluffy, golden pancake poppers ready to delight your family or guests.

Easy Breakfast Pancake Poppers Recipe | Quick Morning Snack
Equipment
- Muffin tin (12 or 24 cups)
- Mixing bowls
- Whisk
- Measuring cups & spoons
- Non-stick spray or butter
- Optional: silicone liners, piping bag
Ingredients
- 1 cup all-purpose flour
- 1 tbsp sugar
- 1 tsp baking powder
- ½ tsp baking soda
- ¼ tsp salt
- 1 cup milk (or oat/almond milk)
- 1 large egg (or flax egg)
- 2 tbsp melted butter (or coconut oil)
- 1 tsp vanilla extract
- Optional add-ins: blueberries, chocolate chips, bacon bits, shredded cheese
Instructions
- Preheat oven to 350°F (175°C). Grease muffin tin with non-stick spray or butter.
- In a bowl, whisk flour, sugar, baking powder, baking soda, and salt.
- In another bowl, whisk milk, egg, melted butter, and vanilla.
- Combine wet and dry ingredients gently—do not overmix.
- Spoon batter into muffin cups, filling about ⅔ full. Add desired mix-ins.
- Bake for 12–15 minutes, until golden and a toothpick comes out clean.
- Cool slightly, then serve warm with syrup, powdered sugar, or yogurt dip.
Notes
- Storage: Keep in airtight container for 3–4 days or freeze up to 2 months.
- Reheating: Use oven or air fryer for best texture; avoid microwaving.
- Variations: Try Nutella centers, pumpkin spice, or savory ham & cheese.
- Tip: Always grease muffin tins well to prevent sticking.