Why Chocolate Eclair Cake Is a Crowd-Pleaser
There’s something utterly comforting about a dessert that combines creamy custard, fluffy whipped topping, and rich chocolate glaze — and that’s exactly what makes Chocolate Eclair Cake so irresistible. This no-bake layered delight evokes nostalgia with its luscious vanilla and chocolate combo, reminding many of classic family gatherings and celebrations. Whether you’re bringing it to a potluck or simply indulging on a cozy weeknight, it’s the perfect blend of easy and elegant. The best part? No oven is needed, making it a foolproof treat that anyone can whip up in no time. Get ready to discover a dessert that’s as simple to assemble as it is delicious to savor — classic flavors everyone loves, layered into a crowd-pleasing masterpiece.
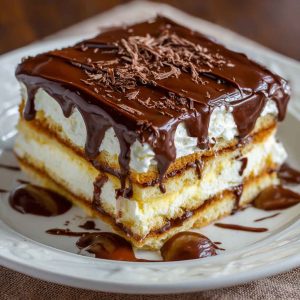
What Is Chocolate Eclair Cake?
Chocolate Eclair Cake is a no-bake dessert inspired by the French éclair, but instead of delicate pastry, it uses layers of graham crackers or ladyfingers to create a simple yet decadent treat. This American adaptation swaps the labor-intensive pastry shell for an easier approach, layering creamy vanilla pudding or custard with whipped topping and finishing it all off with a glossy chocolate glaze. The dessert captures the essence of the classic éclair’s creamy filling and chocolate coating, but with less fuss and more comfort-food vibes. Its popularity comes from being a convenient shortcut to rich, elegant flavors without needing to master pastry techniques. Whether served at holidays, potlucks, or casual get-togethers, it’s a beloved favorite that satisfies chocolate and vanilla cravings alike.
Key Ingredients & Flavor Building Blocks
At the heart of Chocolate Eclair Cake is the creamy vanilla pudding layer. You can opt for instant vanilla pudding mix for convenience or whip up a homemade pastry cream for a more luxurious, custard-like texture. Both create that smooth, velvety base that contrasts beautifully with the other layers. Next up is the whipped topping — homemade whipped cream offers fresh flavor and a light texture, while store-bought options like Cool Whip provide a quick and stable alternative.
The chocolate glaze seals the deal. Choose between a quick ganache made by melting chocolate with cream, a simple chocolate frosting, or even a melt-and-pour chocolate glaze for ease. Each brings its own depth and shine to the final layer.
For the base, graham crackers are classic for their sweet crunch and sturdy texture, but ladyfingers or even thin cookies can be swapped in to add different textures and flavors.
To boost flavor complexity, consider adding a pinch of espresso powder to the chocolate glaze for a mocha hint, a splash of vanilla extract to the pudding, or a subtle splash of rum or coffee liqueur for warmth and depth.
Pro Tip: Use room-temperature pudding when layering to avoid soggy crackers and achieve smooth, even layers.
Essential Tools & Equipment
To assemble this layered dessert, you’ll need a 9×13-inch baking dish or a glass casserole dish — perfect for those classic layers. Mixing bowls and a whisk are essential for preparing pudding and whipped topping. If making your own whipped cream, an electric mixer will save time and effort. A spatula or offset spatula is key for spreading layers evenly and smoothly without tearing the delicate crackers or ladyfingers. Precise measuring tools (cups and spoons) ensure balanced flavors. Finally, a sharp knife will help you slice neat, beautiful pieces after chilling.
Step-by-Step Recipe Instructions
Start by preparing your pudding as directed on the package or use a homemade custard recipe. Let it cool slightly but not fully set — this ensures it’s easy to spread and won’t soak the base too much.
Next, spread a layer of graham crackers evenly on the bottom of your baking dish. These act as the cake’s “crust,” providing a sweet crunch that contrasts with the creamy layers.
Spoon the vanilla pudding over the cracker layer and spread it gently and evenly using a spatula. Take care not to press too hard and break the crackers.
Add a layer of whipped topping over the pudding, smoothing it out delicately to maintain the airy texture.
Repeat the layering process — crackers, pudding, whipped topping — usually two to three times, finishing with a thick, even layer of whipped topping on top.
For the final flourish, pour your chocolate glaze over the top layer. Spread it evenly to cover the whipped cream completely, sealing in the layers below and adding a rich chocolate finish.
Chill the assembled cake in the refrigerator for at least 4 hours, preferably overnight, to allow the layers to meld and soften into that signature eclair-like texture.
When ready to serve, use a serrated or sharp knife for clean cuts. You can garnish with fresh berries, a light dusting of powdered sugar, or even a drizzle of caramel sauce for an extra touch of indulgence.
Expert Tips for Best Results
Patience pays off — chilling overnight is key to letting the layers meld and soften, resulting in the perfect texture. For the chocolate glaze, always use high-quality chocolate; it makes a huge difference in flavor and gives the cake a beautiful shine.
If you prefer a lighter dessert, gently fold some whipped cream into the pudding before layering — this adds airiness without sacrificing creaminess.
Avoid soggy layers by ensuring your pudding isn’t too runny, and spread it promptly at room temperature.
An offset spatula is invaluable for creating even, smooth layers without breaking your crackers or ladyfingers.
For added texture and a flavor contrast, try sprinkling crushed nuts between the layers or finish the cake with a pinch of flaky sea salt on top — it enhances the chocolate beautifully.
Flavor Variations & Creative Twists
Chocolate Eclair Cake is wonderfully versatile, allowing you to customize flavors and textures to suit any occasion or palate. For peanut butter lovers, swirl creamy peanut butter into the vanilla pudding or ripple it through the chocolate glaze for a rich, nutty twist. Coffee fans can elevate the dessert by folding espresso powder into both the pudding and chocolate glaze, creating a mocha éclair cake that’s deeply indulgent.
Add a burst of freshness by layering in fresh or frozen raspberries between the pudding layers — their tartness perfectly balances the rich chocolate and custard. For those with dietary restrictions, gluten-free cookies or crackers make a seamless substitute without sacrificing texture.
Mini or individual servings presented in jars or ramekins offer an elegant and convenient option for parties or gifting. Vegan or dairy-free eaters can enjoy this dessert by using coconut milk-based pudding and dairy-free whipped toppings, preserving the creamy layers and luscious flavor.
For a decadent flair, try adding Nutella between layers or swirling it into the pudding to create a luscious chocolate-hazelnut éclair cake variation.
Serving Suggestions & Presentation Tips
Serve your Chocolate Eclair Cake chilled, garnished with fresh berries, a sprig of mint, or a dusting of powdered sugar for a simple yet elegant finish. It pairs beautifully with a cup of strong coffee, a glass of cold milk, or even dessert wines like a late harvest Riesling or Tawny Port.
For a special touch, pipe whipped topping decoratively on top or drizzle extra melted chocolate over the glaze to create eye-catching patterns. This dessert shines at potlucks, birthdays, or casual dinner parties, offering a no-fuss yet impressive centerpiece.
When slicing, chill the cake thoroughly to prevent sogginess and use a serrated or sharp knife, wiping it clean between cuts for perfect squares. Serve on pretty plates with a fork and a side of fresh fruit or a caramel drizzle for extra indulgence.
Storage, Make-Ahead & Freezing Tips
Store your Chocolate Eclair Cake tightly covered in the refrigerator for up to 4 days. It’s best enjoyed within the first 2 days to savor the freshest texture and flavor. If you want to freeze it, portion the cake into individual servings wrapped tightly in plastic wrap and foil. Thaw overnight in the fridge before serving for the best results.
Prepare the pudding and chocolate glaze ahead of time to streamline assembly on the day of serving. However, avoid freezing if your cake uses whipped cream topping, as freezing alters the texture and can cause separation or graininess.
For make-ahead convenience, assemble the cake the day before to allow the layers to meld and soften perfectly, giving you a stress-free dessert ready to impress.
Troubleshooting Common Issues
Cake too soggy? Use a firmer pudding mix or chill the assembled cake longer to let layers set properly. Ensure pudding isn’t overly runny before layering.
Chocolate glaze too thick or hard? Gently warm it and stir in a splash of cream to loosen consistency without losing shine.
Layers separating? Press each layer gently but firmly when assembling to encourage adhesion and prevent shifting.
Pudding too runny? Reduce liquid in the pudding recipe or thicken with a bit of cornstarch dissolved in cold water before cooking.
Cake not setting? Double-check pudding package instructions and ensure adequate chilling time; overnight refrigeration often works best.
If cracks or dryness appear in the glaze, adding a little butter or cream while warming can smooth it out.
FAQs – People Also Ask
Q1: Is chocolate éclair cake baked?
No. This is a no-bake dessert that relies on pudding and whipped layers setting in the refrigerator.
Q2: Can I make it ahead of time?
Absolutely! Assemble and chill the cake overnight for the best texture and flavor melding.
Q3: What can I use instead of graham crackers?
Ladyfingers, thin cookies, or gluten-free crackers work well as alternatives.
Q4: How do I make homemade pudding for this cake?
Use a custard base with milk, sugar, egg yolks, cornstarch, and vanilla, cooked gently until thickened, then cooled before layering.
Q5: Can I use whipped cream instead of Cool Whip?
Yes. Homemade whipped cream offers a fresher taste and lighter texture, but Cool Whip provides convenience and stability.
Q6: How long does it keep in the fridge?
Store in an airtight container for up to 4 days, best eaten within 2 days for optimal freshness.
Q7: Can this dessert be frozen?
Yes, but only in individual portions wrapped tightly. Avoid freezing if using whipped cream topping, as texture can suffer.
Q8: Is it possible to make a gluten-free version?
Definitely. Use gluten-free cookies or crackers in place of graham crackers to keep the dessert safe for gluten-sensitive guests.
Chocolate Eclair Cake
Equipment
- 9x13-inch glass or ceramic baking dish
- Mixing bowls
- Whisk or electric mixer
- Spatula
- Measuring Cups and Spoons
- Knife for slicing
Ingredients
- Instant vanilla pudding mix
- Cold milk (for pudding)
- Whipped topping (Cool Whip or homemade whipped cream)
- Graham crackers (or ladyfingers/cookies)
- Semi-sweet chocolate chips or chopped chocolate
- Heavy cream (for chocolate glaze)
- Optional: vanilla extract, espresso powder, crushed nuts, sea salt flakes
Instructions
- Prepare the pudding: Whisk instant vanilla pudding mix with cold milk according to package instructions. Let it thicken for a few minutes until set.
- Layer the base: Arrange a single layer of graham crackers on the bottom of the 9x13 dish, breaking pieces as needed to cover evenly.
- Add pudding layer: Spread half of the prepared vanilla pudding evenly over the cracker layer.
- Add whipped topping: Gently spread half of the whipped topping over the pudding layer.
- Repeat layers: Add another layer of graham crackers, then the remaining pudding and whipped topping layers.
- Prepare chocolate glaze: Heat heavy cream until just simmering, pour over chocolate chips, let sit 1 minute, then stir until smooth and glossy.
- Top cake: Pour chocolate glaze evenly over the top whipped layer and smooth gently.
- Chill: Refrigerate the cake for at least 4 hours, preferably overnight, allowing layers to meld and crackers to soften.
- Serve: Slice with a sharp knife, wiping between cuts for clean edges. Optionally garnish with crushed nuts or sea salt.
Notes
- Chilling is key: The cake tastes best after chilling overnight, which allows the graham crackers to soften and flavors to meld.
- Make it your own: Try adding espresso powder to pudding for mocha flavor or swirl peanut butter into the pudding layer for a nutty twist.
- Whipped topping options: For lighter texture, use homemade whipped cream instead of store-bought Cool Whip.
- Storage: Keep refrigerated and consume within 3–4 days for best freshness. Avoid freezing if using whipped cream topping.
- Gluten-free: Swap graham crackers with gluten-free cookies or crackers for a gluten-free version.
- Presentation tip: Use an offset spatula for smooth layers and drizzle extra melted chocolate on top for a bakery-style finish.