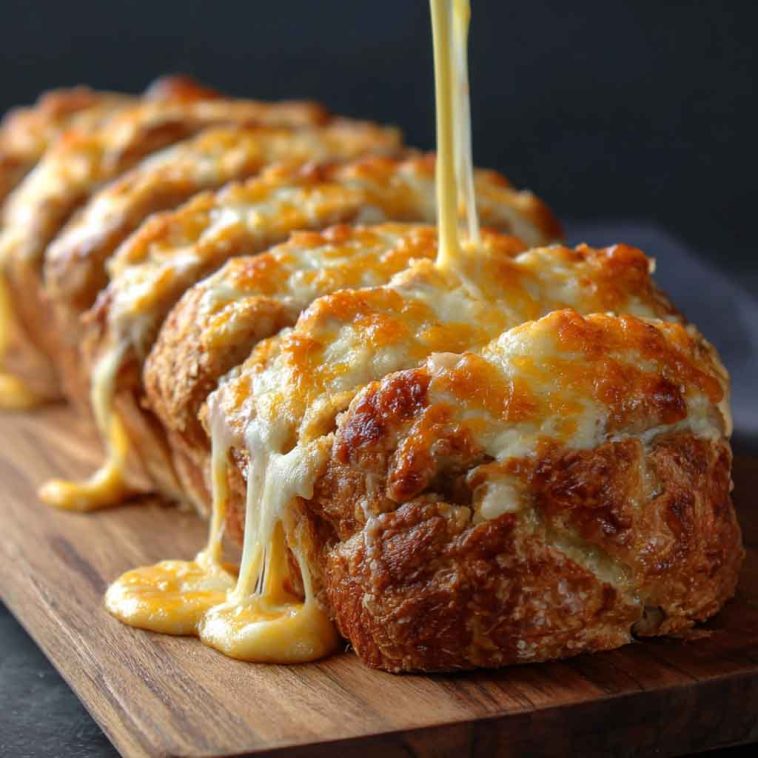
Why Everyone Loves Cheese Bread
Few things rival the irresistible appeal of freshly baked cheese bread. Golden on the outside, gooey or tender inside, and infused with rich, savory cheese—it’s comfort food at its finest. Whether served warm with a bowl of soup, sliced as a side for dinner, or torn apart at a gathering, cheese bread is always a hit.
Part of its universal charm lies in its flexibility. It can be quick and easy (like a no-yeast cheddar loaf) or slow and rewarding (like a yeasted pull-apart bread). Baked in a loaf pan, cast-iron skillet, or muffin tin, it adapts to your time and tools.
Homemade cheese bread beats store-bought every time. It’s fresher, more flavorful, and completely customizable—choose your favorite cheeses, herbs, and spices to make it your own. Whether you’re a seasoned baker or a beginner, cheese bread offers a foolproof path to delicious success.
What Is Cheese Bread? Types Around the World
Cheese bread is a global comfort food, with countless variations rooted in regional traditions and ingredients.
In Brazil, pão de queijo reigns supreme—a chewy, gluten-free ball of joy made with tapioca flour and Parmesan-like cheese. Its crisp exterior and stretchy interior make it instantly addictive.
The United States is home to quick cheese breads—savory, dense loaves leavened with baking powder and loaded with cheddar. These are often sliced and served with chili or soup.
Italy gives us cheesy focaccia—olive oil-rich doughs studded with cheese and sometimes garlic or herbs. Garlic cheese bread, often served with pasta, is another Italian-American favorite.
Other styles include cheddar pull-apart biscuits or monkey bread variations, where dough balls are layered with cheese and baked until bubbling.
Styles vary by leavening—yeast for light and airy, baking powder or eggs for denser options—and by texture, from crusty exteriors to pillowy soft middles. Unlike stuffed or topped bread, true cheese bread has cheese blended throughout the dough, delivering rich flavor in every bite.
Key Ingredients Breakdown & Their Roles
To craft the perfect cheese bread, understanding each ingredient’s purpose is essential:
Cheese is the star. Sharp cheddar adds bold flavor, mozzarella melts into gooey strands, Parmesan brings umami, feta offers tang, and gruyère delivers a nutty richness. Combining cheeses often yields the best results—try mixing one strong-flavored cheese with one that melts beautifully.
Flour provides structure. Use all-purpose flour for most recipes, or bread flour for chewier texture. For gluten-free versions like pão de queijo, tapioca flour is key—it creates the signature chew.
Leavening agents make the bread rise. Baking powder is common in quick breads, while yeast creates airier loaves with a longer rise time. In egg-rich versions, eggs provide structure and lift.
Liquid binds ingredients and affects tenderness. Milk adds richness, buttermilk offers tang and tenderness, and water keeps things simple. The type of liquid used can change the crumb and texture significantly.
Fat, usually butter or oil, contributes flavor and moistness. Butter enhances taste, while oil creates a softer crumb.
Add-ins like garlic, chopped herbs, chili flakes, or green onions elevate flavor and complexity.
Pro Tip: Use a combo of sharp and melty cheeses—like Parmesan and mozzarella—for a balance of flavor and texture that’s hard to beat.
Choosing the Best Cheese for Your Bread Style
Not all cheeses perform the same in baked bread. Choose based on meltability and flavor:
-
Melty cheeses: Mozzarella, Monterey Jack, and Fontina create gooey, stretchy pockets of cheese—great for soft pull-apart breads.
-
Flavorful cheeses: Sharp cheddar, Asiago, and Parmesan pack a punch, perfect for quick breads or loaves where flavor must shine through.
Avoid pre-shredded cheese if possible—it’s coated with anti-caking agents that can prevent smooth melting. Instead, shred your own from a block for better texture and flavor.
Be mindful of saltiness. Strong cheeses like feta or Parmesan can make your bread too salty if overused. Balance with milder varieties.
As for quantity, aim for about 1 to 1½ cups per loaf. Too little, and the flavor disappears. Too much, and you risk a greasy or heavy loaf. Fold cheese evenly through the dough to avoid clumps and ensure uniform cheesiness.
Step-by-Step: How to Make Classic Cheese Bread
Here’s a basic method that can be adapted to most cheese bread styles:
1. Prepare the Dough
Decide on your base: a quick bread (like cheddar loaf) or yeast-based dough (for rolls or focaccia-style). For quick bread, whisk together flour, baking powder, salt, and seasonings in one bowl; mix eggs, milk, and melted butter in another. Combine wet and dry ingredients, then fold in shredded cheese.
For yeast doughs, activate yeast in warm water or milk with a pinch of sugar. Mix in flour, salt, and melted butter, then knead until smooth. Let rise until doubled in size (about 1 hour).
2. Incorporate the Cheese
Gently fold in cheese and optional mix-ins (like garlic, herbs, or chili flakes). For layered or filled breads, you can roll out the dough and scatter cheese on top before folding or rolling up.
3. Shape the Dough
Shape into a loaf, individual rolls, pull-apart balls, or spoon into muffin tins. Grease your baking vessel to prevent sticking.
4. Bake
Bake in a preheated oven at 350–375°F (175–190°C). Time depends on shape:
-
Loaf: 40–50 minutes
-
Rolls: 20–25 minutes
-
Muffins: 18–22 minutes
Look for a golden top and bubbly cheese. Internal temperature should reach about 190–200°F (88–93°C).
5. Cool Before Slicing
Let bread rest on a cooling rack for at least 10–15 minutes. This prevents crumbling and allows flavors to settle.
Essential Tools for Cheese Bread Success
Having the right tools makes cheese bread easier and more consistent:
-
Loaf pan, baking sheet, or cast-iron skillet depending on your style
-
Mixing bowls and a wooden spoon or stand mixer for efficient mixing and kneading
-
Box grater or food processor to shred cheese (skip the pre-shredded stuff!)
-
Pastry brush for butter or herb glazes before or after baking
-
Cooling rack to prevent soggy bottoms and help bread cool evenly
-
Optional: bench scraper for shaping and cleanup, and a kitchen scale for accurate flour and cheese measurement
Flavorful Cheese Bread Variations to Try
Cheese bread is incredibly adaptable, making it the perfect canvas for creative spins. Here are some delicious ideas to inspire your next batch:
Herb & Garlic Cheese Bread
Mix minced garlic, fresh parsley, chives, or thyme into the dough. Brush the top with garlic butter for added flavor and aroma.
Jalapeño Cheddar Cheese Bread
Fold in chopped pickled or fresh jalapeños along with sharp cheddar. Perfect with chili or barbecue.
Sun-Dried Tomato & Feta Cheese Bread
Add chopped sun-dried tomatoes and crumbled feta. The combination of tangy, salty, and savory makes it irresistible.
Bacon and Scallion Cheese Rolls
Crispy cooked bacon and chopped scallions pair beautifully with mild cheddar or Monterey Jack in soft, pull-apart rolls.
Brazilian-Style Pão de Queijo
Use tapioca flour, Parmesan, and eggs for a gluten-free version. These are bite-sized, chewy, and addictive.
Cheese-Stuffed Breadsticks
Wrap strands of mozzarella or provolone inside rolled dough. Bake and serve with marinara sauce for dipping.
Spicy Pepper Jack & Chili Flake Bread
Add crushed red pepper flakes and cubes of pepper jack to your dough for a cheesy loaf with a kick.
Each variation works with the same basic method—just fold in the extras after your dough is mixed. Try blending two cheeses, adding a new herb, or even making mini versions for party snacks.
Storage, Reheating & Meal Prep Tips
Cheese bread is best fresh, but it stores well for later enjoyment with the right methods.
Storage
Once cooled, wrap cheese bread tightly in foil or plastic wrap and store at room temperature for 1–2 days, or in the fridge for up to 5 days.
Freezing
Wrap the entire loaf or individual slices in foil, then place in a freezer-safe bag. Freeze for up to 2 months. Thaw at room temp or overnight in the fridge.
Reheating
To revive freshness:
-
Oven: Wrap in foil and heat at 300°F (150°C) for 10–15 minutes.
-
Toaster oven: Unwrapped for a crispier edge.
-
Microwave: Use for 10–15 seconds (but it may soften the crust).
Make-Ahead Tip
Prepare dough (especially yeast-based) and refrigerate overnight before shaping and baking. You can also freeze unbaked dough balls (like pão de queijo) and bake straight from frozen.
Frequently Asked Questions (FAQs)
Here are answers to the most common cheese bread questions, inspired by Google’s “People Also Ask” section:
Can I use any cheese for cheese bread?
You can use most cheeses, but for best results, combine a melty cheese (like mozzarella or Monterey Jack) with a flavorful one (like sharp cheddar or Parmesan). Avoid overly wet cheeses like fresh mozzarella unless well-drained.
Why is my cheese bread greasy?
Too much cheese or high-fat cheese without balancing ingredients (like flour or eggs) can cause grease to pool. Stick to recommended amounts and drain any oily add-ins (like bacon or sundried tomatoes).
Can I make cheese bread gluten-free?
Yes! Try pão de queijo made with tapioca flour, or use a 1:1 gluten-free flour blend in quick bread recipes. Be aware that texture may change slightly.
What’s the best way to get a crispy top?
Brush the dough with melted butter or egg wash before baking. You can also add a final sprinkle of cheese on top for a golden crust.
Why didn’t my cheese melt properly inside the bread?
Pre-shredded cheese contains anti-caking agents that prevent smooth melting. Use block cheese and shred it yourself for the best results.
Can I make cheese bread in a bread machine?
Yes! For yeast-based cheese bread, add wet ingredients first, then flour and cheese, with yeast last (unless your machine says otherwise). Use the basic or white bread setting.
Final Thoughts: Your Signature Cheese Bread Awaits
Whether you’re baking a rustic loaf for family dinner or whipping up cheesy rolls for a party, cheese bread is endlessly satisfying. With just a few pantry staples and your favorite cheese combo, you can create bakery-quality results at home. From Brazilian pão de queijo to sharp cheddar quick bread, there’s a style for every craving and occasion.
Don’t be afraid to experiment—once you master the basics, the variations are limitless. With its savory aroma, golden crust, and gooey interior, homemade cheese bread is a warm hug in edible form. And trust us—once you start baking it, you won’t stop.

Cheese Bread Recipe
Equipment
- Mixing bowls
- Loaf pan or muffin tin
- Box grater (or food processor)
- Wooden spoon or stand mixer
- Pastry brush (optional)
- Cooling rack
Ingredients
Basic Cheese Bread (Quick Bread Style):
- 2 cups all-purpose flour
- 1 tbsp baking powder
- 1 tsp salt
- ½ tsp garlic powder (optional)
- 1¼ cups shredded sharp cheddar cheese
- ¼ cup grated Parmesan
- 1 cup milk or buttermilk
- 1 egg
- ⅓ cup vegetable oil or melted butter
- Optional: 1–2 tbsp chopped herbs (chives, parsley, or thyme)
Instructions
- Preheat oven to 350°F (175°C). Grease a 9x5 loaf pan or line with parchment paper.
- In a large bowl, whisk together flour, baking powder, salt, and garlic powder.
- Add the cheeses and optional herbs. Toss to coat with the flour mix—this helps the cheese stay evenly distributed
- In a separate bowl, whisk together milk, egg, and oil. Pour into the dry ingredients.
- Mix gently with a wooden spoon until just combined. Do not overmix—batter should be thick and lumpy.
- Pour into prepared pan, smoothing the top.
- Bake for 30–35 minutes, or until golden brown and a toothpick inserted into the center comes out clean.
- Cool in the pan for 5–10 minutes, then transfer to a wire rack to finish cooling before slicing.
Notes
- Cheese Blend Tip: Combine a melty cheese (like mozzarella) with a flavorful one (like Parmesan or cheddar) for optimal results.
- Add a Glaze: Brush the top with garlic butter before or after baking for a glossy, flavor-packed crust.
- Make It Spicy: Stir in chili flakes or chopped jalapeños for heat.
- Go Gluten-Free: Substitute with a 1:1 gluten-free baking blend or try a pão de queijo version with tapioca flour.
- Storage: Wrap tightly and store at room temp for 2 days, or refrigerate for up to 4. Freeze for longer storage—toast to reheat.
- Pão de Queijo Variation: Use tapioca flour, eggs, and milk with grated Parmesan and mozzarella—blended and baked into chewy balls!