Crispy, Juicy, and Packed with Flavor
Few comfort foods spark as much joy as chicken tenders. Golden, crispy on the outside and tender on the inside, they’ve been a family favorite for generations—perfect for dipping, sharing, or enjoying as a quick dinner. But while classic fried tenders are undeniably delicious, they often come with heavy oils and extra calories.
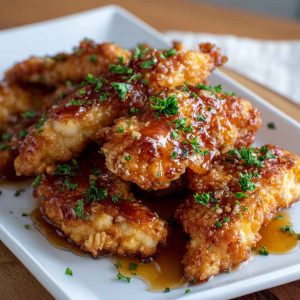
That’s where air fryer honey butter garlic chicken tenders step in. This recipe takes the timeless appeal of chicken tenders and elevates them with a sticky, irresistible glaze. Imagine crunchy-coated tenders fresh from the air fryer, tossed in a luscious mix of sweet honey, rich butter, and fragrant garlic. It’s the perfect harmony of sweet, savory, garlicky, and crispy—all without the guilt of deep frying.
Not only are these tenders healthier, but they’re also incredibly easy to make. With just a handful of pantry staples, an air fryer, and about 30 minutes, you can whip up a meal that feels indulgent yet nourishing. Whether you’re planning a weeknight dinner, prepping for game day, or looking for a family-friendly dish that everyone will devour, this recipe delivers.
By the end of this guide, you’ll know exactly how to achieve crispy perfection and a glaze that clings beautifully to every bite.
What Makes Air Fryer Honey Butter Garlic Chicken Tenders Special?
The magic of this recipe lies in its balance of flavor and method. Instead of deep frying, the air fryer uses hot circulating air to create a crispy coating with just a fraction of the oil. That means you get golden, crunchy tenders that are lighter and healthier, without sacrificing taste.
But the real star is the honey butter garlic glaze. Melted butter provides richness, honey adds natural sweetness with a hint of caramelization, and garlic brings savory depth. Together, they create a sticky glaze that coats every piece, turning simple tenders into a flavor-packed main dish.
These chicken tenders aren’t just delicious—they’re versatile, too. They work for busy weeknights, meal prep lunches, or as a crowd-pleasing appetizer for parties and game days. Crispy, juicy, and bursting with bold flavor, they’re the kind of dish you’ll want on repeat.
Ingredient Breakdown: Flavor at Every Layer
Every layer of this recipe contributes to its crave-worthy texture and flavor. Here’s what you’ll need:
-
Chicken Tenders – Naturally lean and quick to cook, making them perfect for air frying.
-
Coating – A mix of flour and panko breadcrumbs gives the tenders their signature crunch. Panko is especially good for a light, crispy bite.
-
Egg Wash or Buttermilk – Helps the coating stick and adds a subtle richness. Buttermilk also tenderizes the chicken.
-
Garlic – The soul of this recipe. Fresh garlic offers bold, aromatic flavor, while garlic powder provides a more mellow undertone. Using both adds depth.
-
Honey – Natural sweetness that caramelizes beautifully when warmed, creating the glaze’s sticky texture.
-
Butter – Brings a silky richness that makes the glaze cling to every bite.
-
Seasonings – Paprika adds a subtle smokiness, while salt and pepper keep things balanced. Parsley brightens the final dish.
Pro Tip: The key to balance is not letting one flavor dominate. Too much garlic can overpower, while too much honey makes the tenders overly sweet. Adjust to taste until you hit that perfect sweet-savory harmony.
Together, these ingredients transform everyday chicken tenders into something extraordinary.
Choosing the Best Chicken Tenders
When it comes to chicken tenders, freshness makes a difference. Fresh tenders deliver the juiciest, most flavorful results, but frozen tenders can work if thawed properly and patted dry before coating.
If chicken tenders aren’t available, simply cut boneless, skinless chicken breasts into strips. This alternative is just as delicious and often more budget-friendly.
For the best flavor and texture, look for organic or antibiotic-free chicken, which tends to be more tender and naturally flavorful. Also, avoid tenders with excessive added water, as this can make them soggy in the air fryer.
Whichever option you choose, preparing the chicken well (patting it dry and trimming any excess tendon pieces) sets you up for crispy success.
Tools & Equipment You’ll Need
You don’t need much to pull off these tenders, but the right tools ensure crispy results:
-
Air Fryer – Both basket and oven-style models work well.
-
Mixing Bowls – For dredging the flour, egg, and breadcrumbs.
-
Tongs – Essential for flipping tenders without losing the coating.
-
Pastry Brush – Perfect for glazing with honey butter garlic sauce.
-
Meat Thermometer – Ensures the chicken reaches 165°F safely.
With these basics, you’ll be ready to master this recipe with ease.
Step-by-Step Instructions: Crispy Perfection Every Time
Step 1: Prepare the Chicken
Pat the chicken tenders dry with paper towels. This helps the coating stick and ensures they crisp properly.
Step 2: Dredge
Set up three bowls: flour with paprika, garlic powder, salt, and pepper; beaten eggs or buttermilk; and panko breadcrumbs. Dip each tender in flour, then egg, then breadcrumbs, pressing gently to coat.
Step 3: Arrange in Air Fryer
Lightly spray the air fryer basket with oil. Place tenders in a single layer, leaving space between each. Overcrowding reduces crispiness.
Step 4: Air Fry
Cook at 400°F (200°C) for 10–12 minutes, flipping halfway. The tenders should be golden brown and cooked to 165°F internally.
Step 5: Make the Honey Butter Garlic Glaze
While the chicken cooks, melt butter in a small pan. Stir in minced garlic, cooking until fragrant, then whisk in honey. Cook until the sauce thickens slightly into a glaze.
Step 6: Toss or Brush
Remove tenders from the air fryer. Either toss them in the glaze for full coverage or brush it over for a lighter touch.
Expert Tip: Let the chicken rest for 2–3 minutes before serving. This allows the juices to redistribute, keeping the meat tender and juicy.
Serve immediately for maximum crunch!
The Honey Butter Garlic Sauce: The Flavor Hero
The glaze is what transforms these tenders from everyday to extraordinary. With just three ingredients—butter, honey, and garlic—you get a sauce that’s sticky, sweet, and deeply flavorful.
-
Butter adds richness and helps the glaze cling.
-
Honey provides natural sweetness and caramelizes into a glossy coating.
-
Garlic delivers savory depth, balancing the sweetness.
The secret is balance. If you prefer a bolder, garlicky flavor, add more fresh garlic. For extra sweetness, increase the honey slightly. Want a kick? Sprinkle in chili flakes or cayenne for a spicy-sweet twist.
The texture should be slightly thick and glaze-like, not runny. Cook it just long enough for the honey and butter to meld into a silky coating.
This sauce is so good you’ll want to drizzle it over vegetables, rice bowls, or even use it as a dip—it’s the true flavor hero of this recipe.
Variations: Make It Your Own
-
Spicy Kick: Add cayenne, hot sauce, or red chili flakes to the glaze.
-
Asian-Inspired: Swap honey for soy sauce + sesame oil for a teriyaki-style twist.
-
Lemon Herb: Mix lemon zest + thyme into the glaze for a fresh, bright flavor.
-
Cheesy Coating: Mix grated Parmesan into breadcrumbs for extra richness.
-
Gluten-Free: Use gluten-free flour + panko.
-
Kid-Friendly: Keep seasoning mild, serve glaze separately for dipping.
Serving Ideas: What to Pair With Chicken Tenders
-
Classic Sides: French fries, sweet potato fries, onion rings.
-
Healthier Pairings: Steamed veggies, roasted broccoli, cauliflower rice.
-
Comfort Food Combo: Mac & cheese, mashed potatoes, buttery corn.
-
Game-Day Style: Serve with ranch, BBQ, or spicy mayo dips.
-
Presentation Tip: Garnish with parsley + sesame seeds for a polished look.
Storage & Reheating Tips
-
Refrigeration: Store leftovers in an airtight container up to 3 days.
-
Freezing: Freeze tenders (unglazed) up to 2 months. Reheat in air fryer at 375°F until crisp.
-
Reheating: Avoid microwaving (makes coating soggy). Use oven or air fryer.
-
Sauce Note: Reheat glaze separately and toss just before serving for best texture.
Nutrition Information
-
Per Serving (approx. 2 tenders):
Calories: ~280
Protein: 24g
Carbs: 15g
Fat: 12g
Sugar: 6g -
Values may vary depending on coating and glaze thickness.
FAQs: Your Top Questions Answered
Q1: Can I make these without an air fryer?
Yes, bake at 400°F for 18–20 minutes, flipping halfway.
Q2: How do I keep tenders from drying out?
Don’t overcook—use a thermometer (165°F internal temp).
Q3: Can I use chicken thighs instead?
Yes, cut into strips, but cooking time may increase slightly.
Q4: How do I make them extra crispy?
Use panko + a light spray of oil. Don’t overcrowd the basket.
Q5: Can I make these ahead for parties?
Yes, bread tenders in advance, refrigerate, and air fry just before serving.
Q6: Can I double the recipe?
Yes, but cook in batches to avoid soggy coating.
Final Thoughts: Crispy, Sweet, and Savory Bliss
Wrap up by emphasizing:
-
The perfect balance of crispy + juicy chicken.
-
The irresistible honey butter garlic glaze.
-
Healthier than frying, yet packed with comfort-food flavor.
Encourage readers to try it for family dinners, parties, or meal prep.
Air Fryer Honey Butter Garlic Chicken Tenders – Crispy, Juicy & Flavor-Packed
Equipment
- Air fryer (basket or oven style)
- Mixing bowls
- Tongs
- Pastry brush
- Small saucepan or microwave-safe bowl
- Meat thermometer
Ingredients
For Chicken Tenders:
- 1 lb chicken tenders (or chicken breast cut into strips)
- 1 cup all-purpose flour
- 2 large eggs (beaten)
- 1 ½ cups panko breadcrumbs (or regular breadcrumbs)
- 1 tsp paprika
- ½ tsp garlic powder
- ½ tsp salt
- ½ tsp black pepper
- Olive oil spray (for air fryer)
For Honey Butter Garlic Glaze:
- 3 tbsp unsalted butter
- ¼ cup honey
- 3 garlic cloves (minced)
- ½ tsp soy sauce (optional, for depth)
- ½ tsp red chili flakes (optional, for spice)
Instructions
- Prep Chicken: Pat chicken tenders dry with paper towels.
- Set Up Breading Station: In three bowls—flour with paprika, garlic powder, salt, pepper; beaten eggs; breadcrumbs.
- Coat Chicken: Dredge each tender in flour → dip in egg → coat with breadcrumbs.
- Air Fry: Preheat air fryer to 400°F (200°C). Spray basket lightly with oil. Arrange tenders in a single layer (do not overcrowd). Air fry for 10–12 minutes, flipping halfway, until golden brown and internal temp reaches 165°F (74°C).
- Make Sauce: In a small saucepan (or microwave), melt butter. Add garlic and sauté until fragrant. Stir in honey (and soy sauce/chili flakes if using). Cook until slightly thickened and glossy.
- Glaze Tenders: Remove chicken from air fryer and brush or toss in honey butter garlic sauce.
- Serve: Let rest 2 minutes, then serve warm with extra sauce for dipping.
Notes
- Crispier Tenders: Use panko breadcrumbs for crunchier texture.
- Healthier Option: Skip flour dredge and use seasoned breadcrumbs only.
- Meal Prep Friendly: Store leftovers in an airtight container up to 3 days. Reheat in the air fryer for best texture.
- Flavor Variations: Add Parmesan to breadcrumbs, swap honey with maple syrup, or add cayenne for heat.
- Serving Ideas: Pair with fries, mashed potatoes, or a fresh salad.