A show-stopping mashup of red velvet and cheesecake
Red velvet cheesecake layer cake is the kind of dessert that stops conversation—in the best way. Think plush, cocoa-kissed red velvet layers hugging a rich, creamy cheesecake, all wrapped in silky cream cheese frosting. The balance of tangy sweetness, subtle chocolate notes, and cloud-soft texture makes every slice feel luxurious and celebratory. This outline walks you through reliable bake times, structural tips for stacking, and a frosting strategy that stays smooth and stable. You’ll also find smart flavor accents like berry glaze or white chocolate curls to elevate the finish without overwhelming the cake’s signature profile.
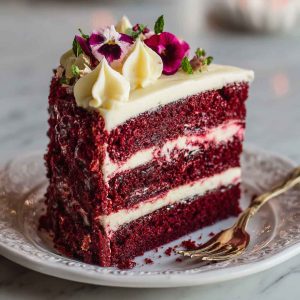
What is a red velvet cheesecake layer cake? Components and key textures
This cake combines two classics: tender red velvet layers and a standalone baked cheesecake tier. You’ll bake both elements, chill until set, then stack and frost. The red velvet offers a moist crumb and gentle cocoa warmth; the cheesecake adds lush creaminess and a cool, dense contrast. Finish with tangy cream cheese frosting—sweet enough to compliment, never cloying. Optional garnishes like glossy berry sauce or a thin white chocolate drip add shine and flavor contrast while keeping the center stage on texture and color.
Ingredient overview: Cake, cheesecake, and frosting—built for balance
- Red velvet cake:
- Flour & cocoa: All-purpose flour plus a small amount of cocoa for subtle chocolate flavor.
- Buttermilk & vinegar: Signature tang and tender crumb.
- Fat: Oil (extra moisture) or butter (flavor).
- Red color: Gel food coloring for vibrant hue without thinning batter.
- Cheesecake layer:
- Cream cheese: Full-fat for structure and silkiness.
- Sugar & eggs: Smooth set, gentle sweetness.
- Sour cream or heavy cream: Soft, creamy texture.
- Vanilla & salt: Round out flavor.
- Cream cheese frosting:
- Cream cheese & butter: 1:1 for stability and spreadability.
- Powdered sugar & vanilla: Sweetness and aroma.
- Pinch of salt: Balance.
- Optional finishers:
- Berry glaze or jam: Thin layer on top for glossy finish.
- White chocolate curls or crumbs: Texture and visual pop.
Tip: Use gel coloring and weigh dry ingredients for consistent crumb and color—vibrancy and texture depend on precision.
Equipment & prep essentials
- Pans: Three 8- or 9-inch round pans (two for cake, one for cheesecake) or bake cheesecake in a springform.
- Mixer: Stand/hand mixer for batters and frosting.
- Baking aids: Parchment rounds, cake strips, oven thermometer.
- Assembly tools: Cake leveler or long serrated knife, offset spatula, turntable (optional), dowels/straws for support (if stacking tall).
- Cooling/chilling: Wire racks and fridge space for overnight chilling of cheesecake.
Tip: Line pans and use cake strips—flat, even layers make stacking easier and prevent doming.
Step-by-step instructions: Bake, chill, stack, and frost
- Bake the cheesecake:
- Mix cream cheese, sugar, salt until smooth. Beat in eggs one at a time, then sour cream/cream and vanilla.
- Bake in a lined springform at 325°F/165°C with a water bath until set at edges and slightly wobbly center (about 45–60 minutes). Cool, then chill overnight.
- Make the red velvet layers:
- Whisk dry ingredients: flour, cocoa, salt, leaveners.
- Whisk wet: buttermilk, eggs, oil/butter, sugar, vanilla, gel color; stir in vinegar.
- Fold dry into wet just until combined. Divide into two pans; bake at 350°F/175°C for 25–30 minutes. Cool completely.
- Frosting:
- Beat cream cheese and butter until fluffy. Add powdered sugar, vanilla, and salt; whip until smooth and spreadable.
- Assembly:
- Level cake layers. Place one red velvet layer on a board; spread a thin frosting layer.
- Unmold cheesecake; set atop the first layer. Add a thin frosting layer over cheesecake.
- Top with second red velvet layer. Apply crumb coat; chill 20–30 minutes.
- Finish with a smooth final coat. Decorate with crumbs, white chocolate, or a thin berry glaze.
- Slice and serve:
- Chill 30 minutes for clean slices; use a hot, dry knife for neat cuts.
Tip: Keep frosting layers thin between cake and cheesecake—excess frosting can cause sliding. Chill after crumb coat to lock structure.
Flavor variations & add-ons
- Berry kiss: Spread a thin raspberry or strawberry glaze over the top.
- White chocolate swirls: Fold melted (cooled) white chocolate into part of the frosting for two-tone piping.
- Red velvet crumbs: Press around the sides for texture and color.
- Citrus lift: Add micro-zested orange to frosting for brightness.
- Cocoa boost: Increase cocoa slightly for deeper chocolate notes (adjust sugar to keep balance).
Tip: Keep accents light—this cake shines when cheesecake creaminess and red velvet tang stay in focus.
Serving suggestions & pairings
Serve chilled but not cold—20 minutes at room temp softens textures. Pair with hot coffee, espresso, or black tea to cut richness, or a small glass of milk for classic comfort. For dessert spreads, offer fresh berries and a simple chocolate sauce on the side. Present on a cake stand with minimal garnish; a flurry of red velvet crumbs and a few white chocolate curls are plenty to telegraph “decadent” without overdecorating.
Make-ahead, storage & freezing tips
- Make-ahead schedule:
- Day 1: Bake cheesecake; chill overnight.
- Day 2: Bake cake layers; cool. Make frosting; assemble and crumb coat; chill.
- Day 3: Final frosting and garnish.
- Storage:
- Refrigerate, covered, up to 3–4 days.
- Freezing:
- Freeze cheesecake layer wrapped well up to 1 month; thaw in fridge. Red velvet layers freeze well; frost fresh.
- Serving temp:
- Chill for structure; temper briefly before slicing for best texture.
Tip: Assemble cold—chilled layers stack cleaner and reduce sliding. Transport with a center dowel for stability.
Common mistakes to avoid
- Warm assembly: Soft frosting and warm layers lead to slipping. Keep everything cool.
- Overmixing cake batter: Tough crumb; fold just until combined.
- Cheesecake overbake: Grainy texture; pull at wobbly-center stage and chill to set.
- Runny frosting: Use full-fat cream cheese and butter; chill if too soft, then re-whip briefly.
- Color missteps: Liquid food coloring can thin batter; use gel for vibrant hue without texture issues.
Tip: If frosting feels loose, chill 10 minutes, then spread. A small offset spatula gives better control on tall cakes.
Frequently asked questions (FAQ)
- What pan sizes work best? Two 8- or 9-inch cake pans and one 8- or 9-inch springform for cheesecake. Keep thicknesses similar for even stacking.
- Can I bake the cheesecake without a water bath? Yes, but a water bath reduces cracks and ensures a creamy center. If skipping, bake low and cool gradually.
- Which fat is better in the cake—oil or butter? Oil delivers extra moisture; butter gives flavor. Many bakers use oil for tenderness and add butter flavor via frosting.
- How do I keep the red velvet color vibrant? Use gel coloring and weigh dry ingredients. A touch more cocoa can deepen hue, but too much can mute red.
- Can I add a berry layer? Yes—thin jam or a restrained berry glaze on top or between layers. Keep it thin to avoid sliding.
- Why is my cheesecake weeping after assembly? Overbake or insufficient chill can cause moisture issues. Bake to wobbly center, chill overnight, and keep assembly cold.
- Is this cake very sweet? It’s rich and sweet, but balance comes from tangy frosting and the gentle cocoa note. Reduce powdered sugar slightly if you prefer a less sweet finish.
- How do I slice cleanly? Heat a long knife in hot water, wipe dry, and slice with steady pressure. Clean between cuts for sharp edges.
- Can I make mini versions? Absolutely—use 6-inch pans or stack single-serving rings. Reduce bake times accordingly and chill well before unmolding.
- Any gluten-free adaptations? Use a reliable GF flour blend for cake and ensure all thickening agents or add-ins are GF. Cheesecake layer is naturally GF.
Tip: For pristine edges, apply a crumb coat, chill, then finish with a thin, smooth final coat—professional results every time.
Nutritional highlights & customization
This is an indulgent dessert, best served in modest slices. The cheesecake brings protein and calcium from dairy; the cake contributes carbohydrates and cocoa’s aromatic lift. To lighten slightly, opt for oil in the cake (moisture without heaviness), reduce powdered sugar in frosting, and consider a thinner exterior coat. For a more decadent take, keep full-fat dairy, add a subtle white chocolate accent, and finish with a glossy berry glaze for contrast—several modern recipes showcase this elegant finish to complement rather than compete with the cake’s core flavors.
Decoration, plating & finishing touches
- Classic look: Smooth cream cheese frosting with a border of red velvet crumbs.
- Elegant topper: White chocolate curls and a few fresh berries.
- Clean edges: Use a bench scraper around the sides; chill and refine.
- Serving style: Present on a cake stand; slice at the table for drama.
- Color pop: A small ring of crumbs at the base highlights the layers.
Tip: Keep garnish light—this cake already delivers visual flair with vivid red and creamy white contrasts.
Easy Decadent Red Velvet Cheesecake Layer Cake Recipe | Rich & Indulgent Dessert
Rich, indulgent, and show-stopping — this Decadent Red Velvet Cheesecake Layer Cake Recipe combines moist red velvet cake layers with creamy cheesecake and luscious cream cheese frosting. A dessert masterpiece perfect for holidays, birthdays, or any celebration that calls for something unforgettable.Equipment
Ingredients
For the cheesecake layer:
- 24 oz (675 g) cream cheese, softened
- 1 cup granulated sugar
- 3 large eggs
- 1 cup sour cream
- 1 tsp vanilla extract
- Pinch of salt
For the red velvet cake layers:
- 2 ½ cups all-purpose flour
- 2 tbsp cocoa powder
- 1 tsp baking soda
- 1 tsp salt
- 1 ½ cups granulated sugar
- 1 ½ cups vegetable oil
- 2 large eggs
- 1 cup buttermilk
- 2 tbsp red gel food coloring
- 1 tsp vanilla extract
- 1 tsp white vinegar
For the cream cheese frosting:
- 16 oz (450 g) cream cheese, softened
- 1 cup unsalted butter, softened
- 4 cups powdered sugar
- 2 tsp vanilla extract
- Pinch of salt
Instructions
Bake the cheesecake:
Bake the red velvet layers:
Make frosting:
Assemble the cake:
Notes
- Color tip: Use gel food coloring for vibrant red without thinning batter.
- Cheesecake tip: Chill overnight for firm texture that stacks cleanly.
- Assembly tip: Keep layers cold during stacking to prevent sliding.
- Make-ahead: Bake cheesecake and cake layers a day ahead; assemble and frost the next day.
- Variations: Add a raspberry glaze on top, or fold melted white chocolate into frosting for extra decadence.
- Storage: Refrigerate covered up to 4 days. Freeze unfrosted layers up to 1 month.