Introduction to Tiramisu Cookie Cups
Tiramisu Cookie Cups are a delightful reinvention of the beloved Italian dessert, transformed into portable, bite-sized indulgences. Instead of traditional ladyfingers soaked in espresso, these treats feature a cookie crust that cradles a creamy tiramisu filling—rich, coffee-kissed, and irresistibly smooth.
They’re the perfect fusion of texture and flavor: crisp cookie meets velvety mascarpone, with hints of cocoa and espresso in every bite. Ideal for parties, potlucks, or cozy nights in, these mini desserts are easy to serve and even easier to love.
Their single-serve format makes them a hit with guests—no slicing, scooping, or plating required. Plus, they’re endlessly customizable, from the cookie base to the garnish. Whether you’re a tiramisu purist or a dessert adventurer, these cookie cups offer a playful, elegant way to enjoy a classic favorite in a modern, mess-free format.
The Inspiration Behind the Recipe
The idea behind Tiramisu Cookie Cups stems from the growing popularity of single-serve desserts. As gatherings become more casual and on-the-go snacking more common, bite-sized treats have taken center stage. Tiramisu, with its layered elegance and bold flavors, was ripe for reinvention.
By swapping the ladyfinger base for a cookie crust, the dessert becomes sturdier, more portable, and easier to portion. The creamy filling remains true to its roots—mascarpone, espresso, and a touch of sweetness—but is piped into the cookie shells for a polished finish.
This recipe celebrates the best of both worlds: the nostalgic comfort of tiramisu and the fun, accessible charm of cookies. It’s a dessert that feels familiar yet fresh, perfect for sharing or savoring solo. Whether served at a dinner party or tucked into a lunchbox, tiramisu cookie cups deliver elegance in every bite-sized package.
Choosing the Right Cookie Base
The cookie base is the foundation of your tiramisu cups, and choosing the right dough makes all the difference. Sugar cookie dough is a popular choice—it’s sweet, neutral, and pairs well with the bold coffee flavors of the filling. It also bakes evenly and holds its shape, making it ideal for forming sturdy cups.
For a deeper flavor profile, espresso cookie dough adds a rich, coffee-infused twist. It complements the tiramisu filling beautifully and enhances the dessert’s overall complexity. You can make it from scratch or add instant espresso powder to a basic sugar cookie recipe.
Store-bought dough offers convenience and consistency. Pre-made sugar cookie dough is widely available and easy to portion. Homemade dough, however, allows for customization—adjust sweetness, add spices, or incorporate cocoa powder for a chocolatey base.
Pro tip: Use mini muffin tins to shape the cookie cups. Press small balls of dough into each cavity, forming a well in the center. After baking, use a spoon or tart tamper to gently reshape the cups while warm. This ensures a perfect vessel for your creamy filling and keeps the structure intact.
Crafting the Creamy Tiramisu Filling
The filling is the heart of tiramisu cookie cups—smooth, rich, and infused with coffee. Traditionally, tiramisu uses mascarpone cheese, which offers a mild, buttery flavor and silky texture. For a budget-friendly or tangier alternative, cream cheese works well, though it’s slightly firmer and more pronounced in taste.
Sweeteners play a key role. Powdered sugar blends smoothly and adds sweetness without grittiness. For a low-carb version, erythritol or monk fruit sweetener can be used—just ensure it’s finely ground to maintain texture.
Coffee flavoring is essential. Brewed espresso delivers authentic depth, while coffee extract offers concentrated flavor without added liquid. For an adult twist, a splash of coffee liqueur like Kahlúa or Tia Maria adds warmth and complexity.
To lighten the filling, fold in whipped cream or Cool Whip. This adds airiness and makes the texture more mousse-like. Whipped cream offers a fresher taste, while Cool Whip provides stability and convenience.
Expert tip: Chill the filling for at least 30 minutes before piping. This firms it up, making it easier to handle and helping it hold its shape. Use a piping bag with a star or round tip for elegant swirls. The result is a luscious, coffee-kissed filling that contrasts beautifully with the crisp cookie shell.
Assembly and Baking Tips
Creating the perfect tiramisu cookie cup involves a few key steps. Start by shaping the cookie dough in a mini muffin tin. Press each portion into the cavity, forming a well. Bake at 350°F (175°C) for 10–12 minutes, or until golden and set.
Immediately after baking, use a spoon or tart tamper to gently press the center of each cookie to reinforce the cup shape. Let them cool completely in the tin before unmolding—this prevents cracking and ensures structural integrity.
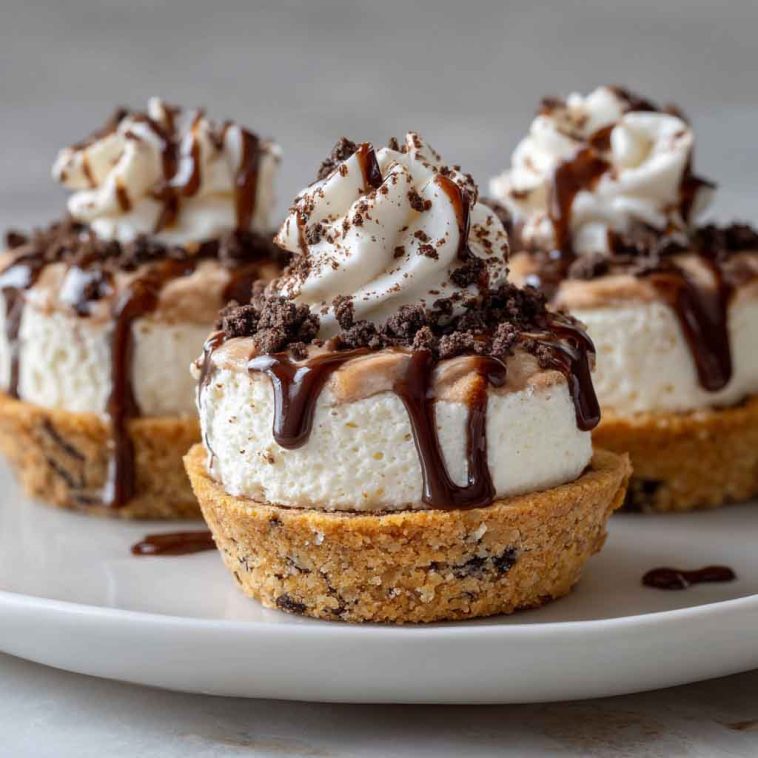
Once cooled, pipe the chilled tiramisu filling into each cup. Use a piping bag with a decorative tip for a professional look. Swirl techniques like rosettes or stars add visual appeal and help hold garnishes.
Garnish with a dusting of cocoa powder, espresso dust, or a single coffee bean for flair. Chocolate curls or mini chocolate chips also work well. These finishing touches elevate the presentation and reinforce the tiramisu theme.
Time-saver tip: Bake and freeze the cookie cups ahead of time. Store in an airtight container and thaw before filling. This makes party prep easier and allows you to assemble fresh, creamy desserts on demand.
With the right tools and techniques, tiramisu cookie cups become a show-stopping treat that’s as fun to make as it is to eat.

Tiramisu Cookie Cups – Irresistible Bite-Sized Desserts with Classic Italian Flavor
Equipment
- Mini muffin tin
- Mixing bowls
- Electric mixer or whisk
- Piping bag with decorative tip
- Spoon or tart tamper
- Sifter (for cocoa garnish)
Ingredients
Cookie Base:
- 1 tube sugar cookie dough (or homemade equivalent)
- Optional: 1 tsp instant espresso powder (for flavor twist)
Tiramisu Filling:
- 8 oz mascarpone cheese (or cream cheese)
- ½ cup powdered sugar
- 2 tbsp brewed espresso (or 1 tsp coffee extract)
- 1 tsp vanilla extract
- ½ cup whipped cream or Cool Whip
- Optional: 1 tbsp coffee liqueur (e.g., Kahlúa)
Garnish:
- Cocoa powder
- Espresso dust or chocolate curls
- Coffee beans or fresh mint (optional)
Instructions
- Preheat Oven: Set to 350°F (175°C). Grease mini muffin tin lightly.
- Shape Cookie Cups: Roll dough into 1-inch balls and press into each cavity to form a cup. Bake for 10–12 minutes until golden.
- Reshape While Warm: Use a spoon or tart tamper to gently press the center of each cookie to reinforce the cup shape. Cool completely before unmolding.
- Make Filling: Beat mascarpone, powdered sugar, espresso, and vanilla until smooth. Fold in whipped cream gently. Chill for 30 minutes.
- Pipe Filling: Transfer chilled filling to a piping bag. Pipe into cooled cookie cups using a swirl or rosette pattern.
- Garnish: Dust with cocoa powder and add optional toppings like chocolate curls or coffee beans.
- Serve or Chill: Serve immediately or refrigerate until ready to enjoy.
Notes
- For gluten-free: use almond flour cookie dough and ensure all ingredients are certified GF.
- For low-carb: substitute erythritol and use keto-friendly cookie base.
- Vegan option: use dairy-free cream cheese and coconut whip.
- Freeze cookie cups unfilled for up to 2 months.
- Filled cups last 3–4 days in the fridge.
- Chill filling before piping for best texture and structure.