The Magic of No-Knead Artisan Bread
There’s something deeply satisfying about pulling a golden, crackling loaf of bread from your oven—especially when it required almost no effort. I still remember the first time I made no-knead bread on a rainy weekend. I mixed the dough in five minutes, let it rest overnight, and the next day, I had a rustic loaf that looked like it came from a bakery window.
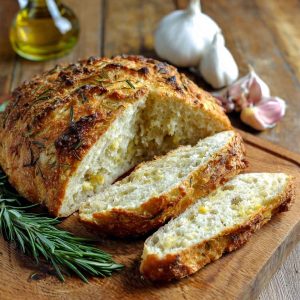
This rosemary garlic version takes that magic up a notch. It’s fragrant, savory, and perfect for dipping into soups, serving with cheese, or simply slathering with butter. And the best part? No kneading, no fancy equipment, and no stress.
Whether you’re a seasoned baker or just dipping your toes into homemade bread, this recipe is forgiving, flavorful, and incredibly rewarding. In this guide, you’ll learn how to choose the right ingredients, master the slow-rise method, and bake a loaf that’s crusty on the outside and tender on the inside.
Why Rosemary & Garlic Are a Dream Team
Rosemary and garlic are the kind of pairing that makes your kitchen smell like heaven. Rosemary brings a woodsy, pine-like aroma that cuts through richness and adds freshness. It’s bold but not overpowering—perfect for rustic breads.
Garlic, especially when roasted, adds a mellow sweetness and deep umami flavor. Roasting transforms its sharp bite into something caramelized and almost buttery. When folded into dough, it infuses every bite with warmth and complexity.
Together, they create a loaf that’s earthy, aromatic, and savory—ideal for pairing with olive oil, cheese, or hearty stews. The rosemary lifts the richness of the garlic, while the garlic grounds the herbal notes of the rosemary.
This combination isn’t just delicious—it’s timeless. Whether you’re baking for a dinner party or just want something special for your weekend brunch, rosemary and garlic bring a touch of elegance to every slice.
Choosing the Right Ingredients
Great bread starts with great ingredients. For this loaf, you’ll want to use bread flour if you prefer a chewier texture and better structure. All-purpose flour works too—it’ll yield a slightly softer crumb and is perfect for beginners.
Garlic: Fresh cloves are best. Roast a whole bulb wrapped in foil with olive oil at 425°F for 45 minutes until golden and soft. You can also use minced garlic for a sharper flavor, but roasted garlic adds depth.
Rosemary: Fresh rosemary is ideal—it’s more aromatic and flavorful. If using dried, reduce the amount by two-thirds and crush it slightly to release the oils.
Yeast: Both active dry and instant yeast work. Instant yeast can be mixed directly into the flour, while active dry should be dissolved in water first.
Salt & Water: Use fine sea salt for even distribution and filtered water if your tap water is heavily chlorinated—it can affect yeast activity.
Seasoning & Add-In Variations
While rosemary and garlic are the stars, you can easily customize this loaf with other herbs and add-ins. Try thyme, oregano, or parsley for a Mediterranean twist. These herbs pair beautifully with garlic and add subtle layers of flavor.
For add-ins, consider chopped olives, sun-dried tomatoes, or grated parmesan. These ingredients add bursts of saltiness and umami, making the bread even more irresistible.
Bold tip: Before mixing your dough, toast your garlic and herbs in olive oil for a minute or two. This step intensifies their flavor and distributes it more evenly throughout the loaf.
You can also sprinkle coarse sea salt or extra rosemary on top before baking for a visually stunning finish. Whether you keep it simple or go bold, these variations make the bread uniquely yours—and perfect for sharing.
Mixing & Resting the Dough
No-knead bread is all about patience, not elbow grease. Start by mixing your flour, salt, yeast, water, rosemary, and garlic in a large bowl. Stir until a shaggy, sticky dough forms—don’t worry about perfection.
Cover the bowl with plastic wrap or a damp towel and let it rest at room temperature for 12–18 hours. This slow fermentation develops flavor and creates a beautiful open crumb.
You’ll know it’s ready when the dough is bubbly, expanded, and jiggly. It should have doubled in size and show signs of fermentation—tiny bubbles and a slightly sour aroma.
Bold tip: Use a clear glass bowl so you can easily monitor the rise and bubbles. It’s a simple trick that helps you learn what “ready” looks like.
This long rest is the secret to artisan flavor without the need for kneading. Just mix, cover, and let time do the work.
Shaping & Second Rise
Once your dough has fermented, it’s time to shape. Gently turn it out onto a floured surface. Avoid punching it down—just fold the edges inward to form a loose ball. The goal is to preserve the air bubbles for a light, airy crumb.
Transfer the dough to a cast iron skillet, Dutch oven, or parchment-lined bowl for its second rise. Cover and let it rest for 30–60 minutes, until slightly puffed.
You’ll know it’s ready when it springs back slowly when touched—not too firm, not too slack.
Bold tip: Sprinkle cornmeal or semolina on the bottom of your baking vessel before placing the dough. This prevents sticking and gives the bottom crust a delightful crunch.
This gentle shaping and second rise help the bread hold its structure and bake evenly. It’s the final step before your kitchen fills with the irresistible scent of rosemary and garlic.
Baking Techniques for Artisan Results
Before baking, preheat your oven to 450°F and place your Dutch oven or cast iron pot inside to heat up for at least 30 minutes. A blazing-hot vessel ensures a crisp crust and proper oven spring.
Start by baking the dough covered—this traps steam, mimicking a professional steam oven and helping the crust form slowly while the interior cooks. After 30 minutes, remove the lid and bake uncovered for 10 more minutes to deepen the crust’s color and add crunch.
The total bake time is 30–40 minutes, depending on your oven and desired crust. The loaf should sound hollow when tapped and have a deep golden hue.
Bold tip: That final 10 minutes without the lid is where the magic happens. It caramelizes the crust and intensifies flavor. For extra crispiness, crack the oven door slightly during the last few minutes.
This method gives you a loaf that’s crusty, chewy, and worthy of any artisan bakery—without the need for steam injectors or sourdough starters.
Serving Suggestions & Pairings
This bread is best served warm, fresh from the oven. Slice it thick and slather with soft butter, dip into herbed olive oil, or pair with a bowl of hearty soup—think creamy tomato, lentil, or wild mushroom.
It’s also a showstopper on a cheese board, especially alongside brie, aged cheddar, or goat cheese. For dinner, serve it with pasta dishes, roasted vegetables, or grilled meats to soak up sauces and juices.
Presentation tip: Slice the loaf and arrange it in a linen-lined basket with sprigs of rosemary tucked in for a rustic, inviting look. Drizzle with olive oil and a pinch of flaky salt for a gourmet touch.
Whether it’s a cozy night in or a festive gathering, this bread elevates any meal and makes you look like a kitchen pro.
Storage, Freezing & Reheating
To store, keep the loaf at room temperature in a paper bag or wrapped in a clean towel for up to 2 days. Avoid plastic—it traps moisture and softens the crust. For longer storage, refrigerate in an airtight container for up to 5 days.
To freeze, wrap the whole loaf or individual slices tightly in foil and place in a freezer bag. It’ll keep for up to 3 months. Thaw at room temperature or reheat straight from frozen.
Reheating tip: For a crisp crust, wrap the bread in foil and warm in a 350°F oven for 10–15 minutes. Remove the foil for the last few minutes to re-crisp the crust.
Bold tip: This method revives the bread to near bakery-fresh texture—perfect for leftovers or gifting.
Variations & Customizations
Want to mix things up? Swap half the flour for whole wheat or rye to add nuttiness and depth. Just note: whole grain flours absorb more water, so adjust hydration slightly.
For vegan or dairy-free versions, this recipe is already plant-based—just skip any cheese add-ins. For a gluten-free adaptation, use a gluten-free flour blend designed for yeast breads, and add a binder like psyllium husk. Results may vary, so experiment with small batches.
Flavor twists? Try adding lemon zest for brightness, chili flakes for heat, or caramelized onions for sweetness. These additions make the loaf uniquely yours.
This bread is a blank canvas—play with herbs, spices, and mix-ins to suit your taste or the season. It’s rustic, forgiving, and endlessly customizable.
FAQs – Based on “People Also Ask” (250 words)
Q1: Can I make no-knead bread without a Dutch oven? Yes! Use a cast iron skillet, oven-safe pot, or even a baking stone with a metal bowl or foil tent as a lid. The key is trapping steam during the first part of baking.
Q2: How do I roast garlic for bread? Slice the top off a garlic bulb, drizzle with olive oil, wrap in foil, and roast at 425°F for 45 minutes. The cloves will be soft, golden, and sweet—perfect for folding into dough.
Q3: Can I speed up the rise time? You can shorten it to 8–10 hours by placing the dough in a warm spot (around 75–80°F). However, longer fermentation (12–18 hours) develops better flavor and texture.
Q4: Why is my dough too sticky? Sticky dough is normal for no-knead recipes. Use floured hands and surfaces to shape gently. Don’t add too much flour—it’s meant to be wet and loose.
Q5: Can I use dried rosemary instead of fresh? Absolutely. Use about ⅓ the amount of dried rosemary. Crush it slightly to release oils. Fresh rosemary offers brighter flavor, but dried works well too.
Final Thoughts & Encouragement
Now it’s your turn to bake something beautiful. This rosemary garlic loaf is perfect for cozy weekends, holiday tables, or even as a homemade gift wrapped in parchment and twine.
Don’t be afraid to experiment—try new herbs, add-ins, or flour blends. Each loaf tells a story, and yours will be deliciously unique.
Remember: artisan bread doesn’t require fancy tools—just patience, good ingredients, and a bit of curiosity. Share your creation, snap a photo, and let the aroma of fresh bread fill your home with joy.
Happy baking!
Rustic No-Knead Rosemary Garlic Bread – Crispy Crust & Aromatic Perfection!
Equipment
- Large mixing bowl (preferably clear)
- Measuring Cups and Spoons
- Wooden spoon or spatula
- Dutch oven or cast iron pot with lid
- Parchment paper
- Foil (for roasting garlic)
- Oven mitts
- Cooling rack
Ingredients
- 3 cups (360g) bread flour or all-purpose flour
- 1½ tsp salt
- ½ tsp instant yeast (or ¾ tsp active dry yeast)
- 1¼ cups (300ml) lukewarm water
- 1 bulb roasted garlic (about 8–10 cloves)
- 1 tbsp fresh rosemary, chopped (or 1 tsp dried)
- Optional: 1 tbsp olive oil (for flavor), cornmeal (for dusting)
Instructions
- Roast the Garlic Slice the top off a garlic bulb, drizzle with olive oil, wrap in foil, and roast at 425°F (220°C) for 45 minutes. Cool and squeeze out cloves.
- Mix the Dough In a large bowl, combine flour, salt, yeast, rosemary, and roasted garlic. Add water and stir until a shaggy dough forms.
- Ferment Cover the bowl and let rest at room temperature for 12–18 hours until bubbly and doubled in size.
- Shape & Second Rise Turn dough onto a floured surface. Gently shape into a ball. Place on parchment in a Dutch oven or skillet. Cover and let rise for 30–60 minutes.
- Preheat Oven Preheat oven to 450°F (230°C) with the Dutch oven inside.
- Bake Place dough (with parchment) into hot Dutch oven. Cover and bake for 30 minutes. Remove lid and bake uncovered for 10 more minutes until golden brown.
- Cool Transfer to a cooling rack and let rest for at least 30 minutes before slicing.
Notes
- Use a clear bowl to monitor fermentation visually.
- For extra flavor, toast rosemary and garlic in olive oil before mixing.
- Add-ins like olives, sun-dried tomatoes, or parmesan can be folded in during mixing.
- Store leftovers wrapped in a towel or paper bag to preserve crust.
- Freeze slices individually for easy reheating.
- Reheat wrapped in foil at 350°F for 10–15 minutes to restore crispness.