Rustic Italian Crusty Bread
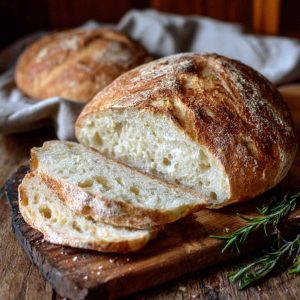
There’s something magical about pulling a fresh loaf of rustic Italian bread out of the oven. The kitchen fills with the nutty, toasty aroma of baked grain, and the first crackle of the golden crust makes your heart skip a beat. Slice through it and you’ll find that irresistible contrast: a crisp shell giving way to a tender, chewy crumb that begs to be dipped in olive oil or layered with cured meats.
The beauty of this bread is its simplicity. Flour, water, yeast, salt—that’s really all it takes to create a loaf that feels like it came straight from a country kitchen in Tuscany. No fancy equipment, no complicated methods—just a little patience and some love for good bread. This is everyday Italian baking at its best, and once you make it at home, you’ll wonder why you ever settled for store-bought.
What Makes It “Rustic Italian Crusty Bread”?
At its core, rustic Italian crusty bread is a “lean dough”: nothing more than flour, water, yeast, and salt. Occasionally you’ll see a splash of olive oil or a pinch of sugar to encourage browning and flavor, but the heart of this bread is simplicity (Recipes from Italy, Seasoned Advice).
What sets it apart from other loaves is its free-form shape. Unlike sandwich bread baked neatly in a tin, rustic Italian bread is shaped by hand—often as a round boule or oval bâtard—and baked directly on a hot surface. This method creates the hallmark crackly crust and open, airy crumb that bread lovers crave.
In baking terms, this style falls under “hearth bread” (Wikipedia)—loaves baked directly on a stone or in a hot oven chamber, often with steam to build that signature crunch. The word rustic is fitting: it captures the old-world, artisanal spirit of bread made for family tables, where looks don’t matter as much as the honest, hearty flavor. The irregular crust, deep scoring, and open texture aren’t imperfections—they’re proof that the loaf was made with real hands, not machines.
Key Ingredients & Flour Choices
Though the ingredient list is short, your choice of flour makes a huge difference in the final loaf. Italian bakers often reach for Tipo 00 flour, a finely milled wheat flour that produces a soft, delicate crumb. However, for rustic bread, a stronger flour is often preferred—something like Manitoba flour, known for its higher protein content, which helps the dough absorb more water and develop stronger gluten. You’ll sometimes see blends with Type-1 flour or even whole wheat for added depth and nutty flavor (Forthefeast, Recipes from Italy).
The rest of the lineup is humble but essential: water to hydrate, yeast to lift, and salt to balance flavor. Interestingly, in certain regions of Tuscany, bakers leave the salt out entirely, resulting in a uniquely bland loaf designed to pair with salty cured meats or hearty soups (Seasoned Advice).
Optional additions—like a drizzle of olive oil, a spoonful of sugar, or a pinch of malt—can enhance crust color and flavor. Some bakers even use beer yeast or malt powder to mimic the old-fashioned tang and crunch of bakery loaves (Eatalianwithroberto). But even with nothing extra, rustic Italian bread proves that great bread doesn’t need embellishment—it just needs good flour and time.
Mixing & Dough Handling
One of the joys of rustic Italian bread is how forgiving it is to make. While traditional loaves relied on hours of kneading, many modern recipes embrace the no-knead approach—simply mixing ingredients together, letting time and fermentation do the hard work. This method, popularized for home bakers, shows that you don’t need to muscle your way to gluten development (Savoring Italy, Mel’s Kitchen Café, Glamour).
Instead of kneading, you can use stretch-and-fold techniques during the first rise: gently pulling and folding the dough over itself to build strength. Variations include wallet folds or simple rest-and-mix cycles, all designed to give structure without overworking (Recipes from Italy, Eatalianwithroberto).
The beauty of no-knead dough is its flexibility. If life interrupts, the dough can rise a little longer without disaster. It’s beginner-friendly and forgiving—great news if you’re new to bread baking. The dough will look sticky and shaggy at first, but don’t panic. By the end of fermentation, it transforms into something supple, stretchy, and full of life. Watching that transformation is half the fun—it’s like kitchen alchemy, with nothing but time and a few simple ingredients.
Fermentation & Rise Strategy
Fermentation is where the magic really happens. In most rustic bread recipes, you’ll give the dough an initial rise of around two hours until it doubles in size. After shaping, the dough rests again for another one to two hours, giving it time to relax and build flavor before baking (La Cucina Italiana, Ciao Florentina).
For even better results, many bakers turn to long fermentation. Allowing the dough to rest overnight in the refrigerator slows down the yeast activity, letting complex flavors develop while improving crust color and texture. This technique, known as cold fermentation, also makes the dough easier to handle and shape the next day (Baran Bakery, Eatalianwithroberto, Recipes from Italy).
Think of it as giving your bread time to “mature.” The difference is subtle but noticeable: a slightly tangier aroma, a deeper caramelized crust, and a more open crumb. If you’ve ever wondered why bakery bread has that distinct taste you can’t quite replicate, long fermentation is usually the secret.
Whether you choose the quick route or the overnight rest, the key is patience. Let the dough tell you when it’s ready—look for volume, texture, and bubbles rather than watching the clock.
Shaping & Scoring the Loaf
When it comes time to shape, rustic Italian bread keeps things simple. Dust your work surface with flour, then gently turn out the dough. Shape it into a boule (round) or bâtard (oval) by tucking the edges underneath until you have a smooth, taut surface. Don’t stress about perfection—the charm of rustic bread lies in its irregular, home-baked look.
Before baking, use a bread lame or a sharp knife to score the surface. These cuts aren’t just decorative—they guide the dough as it expands in the oven, ensuring you get that beautiful oven spring (The Home in Homestead).
If you prefer a hands-off approach, try the “no-shape” method: simply plop the risen dough straight into a preheated Dutch oven, often using parchment paper to make the transfer easy (Eatalianwithroberto). The result may look rough and ready, but that’s exactly the point. Rustic bread celebrates character, not perfection.
Baking Techniques
Dutch oven or cast iron: traps steam → professional-style crust
Covered first 20–30 min, then uncover for browning
Mimics steam-injected bakery ovens (Savoring Italy, Glamour)
Temperature strategy: start hot (230–250 °C / 450–500 °F)
High initial heat → oven spring
Lower slightly after uncovering if needed (Recipes from Italy, Eatalianwithroberto)
Alternative baking surfaces:
Hot pizza stone or baking steel → crisp base, rustic crust (Ciao Florentina)
Preheating the stone is crucial
Final crisping step: crack oven door open last 5 min for a dry, shattering crust (Eatalianwithroberto)
Internal temperature test: aim for ~95 °C (200 °F)
Cooling & Storage Tips
Cooling:
Always cool on wire rack to avoid soggy bottoms
Wait at least 1 hour before slicing (Simply Recipes, Ciao Florentina)
Storage:
Day 1: wrap in towel or paper bag to preserve crust
Longer storage: paper first, then plastic (to slow staling but keep some crust) (Recipes from Italy)
Freezing:
Wrap whole loaf or slices tightly in plastic, then foil
To reheat: 220 °C / 425 °F oven, 4–5 min → tastes freshly baked (Simply Recipes, Savoring Italy)
Serving Suggestions & Uses
- Classic with soups (ribollita, minestrone), stews, or saucy mains (Ciao Florentina, Eatalianwithroberto)
Bruschetta, panini, or simple olive oil + garlic rub (Gather for Bread)
Rustic sandwiches with cured meats and cheeses
Stale bread repurposed:
Panzanella salad
Croutons or breadcrumbs
Tuscan bread soups (pappa al pomodoro, acquacotta)
Pro Tips for Best Results
Heat & steam: preheat oven + Dutch oven, add steam for crust
Rise by sight: dough should double, not just by timer
Flour choices: Manitoba or Type 1 for strong structure; 00 for tenderness
Patience: resist slicing warm bread; cooling sets crumb & crust
FAQs
What’s the difference between Italian crusty bread and French bread?
Italian bread often has a chewier crumb, higher hydration, and rustic shape, while French bread (like baguette) is lighter, thinner-crusted. (Savoring Italy)
Can I make this bread ahead of time?
Yes! Refrigerate dough up to 3 days before shaping, or freeze baked loaf and reheat before serving. (Savoring Italy)
Why is my crust soft or chewy, not crispy?
Usually due to missing steam or insufficient oven heat. Bake covered, then uncovered, and crack the oven door the last few minutes. (Eatalianwithroberto, Recipes from Italy)
Can I add olive oil to the dough?
Yes, a drizzle enhances flavor and tenderness, but too much will soften the crust rather than keep it crisp. (Seasoned Advice, Baran Bakery)
Rustic Italian Crusty Bread | Easy Homemade Artisan Loaf
Equipment
- Large mixing bowl
- Wooden spoon or dough scraper
- Kitchen scale (recommended)
- Clean kitchen towel or plastic wrap
- Dutch oven, cast-iron pot, or baking stone
- Parchment paper
- Sharp knife or bread lame
- Wire cooling rack
Ingredients
- 500 g (≈ 4 cups) bread flour (or Italian Tipo 00 / Manitoba)
- 350 ml (1 ½ cups) warm water (~40°C / 105°F)
- 7 g (2 tsp) salt
- 7 g (2 tsp) instant yeast (or 10 g fresh yeast)
- Optional: 1 tbsp olive oil or 1 tsp sugar/malt for enhanced flavor & crust
Instructions
- Mix the dough: In a large bowl, combine flour, yeast, and salt. Add water (and olive oil/sugar if using). Stir until a sticky dough forms.
- First rise: Cover the bowl with a towel or wrap. Let dough rise at room temperature for about 2 hours, until doubled.
- Shape: Lightly flour a surface. Turn out dough, gently shape into a round boule or oval bâtard. Avoid over-handling.
- Second rise: Place shaped dough on parchment, cover, and let rise another 1–2 hours.
- Preheat oven: Place Dutch oven (with lid) inside oven. Preheat to 230°C / 450°F for at least 30 min.
- Bake (covered): Carefully transfer dough (with parchment) into hot pot. Cover and bake 25–30 min.
- Bake (uncovered): Remove lid, bake another 10–15 min until crust is deep golden brown. Internal temp should reach ~95°C / 200°F.
- Cool: Transfer loaf to wire rack. Let cool fully (about 1 hour) before slicing.
Notes
- For more flavor, refrigerate the dough overnight (cold fermentation).
- Use Manitoba or bread flour for stronger gluten and a chewier crumb.
- To keep crust crisp, store in a paper bag or wrapped in a towel—not plastic.
- If baking on a stone/steel: place a pan of water in oven to create steam.
- Freeze sliced bread for up to 3 months; reheat at 220°C / 425°F for 5 minutes.