Why This Cheesecake is Pure Lemon Bliss
If there’s one dessert that captures sunshine on a plate, it’s Triple Lemon Meringue Cheesecake. Imagine the perfect balance of sweet, tangy, and creamy in every single bite — that’s exactly what this show-stopping dessert delivers.
Why “triple lemon”? Because the flavor comes in three irresistible layers. First, the silky cheesecake filling infused with fresh lemon zest and juice. Second, a golden layer of glossy lemon curd spread over the cooled cheesecake for extra brightness. And finally, a cloud of fluffy meringue, toasted until golden and caramelized, creating that dramatic finishing touch.
This dessert isn’t just cheesecake; it’s a celebration of lemons in their finest form. Whether you’re planning a spring brunch, an Easter feast, a summer barbecue, or simply want to wow guests at a dinner party, this cheesecake is guaranteed to steal the spotlight.
In this guide, you’ll learn everything you need to know to make it from scratch — from choosing the right lemons to mastering the water bath technique, whipping the perfect meringue, and storing leftovers (if there are any!). By the end, you’ll be confident in creating your own stunning Triple Lemon Meringue Cheesecake at home.
What is Triple Lemon Meringue Cheesecake?
At its core, Triple Lemon Meringue Cheesecake is a decadent fusion of two beloved desserts: the creamy indulgence of cheesecake and the bright, tangy elegance of lemon meringue pie. What sets it apart is the three layers of lemon flavor working in harmony.
Unlike a classic lemon cheesecake, which typically has lemon flavor baked into the filling, this version takes it further. The cheesecake base itself is lemony, but it’s enhanced by a velvety lemon curd spread on top. Then, instead of a traditional whipped cream topping, a luscious meringue crown is added — light, airy, and beautifully toasted.
The result? A dessert that’s equal parts indulgent and refreshing. Cheesecake lovers adore it for the creamy texture, while lemon enthusiasts can’t resist the bold citrus punch. It’s a dessert that looks as stunning as it tastes, making it a true centerpiece for any occasion.
Flavor Profile: Sweet, Tart, and Creamy
Triple Lemon Meringue Cheesecake is a masterclass in flavor balance. Every layer plays its part:
The crust is buttery, crumbly, and slightly sweet, creating the perfect foundation.
The cheesecake filling is rich and velvety, yet lifted by lemon zest and juice, offering a delicate tang that cuts through the creaminess.
The lemon curd is where the magic happens — bold, bright, and tangy, it delivers that unmistakable citrus kick.
The meringue topping is airy, fluffy, and kissed with toasted caramel notes once lightly torched or broiled.
Together, these elements create a dessert that’s not just delicious but texturally exciting: crunchy crust, creamy filling, silky curd, and cloud-like meringue. It’s sweet without being heavy, tart without being overpowering. Each bite feels like a little explosion of sunshine, making it one of those desserts that you’ll crave again and again.
Ingredient Breakdown: What You’ll Need & Why
To create this cheesecake, you’ll need a thoughtfully chosen list of ingredients. Here’s why each one matters:
Crust: Made with crushed graham crackers or digestive biscuits blended with melted butter. This gives structure and a subtle sweetness that balances the tart lemon.
Cheesecake filling: Cream cheese is the star, providing a smooth and creamy base. Sour cream adds a gentle tang and richness. Sugar balances the citrus, while eggs provide structure and help the cheesecake set. Fresh lemon juice and zest brighten the flavor, cutting through the richness.
Lemon curd: A luxurious layer made from egg yolks, sugar, lemon juice, zest, and butter. The yolks give it body, while butter provides a glossy finish. It’s tangy, sweet, and utterly decadent.
Meringue: Egg whites whipped with sugar and a pinch of cream of tartar to stabilize. This layer adds height, elegance, and a marshmallow-like texture that pairs beautifully with the tart lemon curd.
Flavor boosters: A splash of vanilla in the cheesecake adds warmth and depth. A pinch of salt sharpens the flavors and prevents the dessert from being overly sweet.
Choosing lemons: Meyer lemons are sweeter and floral, while Eureka lemons (more common) bring a sharper, classic tartness. Either works beautifully depending on your flavor preference. Pro tip: Always zest before juicing to avoid struggling with slippery fruit!
Tools & Equipment Needed
To make this cheesecake successfully, a few kitchen essentials are key:
A 9-inch springform pan for easy release.
A stand mixer or hand mixer for whipping filling and meringue.
Heatproof mixing bowls for lemon curd and meringue.
A microplane zester and citrus juicer to extract maximum lemon flavor.
An offset spatula for spreading curd and meringue smoothly.
A kitchen torch (or oven broiler) to toast the meringue until golden.
Optional but helpful: a roasting pan for the water bath, which prevents cracks and ensures even baking.
Step-by-Step Instructions Overview
While the full recipe dives into detail, here’s a bird’s-eye view of the process:
Prepare the crust: Mix crushed graham crackers and butter, press into the springform pan, and bake briefly for stability.
Make the cheesecake filling: Beat cream cheese, sugar, eggs, sour cream, zest, and juice. Pour over crust and bake gently in a water bath.
Cool completely: Cheesecake must chill for several hours (ideally overnight) to set properly.
Prepare lemon curd: Cook egg yolks, sugar, lemon juice, zest, and butter until thickened, then spread over the chilled cheesecake.
Whip meringue: Beat egg whites with sugar and cream of tartar until stiff peaks form. Spread or pipe onto cheesecake.
Toast the meringue: Use a torch or broiler for that golden, caramelized finish.
Patience is key — resting, chilling, and layering each component ensures a flawless, bakery-worthy cheesecake.
Baking & Technique Tips for Success
A stunning lemon meringue cheesecake is all about technique. The cheesecake base should be creamy yet firm, without cracks. To prevent splitting, always bake in a water bath (bain-marie). Wrap the springform pan tightly in foil, set it in a larger pan, and fill with hot water halfway up the sides. This gentle heat keeps the texture silky.
Overmixing the batter can incorporate too much air, leading to bubbles and cracks. Mix just until smooth and combined. For cooling, patience is key — turn off the oven, crack the door, and let the cheesecake rest inside for about an hour before moving it.
The meringue layer deserves equal care. Beat egg whites until they reach glossy stiff peaks, adding sugar gradually. This ensures stability and prevents weeping.
For lemon curd, cook it low and slow, whisking constantly. This avoids scrambling eggs and creates a custard that’s thick and spreadable.
Finally, remember the assembly order: cheesecake first, then cooled lemon curd, and finish with the meringue. For professional-looking slices, dip a sharp knife in hot water, wipe clean, and repeat between cuts.
Variations & Creative Twists
One of the joys of this cheesecake is how versatile it can be. Start with the crust — while a buttery graham cracker base is classic, you can switch it up with vanilla wafers, shortbread cookies, or even almond biscotti for added texture and flavor.
Not a lemon-only fan? Try a citrus swap! Lime curd adds a tropical tang, while orange gives a sweeter, softer finish. You can even combine citrus for a mixed zest cheesecake.
For parties, consider mini cheesecake cups baked in muffin tins. They’re easier to serve and perfectly portioned.
If baking isn’t on the agenda, a no-bake version can be made with a stabilized whipped cream topping instead of meringue. You’ll still get that light, airy finish without the oven time.
Need a gluten-free option? Swap graham crackers for a crust made with almond flour and a touch of butter. The nutty base pairs beautifully with the citrus notes.
These creative spins let you adapt the recipe to your preferences, dietary needs, and the occasion — without losing its showstopping charm.
Serving Suggestions & Pairings
This cheesecake shines brightest when served chilled but slightly softened. Take it out of the fridge about 15–20 minutes before slicing for the creamiest bite.
Pair it with a handful of fresh berries, like tart raspberries or juicy blueberries, to balance the richness. For drinks, you can’t go wrong with a glass of sparkling water, lemonade, or champagne — all of which enhance the refreshing citrus notes.
If you’re aiming for indulgence, add a dollop of fresh whipped cream on the side.
For presentation, consider a little theatrics: lightly torch the meringue at the table for a golden, toasted finish that will wow guests. Serving it on a cake stand with a garnish of lemon zest curls or edible flowers adds elegance without effort.
Storage & Make-Ahead Tips
Cheesecake is an excellent make-ahead dessert, but timing is everything. The base (without toppings) keeps well in the fridge for up to 3 days. Simply wrap tightly in plastic wrap to prevent dryness.
Meringue, however, is best enjoyed fresh. Once topped, it looks and tastes its best within 6 hours. If you need extra time, keep it loosely covered in the fridge to avoid condensation.
Freezing is an option for the cheesecake base only. Bake and cool, then wrap in foil and freeze for up to 2 months. When ready to serve, thaw overnight in the refrigerator before adding lemon curd and meringue.
For parties, a smart plan is to bake the cheesecake a day ahead, store chilled, and then prepare the lemon curd and meringue the day of serving. This way, every layer is at peak freshness.
Nutrition & Calories
This lemon meringue cheesecake is indulgent — a true celebration dessert. Per slice (based on 12 servings), you can expect:
Calories: 480–520
Protein: ~7g
Carbohydrates: ~48g
Fat: ~29g
The values will vary slightly depending on crust choice and portion size. While it’s not an everyday dessert, it’s a worthwhile treat for birthdays, holidays, or any occasion that calls for a little luxury. Pair it with lighter meals to balance out the richness, and enjoy each bite guilt-free — because some desserts are simply made to be savored.
FAQs
Can I make lemon meringue cheesecake ahead of time?
Yes! Bake the cheesecake and prepare the lemon curd a day ahead. Add the meringue just before serving for best results.
How do you keep meringue from weeping?
Whip egg whites with sugar slowly until glossy stiff peaks form. Also, avoid high humidity and bake the meringue briefly to stabilize it.
What’s the best way to thicken lemon curd for cheesecake?
Cook the curd gently over low heat, whisking constantly. If it’s too thin, continue cooking until it coats the back of a spoon.
Do I need to refrigerate cheesecake with meringue?
Yes, always refrigerate after adding the meringue. Just know it’s best enjoyed within a few hours.
Can I use bottled lemon juice instead of fresh?
Fresh lemon juice is strongly recommended — it gives brighter flavor and avoids bitterness. Bottled juice works in a pinch, but the flavor won’t be as vibrant.
How do I stop cheesecake from cracking?
Use a water bath, avoid overmixing, and allow it to cool gradually in the oven.
What’s the difference between lemon cheesecake and lemon meringue pie?
Lemon cheesecake has a creamy cheese base with lemon curd and meringue, while lemon meringue pie uses a pastry crust with a lemon custard filling.
Final Thoughts: A Dessert Worth the Effort
This lemon meringue cheesecake is more than just a dessert — it’s a masterpiece of textures and flavors. The buttery crust, creamy cheesecake, tangy lemon curd, and fluffy meringue create triple layers of joy.
Though it requires a little patience and precision, the results are stunning and well worth the effort. Each slice is a balance of tart, sweet, and creamy, with a light-as-air finish.
Whether you’re baking it for a celebration or simply to treat yourself, this cheesecake proves that sometimes the most unforgettable desserts are the ones that take a little extra love.
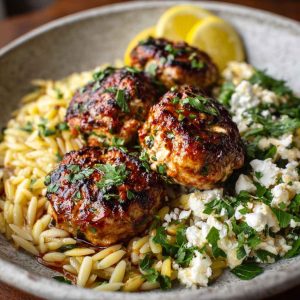
Savory Greek Chicken Meatballs with Zesty Lemon Orzo – Fresh, Flavorful & Easy Dinner
Equipment
- Baking sheet or air fryer basket
- Mixing bowl or resealable bag
- Tongs
- Meat thermometer
- Optional: wire rack for crispier wings
Ingredients
- 2 lbs chicken wings, separated into drumettes and flats
- 1–2 tbsp olive oil
- 2–3 tbsp Cajun seasoning (store-bought or homemade)
- Optional glaze: 2 tbsp butter + 1–2 tbsp hot sauce
- Optional: lemon juice or vinegar for brightness
Homemade Cajun seasoning option:
- 1 tsp paprika
- ½ tsp cayenne pepper
- ½ tsp garlic powder
- ½ tsp onion powder
- ¼ tsp dried thyme
- ¼ tsp dried oregano
- Pinch of black pepper and salt
Instructions
- Prepare wings: Pat chicken wings dry. Optional: marinate briefly with Cajun seasoning and a drizzle of oil.
- Season: Coat wings evenly with Cajun seasoning
- Cooking methods:Oven-baked: Preheat to 400°F (200°C). Arrange wings on a baking sheet or wire rack. Bake 35–40 minutes, flipping halfway.Air fryer: Preheat to 400°F (200°C). Place wings in basket without overcrowding. Cook 20–25 minutes, shaking halfway.Deep-fried: Heat oil to 375°F (190°C). Fry wings in batches 8–10 minutes until golden and cooked through.
- Optional glazing: Toss hot wings in melted butter and hot sauce mixture for a classic glaze.
- Check doneness: Wings should reach internal temperature of 165°F (74°C).
- Serve: Garnish with lemon wedges or fresh herbs if desired.
Notes
- Crispiness tip: Pat wings dry and avoid overcrowding pan or air fryer.
- Flavor balance: Add a touch of sweetness (honey/maple) or acidity (lemon/vinegar) to offset heat.
- Storage: Refrigerate cooked wings 3–4 days in airtight container; freeze up to 3 months. Reheat in oven or air fryer to maintain crispiness.
- Variations: Garlic Cajun, smoked paprika, herb-forward, or spicy with red pepper flakes/jalapeño.
- Tips: Let wings rest after seasoning for better flavor absorption. Use a wire rack for even baking.