Why Crispy Drumsticks Are Irresistible
There’s something universally comforting about a platter of crispy chicken drumsticks. Whether served at a family dinner, a game-day gathering, or as the highlight of a weekend cookout, these golden-brown beauties always disappear fast. The magic lies in their irresistible texture—the satisfying crunch of perfectly crisped skin paired with the juicy, flavorful meat inside.
Unlike wings or thighs, drumsticks have a perfect balance of meat-to-skin ratio, making every bite a mix of savory richness and crispy perfection. They’re also budget-friendly, easy to find, and kid-approved, which makes them a go-to protein for both everyday meals and special occasions.
But what truly transforms chicken drumsticks from simple to spectacular is the seasoning. A thoughtful blend of spices and a smart cooking technique turn this humble cut of chicken into a flavor-packed dish that can rival any takeout fried chicken. From smoky paprika to a pinch of cayenne for heat, the right spices cling to the crispy coating and elevate every bite.
In this guide, you’ll learn not just how to cook crispy drumsticks, but how to master the science of crunch, choose the best seasonings, and adapt them to your preferred cooking method—oven, skillet, or air fryer.
What Are Seasoned Crispy Chicken Drumsticks?
Seasoned crispy chicken drumsticks are exactly what they sound like—chicken drumsticks cooked until the skin turns shatteringly crisp while locking in juicy, tender meat. What sets them apart is the seasoning: a carefully chosen mix of spices that enhances the natural richness of the chicken and ensures every bite is full of flavor.
There are several ways to achieve this irresistible crispiness:
Oven-baked: A healthier method that uses high heat and a wire rack for airflow, creating even browning and crunch without excess oil.
Fried: The classic indulgent version, where the drumsticks are submerged in hot oil, producing a deep golden crust.
Air-fried: A modern twist, delivering similar crispiness to frying but with minimal oil.
The seasoning is the key to flavor depth. From smoky paprika and garlic powder to fiery cayenne, the right blend transforms simple chicken into a mouth-watering experience.
The Secret to Crispy Chicken: Science of Crunch
Achieving the ultimate crispy chicken is part art, part science. The crisp factor relies on three main elements: moisture, coating, and cooking method.
Moisture control: Too much surface moisture prevents browning and creates soggy skin. That’s why patting the chicken dry with paper towels before seasoning is crucial. Dry skin = crisp skin.
Coating: A light dusting of flour, cornstarch, or breadcrumbs helps the chicken brown more evenly and adds an extra layer of crunch. Cornstarch, in particular, creates a delicate, shatter-like crispness.
Cooking method: High, consistent heat is key. In the oven, a hot temperature (around 400–425°F) ensures the skin crisps without drying out the meat. For frying, oil temperature control (350–375°F) is essential. Too low, and the chicken absorbs oil; too high, and it burns before cooking through.
Drumsticks are ideal for crispy cooking because they’re dark meat with higher fat content, meaning they stay juicy even when exposed to high heat. Plus, their skin provides the perfect surface for seasoning and crisping.
Pro tip: Always let the chicken rest on a rack for a few minutes after cooking. This prevents steam from softening the crust and keeps that crunch intact.
Key Ingredients That Make It Work
A few essential ingredients transform basic drumsticks into a crispy, flavor-packed dish:
Chicken Drumsticks: Choose fresh, bone-in, skin-on drumsticks for maximum juiciness. Avoid removing the skin, as it’s the foundation of crispiness.
Seasonings: A balanced spice blend elevates the flavor. Staples include paprika (smoky depth), garlic powder (savory punch), onion powder (mellow sweetness), black pepper (earthy heat), and cayenne (optional kick). Herbs like thyme or oregano add an aromatic touch.
Salt: Never skip it. Salt enhances flavor and helps draw out surface moisture for better crisping.
Oils/Fats: Light coatings of olive oil, avocado oil, or melted butter help seasonings stick and encourage browning. Oils with high smoke points are best for frying.
Coating Options: For extra crunch, lightly dust drumsticks with flour, cornstarch, or a flour–breadcrumb mix. Cornstarch gives an airy crisp, while breadcrumbs add a hearty crunch.
Flavor Variations:
Mild & Savory: Stick to herbs and garlic for a family-friendly version.
Spicy Kick: Add cayenne, chili powder, or hot paprika for heat lovers.
Smoky BBQ: Blend in smoked paprika and a touch of brown sugar for sweet-smoky flavor.
The combination of skin-on chicken, the right seasoning, and a crisping agent (oil + coating) is the secret to drumsticks that are crispy outside, juicy inside, and full of flavor.
Tools & Equipment You’ll Need
Crispy drumsticks don’t require fancy tools, but the right equipment makes a huge difference:
Baking Sheet + Wire Rack: For oven-baked drumsticks, a rack allows hot air to circulate, preventing soggy bottoms.
Cast Iron Skillet: Ideal for frying or pan-searing. Cast iron holds heat well and ensures even crisping.
Air Fryer Basket: Perfect for oil-light cooking with excellent airflow, producing crisp skin without deep frying.
Tongs: Essential for flipping drumsticks without piercing the skin, which releases juices.
Meat Thermometer: The safest way to ensure chicken reaches 165°F internally without overcooking.
Parchment Paper: For easy cleanup when baking.
Expert Tip: Always rest cooked chicken on a wire rack instead of a plate. This prevents steam from softening the crust, keeping that crunch intact until serving.
Step-by-Step: How to Make Seasoned Crispy Chicken Drumsticks
Step 1: Prep the Chicken
Pat drumsticks dry with paper towels to remove excess moisture. Trim any excess skin or fat if necessary.
Step 2: Season Generously
In a bowl, combine paprika, garlic powder, onion powder, black pepper, cayenne, herbs, and salt. Rub the mixture evenly over each drumstick. Lightly coat with olive oil or melted butter to help seasonings stick.
Step 3: Coat (Optional for Extra Crunch)
For added crispiness, dredge the seasoned drumsticks in a light coating of flour, cornstarch, or breadcrumbs. Shake off excess to avoid clumping.
Step 4: Choose Your Cooking Method
Oven-Baked: Place drumsticks on a wire rack set over a baking sheet. Bake at 425°F (220°C) for 35–45 minutes, flipping halfway through, until golden brown and crispy.
Fried: Heat oil in a deep skillet or Dutch oven to 350–375°F (175–190°C). Fry drumsticks in batches for 10–12 minutes, turning occasionally, until crisp and cooked through. Drain on a wire rack.
Air Fryer: Arrange drumsticks in a single layer in the air fryer basket. Cook at 400°F (200°C) for 20–25 minutes, shaking or flipping halfway.
Step 5: Rest Before Serving
Transfer drumsticks to a wire rack for 5 minutes before serving. This prevents steam from softening the skin.
Tips for Preventing Soggy Chicken:
Don’t overcrowd the pan, oven rack, or air fryer basket.
Keep oil at a steady temperature while frying.
Always serve fresh—crispy chicken is best enjoyed right away.
The result? Crispy, golden-brown drumsticks that are seasoned to perfection and guaranteed to be the star of your table.
Flavor Variations & Seasoning Ideas
The beauty of crispy chicken drumsticks is that they act as a blank canvas for endless flavor profiles. A classic BBQ spice rub—paprika, garlic powder, onion powder, and brown sugar—adds that smoky-sweet bite everyone loves. If you crave heat, a spicy Cajun or Creole mix brings bold layers of chili, cayenne, and herbs that wake up your taste buds.
For something bright and citrusy, try a lemon-pepper coating, which pairs especially well with roasted veggies or light salads. If you want a sweet-savory glaze, honey-garlic is a sticky, irresistible choice. Simply brush on during the last 10 minutes of baking. For an umami-packed option, an Asian-inspired soy-ginger marinade balances saltiness with warmth, perfect for pairing with rice or noodles.
Pro Tip: Keep a jar of your favorite base seasoning mix ready (salt, pepper, garlic powder, paprika) so you can build on it quickly with fresh herbs, zests, or sauces. This shortcut makes midweek dinners faster without sacrificing flavor.
Serving Suggestions & Pairings
Crispy chicken drumsticks deserve the right partners on the plate. For hearty sides, creamy mashed potatoes, cornbread, roasted vegetables, or tangy coleslaw make the perfect balance of textures and flavors. If you prefer something lighter, a crisp green salad or grilled asparagus keeps the meal fresh.
Dipping sauces turn drumsticks into a customizable experience. Offer a spread of ranch, honey mustard, hot sauce, or garlic aioli so each guest can dip to their preference. For gatherings, this creates a fun, interactive way to enjoy them.
As for drinks, iced tea, lemonade, or a light beer pair wonderfully, cutting through the richness while keeping the meal refreshing. If serving at a party, you can even set up a “drumstick bar” with various sauces and toppings for a festive touch.
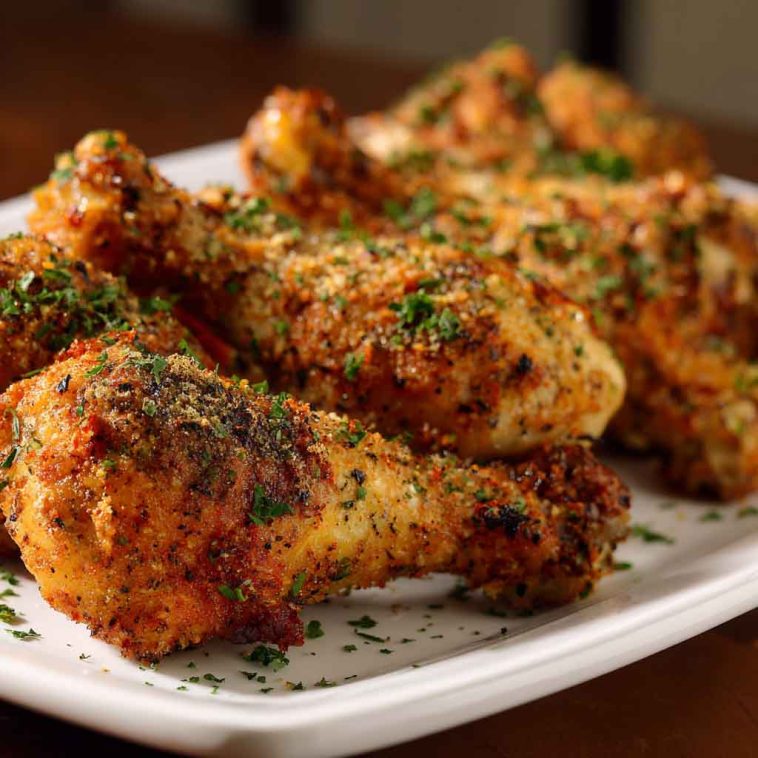
Presentation matters, too—pile them high on a rustic platter with fresh herbs sprinkled on top for a mouthwatering centerpiece that instantly feels celebratory.
Storage & Reheating Tips
Leftover drumsticks keep beautifully if stored correctly. Place cooled chicken in an airtight container and refrigerate for up to 3–4 days. To reheat while keeping the skin crispy, skip the microwave—use an oven (350°F/175°C for 10–12 minutes) or an air fryer (5–7 minutes at 375°F/190°C). Both methods restore the crunch without drying out the meat.
Drumsticks can also be frozen. For best results, freeze them after cooking and cooling; wrap tightly in foil or freezer bags, then store for up to 2 months. Reheat straight from frozen in the oven for convenience.
If you want to freeze uncooked drumsticks, season first, then place in freezer bags. Thaw in the fridge overnight before baking or air frying for best results.
Nutrition Breakdown
On average, a medium-sized crispy baked chicken drumstick (skin-on) contains about:
Calories: 150–180
Protein: 18g
Fat: 9g
Carbs: 2–4g (depending on coating)
Compared to frying, which can nearly double the fat content, baked or air-fried drumsticks offer a much lighter alternative while still delivering crunch. Air frying typically cuts oil use by 70–80%, making it the healthiest crisping method.
For a leaner option, remove the skin before cooking—though you’ll lose some crisp factor. Alternatively, use whole-wheat breadcrumbs, panko, or almond flour for a lighter, high-fiber coating. Choosing spices over heavy sauces also keeps calories in check while maximizing flavor.
Expert Tips & Troubleshooting
Crispy perfection comes down to small details. To avoid soggy skin, pat the drumsticks dry with paper towels before seasoning. Moisture is the enemy of crispiness. Next, always cook at the right internal temperature: 165°F (74°C)—this ensures juicy, safe chicken without overcooking.
If your drumsticks are bland, adjust seasoning generously. Remember, chicken can handle more salt and spice than you think, especially with the skin on. For even coating, use a light drizzle of oil or cooking spray before baking.
Scaling the recipe for a crowd? Use two sheet pans instead of crowding one—this keeps hot air circulating so the drumsticks crisp evenly. If cooking in batches, keep finished ones warm in a low oven (200°F/95°C) until ready to serve.
Finally, if breading falls off, make sure drumsticks are lightly coated in flour or cornstarch before dipping in egg wash or oil—this helps everything stick.
FAQs
How do you get chicken drumsticks crispy in the oven?
Bake at a high temp (400–425°F / 200–220°C) with space between each drumstick. Use a wire rack for maximum air circulation.
Should you remove the skin before cooking drumsticks?
Not if you want crispiness! The skin renders fat that creates crunch. For lower calories, you can remove it, but the texture will differ.
Can you make drumsticks crispy without flour?
Yes—coat with baking powder, cornstarch, or just seasonings and a light oil drizzle. The oven’s dry heat will do the rest.
What temperature is best for crispy baked chicken?
400–425°F (200–220°C) gives the best golden-brown results while ensuring juicy meat inside.
How do you season drumsticks for maximum flavor?
Season under the skin and not just on top. Letting them rest with seasoning (at least 30 minutes or overnight) boosts flavor.
Can you air fry frozen drumsticks?
Yes, though cooking time increases by 5–10 minutes. For best results, thaw first to ensure even cooking and crispiness.
Final Thoughts
Crispy chicken drumsticks are the ultimate comfort food—simple, satisfying, and endlessly customizable. Whether you stick to classic seasonings or experiment with bold global flavors, the combination of juicy meat and crunchy skin is always a winner. These drumsticks work for weeknight dinners, weekend cookouts, or game-day spreads, making them a recipe worth mastering.
Don’t be afraid to experiment with glazes, spice blends, or dipping sauces to discover your personal favorite twist. Once you’ve made them at home, you’ll never look at takeout drumsticks the same way again.

Seasoned Crispy Chicken Drumsticks – Juicy, Flavorful & Easy!
Equipment
- Baking sheet + wire rack (oven method)
- Cast iron skillet or deep fryer (frying)
- Air fryer basket (air-frying)
- Tongs
- Meat thermometer
- Parchment paper (optional)
Ingredients
- 12 chicken drumsticks (about 3 lbs)
- 2 tbsp olive oil or melted butter
- 1 tsp salt (adjust to taste)
- ½ tsp black pepper
- 1 tsp garlic powder
- 1 tsp onion powder
- 1 tsp smoked paprika
- ½ tsp cayenne pepper (optional for heat)
- ½ tsp dried thyme or oregano
- 2–3 tbsp flour, cornstarch, or breadcrumb blend (optional, for extra crisp)
Optional Glazes or Seasoning Variations:
- BBQ spice rub, honey-garlic, lemon-pepper, soy-ginger, or Cajun mix
Instructions
- Prep the Chicken: Pat drumsticks dry and trim excess skin/fat.
- Season: Combine spices and rub all over the chicken. Drizzle with oil to help seasonings stick.
- Coat (Optional): Lightly dust with flour, cornstarch, or breadcrumbs for extra crunch. Shake off excess.
- Cook:Oven-Baked: Preheat oven to 425°F (220°C). Place drumsticks on a wire rack over a baking sheet. Bake 35–45 minutes, flipping halfway, until golden and 165°F internally.Fried: Heat oil to 350–375°F (175–190°C). Fry in batches 10–12 minutes until crispy and cooked through. Drain on a wire rack.Air Fryer: Cook at 400°F (200°C) for 20–25 minutes, flipping halfway.
- Rest: Let drumsticks rest 5 minutes before serving to retain crispiness.
- Serve: Pair with sides like coleslaw, roasted veggies, or dipping sauces (ranch, honey mustard, aioli).
Notes
- Skin-On for Crunch: Removing skin reduces crisp factor.
- Flavor Boost: Season under the skin for deeper flavor.
- Make Ahead: Refrigerate cooked drumsticks for 3–4 days; reheat in oven or air fryer to restore crispiness.
- Freezing: Cooked drumsticks freeze up to 2 months; thaw overnight before reheating.
- Serving Ideas: Try with mashed potatoes, cornbread, or a fresh salad.