Why These Pizza Pockets Are a Total Win
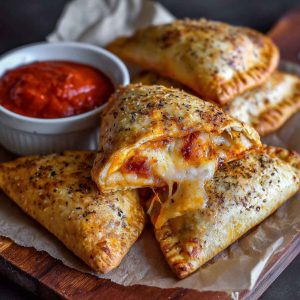
Imagine biting into a warm, golden pocket filled with oozy melted cheese, tangy tomato sauce, and all your favorite pizza flavors. That’s exactly what these homemade pizza pockets deliver—a perfect handheld treat that’s crispy on the outside, cheesy and flavorful on the inside. Whether you’re packing lunches for the kids, serving quick dinners on busy weeknights, or looking for a crowd-pleasing game day snack, these pizza pockets check all the boxes.
What makes these pizza pockets a total win is their versatility and foolproof method. No more soggy, overly greasy frozen versions or complicated recipes that require hours of prep. With a handful of simple ingredients, easy-to-follow steps, and clever tips, you’ll master how to create perfectly sealed pockets with melty cheese, flavorful sauce, and delicious fillings every time. Plus, they freeze beautifully for make-ahead convenience, so you can have homemade comfort food ready whenever hunger strikes.
Get ready to elevate your snack game and impress family and friends with these cheesy, golden pockets bursting with classic pizza goodness!
What Are Pizza Pockets & How Do They Compare with Calzones or Hot Pockets?
Pizza pockets are essentially handheld turnovers filled with classic pizza ingredients like cheese, sauce, and toppings, wrapped in dough and baked to golden perfection. They originated as a convenient way to enjoy pizza flavors on the go, with roots that trace back to Italian calzones and other stuffed bread traditions.
While similar to calzones, pizza pockets differ primarily in shape and dough preparation. Calzones are often larger, crescent-shaped, and made with pizza dough folded over, sometimes brushed with olive oil before baking. Pizza pockets tend to be smaller, more uniformly sealed turnovers, and can be made with various dough types, including puff pastry or biscuit dough.
Compared to commercial frozen “Hot Pockets,” homemade pizza pockets offer fresher taste, customizable fillings, and no preservatives or artificial ingredients. They’re budget-friendly, freezer-friendly, and infinitely adaptable to your cravings, making them a delicious alternative to store-bought options.
Ingredient Breakdown & Smart Substitutions
Here’s a breakdown of the essential ingredients you’ll need, along with smart swaps to suit your tastes and dietary needs:
Dough Options
Store-bought pizza dough: Convenient and ready to roll, available fresh or frozen at most grocery stores.
Puff pastry: For a flakier, buttery crust that’s quick to prep—just thaw and roll out.
Biscuit dough: For a tender, flaky crust with a slight rise, biscuit dough is an easy shortcut.
Homemade yeast dough: For the purists, making your own pizza dough yields the best texture and flavor but requires extra time for rising.
Cheese
Mozzarella: The classic melt and stretch that every pizza pocket needs. Use fresh grated mozzarella for best results.
Cheddar or provolone: Add depth and sharpness with a mix of cheeses for more flavor complexity.
Avoid pre-shredded cheese with anti-caking agents if possible, as it can affect melting quality.
Sauce
Jarred marinara or pizza sauce: Convenient and flavorful. Look for low-sugar, high-quality brands.
Homemade quick sauce: Mix tomato paste with garlic powder, dried oregano, basil, salt, and a little water or olive oil for a fast, customizable option.
Fillings
Meats: Pepperoni, ham, cooked sausage, or bacon all work well.
Vegetables: Mushrooms, onions, bell peppers, and olives add great texture and flavor—make sure they’re cooked or sautéed and patted dry to avoid sogginess.
Herbs and spices: Fresh basil, oregano, or crushed red pepper flakes can add extra pizzazz.
Binder & Finish
Egg wash: Beaten egg brushed over the pockets before baking gives a shiny, golden crust.
Milk wash: A dairy alternative for a lighter finish if preferred.
Dietary Swaps
Gluten-free dough: Many stores sell gluten-free pizza dough or crust mixes suitable for these pockets.
Dairy-free cheese: Plant-based cheeses can substitute for mozzarella in vegan or lactose-intolerant diets.
Vegan versions: Use puff pastry or dough without dairy or eggs, and swap cheese for vegan alternatives.
Pro Tip: Roll the dough evenly to about 1/8 inch thickness, and don’t overfill the pockets to avoid leaks or soggy bottoms.
Must-Have Tools & Prep Setup
To make your pizza pockets easily and efficiently, gather these essential tools:
Baking sheet and parchment paper: For easy cleanup and even baking.
Rolling pin or clean bottle: To roll out your dough uniformly.
Sharp knife or pizza cutter: For cutting dough into neat rectangles or circles.
Pastry brush: To apply egg or milk wash for that golden finish.
Cooling rack: To let pockets cool evenly and stay crispy.
Optional tools that help:
Silicone baking mat: For non-stick baking and reusability.
Food processor: Handy if you’re making dough from scratch.
Prep Tips to Save Time & Prevent Common Issues
Divide dough into equal portions first: Use a ruler or kitchen scale for consistency, ensuring even cooking and portion control.
Keep fillings dry: Vegetables and cooked meats should be patted dry with paper towels to prevent soggy dough. Excess moisture is the enemy of crisp pockets.
Seal edges properly: Press edges firmly with your fingers, then crimp with a fork to create a tight seal that keeps fillings inside while baking.
Chill assembled pockets briefly: If your dough becomes too warm and soft while assembling, pop the pockets in the fridge for 10–15 minutes before baking. This helps maintain shape and reduces leakage.
With these prep tips, you’ll avoid the common pitfalls of soggy or bursting pizza pockets and enjoy perfectly golden, delicious results every time.
INSTRUCTIONS, VARIATIONS & HELPFUL TIPS
1. Step-by-Step Instructions for Perfect Pizza Pockets (≈400 words)
Step 1: Prepare Your Dough
Lightly flour your work surface and roll out the dough to about 1/8 inch thickness. If using store-bought dough or puff pastry, make sure it’s fully thawed but still cool so it’s easier to handle.
Step 2: Cut the Dough into Portions
Cut the dough into equal-sized rectangles or circles—roughly 4×6 inches works great for handheld pockets. Use a sharp knife or pizza cutter for clean edges.
Step 3: Add the Sauce and Fillings
Spread a thin layer of your pizza sauce on one half of each dough piece, leaving about ½ inch border around the edges. Avoid using too much sauce to prevent sogginess.
Layer on your cheese generously, followed by your chosen fillings. Keep the amount moderate to allow the dough to seal properly.
Step 4: Seal the Pockets
Fold the dough over the fillings to create a half-moon or rectangular pocket. Press down firmly on the edges to remove air pockets, then crimp the edges with a fork to seal completely. This step is crucial to prevent leaks.
Step 5: Apply the Egg or Milk Wash
Use a pastry brush to lightly coat the tops and edges with beaten egg or milk. This will give your pockets a beautiful golden color and help the edges stick together.
Step 6: Bake Until Golden and Bubbling
Place the pockets on a parchment-lined baking sheet, spaced apart. Bake in a preheated oven at 375°F (190°C) for 18–22 minutes, or until the crust is golden and cheese is melted and bubbly inside.
Step 7: Cool Slightly Before Serving
Remove the pockets from the oven and transfer to a cooling rack. Let them rest for 5 minutes before eating to avoid burning your mouth and allow fillings to set.
Variations to Customize Your Pizza Pockets
Meat Lover’s Delight
Load your pockets with pepperoni, cooked sausage, and crispy bacon for a protein-packed indulgence.
Veggie Supreme
Try sautéed mushrooms, onions, bell peppers, spinach, and black olives for a colorful, nutrient-rich option.
BBQ Chicken
Swap tomato sauce for barbecue sauce and fill with shredded cooked chicken, mozzarella, and red onion for tangy, smoky flavor.
Four Cheese
Mix mozzarella, cheddar, parmesan, and provolone for a rich, gooey cheese explosion.
Spicy Kick
Add jalapeños, crushed red pepper flakes, or hot sauce to your fillings for a fiery twist.
Expert Tips for Perfect Pizza Pockets
Don’t overfill: Too many fillings can cause leaks and soggy bottoms. Less is more when it comes to filling thickness.
Use cold dough: Dough that’s too warm can become sticky and difficult to handle, causing tearing. Chill if needed.
Dry fillings: Sauté vegetables and drain excess moisture thoroughly to avoid sogginess.
Patch tears immediately: If the dough tears while folding, pinch the tear closed or patch with a small piece of dough.
Freeze before baking: For make-ahead meals, freeze assembled pockets on a baking sheet until solid, then transfer to a freezer bag. Bake from frozen, adding a few extra minutes.
Serving Ideas to Elevate Your Pizza Pockets
Serve your pizza pockets hot with a side of marinara or ranch dipping sauce for extra indulgence. Pair them with a fresh green salad or crispy veggies to balance the richness. For kids’ lunches, pack pockets with fruit slices and a small treat. They’re also perfect for parties—just cut larger pockets into bite-sized pieces for easy sharing. Leftovers can be reheated in the oven or toaster oven to revive their crispiness, making them a great make-ahead snack or meal.
Storage & Reheating
To store: Keep baked pizza pockets in an airtight container in the refrigerator for up to 3 days.
To freeze: Wrap each pocket individually in plastic wrap and place in a freezer-safe bag or container for up to 2 months.
To reheat: Warm in a 350°F (175°C) oven for 10–15 minutes until heated through and crispy. Avoid microwaving to prevent soggy crusts. For frozen pockets, bake at 375°F (190°C) for 20–25 minutes, or until golden and hot.
Frequently Asked Questions (FAQs)
Q: Can I make pizza pockets ahead of time?
A: Yes! Assemble the pockets, freeze them on a baking sheet, then transfer to a bag. Bake directly from frozen, adding a few minutes to the cooking time.
Q: What if my pizza pockets leak?
A: Make sure not to overfill and press edges firmly when sealing. Using an egg wash helps seal the dough. Chilling pockets before baking can also reduce leaks.
Q: Can I use gluten-free dough?
A: Absolutely! Gluten-free dough works well, but watch baking time as it may vary.
Q: How do I keep the crust crispy?
A: Baking on parchment or a silicone mat helps, and reheating in the oven or toaster oven instead of a microwave keeps the crust crisp.
Homemade Easy Cheesy Pizza Pockets
Equipment
- Baking sheet
- Parchment paper
- Rolling pin or clean bottle
- Sharp knife or pizza cutter
- Pastry brush
- Cooling rack
- Optional: Silicone baking mat, food processor (for dough)
Ingredients
- 1 lb pizza dough (store-bought or homemade) or equivalent puff pastry/biscuit dough
- 1 cup shredded mozzarella cheese
- ½ cup pizza or marinara sauce
- ½ cup your choice of fillings (pepperoni, cooked sausage, sautéed veggies, etc.)
- 1 egg (beaten, for egg wash) or 2 tbsp milk
- Optional: Additional cheese (cheddar, provolone), herbs, spices
Instructions
- Preheat oven to 375°F (190°C). Line a baking sheet with parchment paper.
- Roll out dough on a lightly floured surface to 1/8 inch thickness. Cut into 8 equal rectangles (about 4x6 inches).
- Spread about 1 tablespoon of sauce on half of each rectangle, leaving a ½-inch border.
- Layer cheese and fillings on the sauce side, avoiding overfilling.
- Fold dough over to form pockets and press edges to seal, then crimp with a fork.
- Brush tops with beaten egg or milk wash.
- Bake for 18–22 minutes, until golden brown and cheese is melted.
- Cool on a rack for 5 minutes before serving.
Notes
- For crispier crust, bake on a silicone mat or preheated pizza stone.
- To freeze, assemble pockets and freeze on a baking sheet until firm, then transfer to freezer bags. Bake from frozen, adding 5–7 minutes to baking time.
- Avoid soggy pockets by patting fillings dry and using a thin layer of sauce.
- Customize with your favorite cheeses and toppings for endless variety.