What Makes Banoffee Pie the Ultimate Caramel Banana Bliss
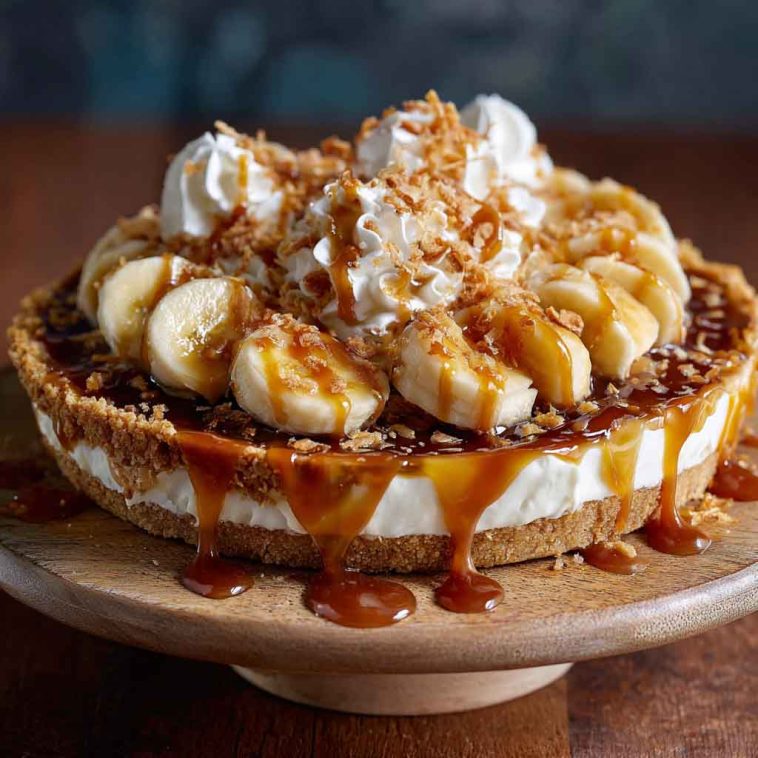
Banoffee pie is a dessert that effortlessly combines rich, creamy caramel, sweet ripe bananas, and a crunchy buttery crust into one heavenly bite. It’s no wonder this pie has become a beloved classic, cherished for its perfect balance of textures and flavors that delight every palate. Whether served at a family gathering, a special occasion, or a casual weekend treat, banoffee pie feels both indulgent and comforting. The smoothness of the whipped cream topping adds a lightness that complements the dense caramel and fresh fruit underneath. Best of all, this show-stopping dessert is surprisingly simple to prepare, making it a fantastic choice for bakers of all skill levels who want to impress without stress. Prepare for a slice of sweet nostalgia that’s as delightful to make as it is to eat.
The Origin and History of Banoffee Pie
Banoffee pie traces its origins back to the 1970s in England, where it was invented by chefs Nigel Mackenzie and Ian Dowding at The Hungry Monk restaurant in Sussex. The name “banoffee” cleverly blends “banana” and “toffee,” capturing the essence of its two star ingredients. Originally a humble creation, the pie quickly won hearts across Britain, celebrated for its comforting flavors and simple assembly. Over the decades, banoffee pie has evolved, inspiring countless variations worldwide—from adding coffee or chocolate notes to experimenting with crust bases beyond the classic digestive biscuit. Its global appeal lies in its nostalgic feel and versatility, fitting perfectly into British teatime culture and beyond. Today, it remains a favorite dessert in cafes and homes alike, a testament to its timeless charm and universally loved flavor combination.
Key Ingredients That Bring Banoffee Pie to Life
The foundation of a great banoffee pie starts with its crust, traditionally made from crushed digestive biscuits or graham crackers mixed with melted butter. This base provides a buttery, slightly sweet crunch that perfectly contrasts the soft filling. Next comes the luscious caramel layer, usually crafted from sweetened condensed milk boiled to create rich dulce de leche, though store-bought caramel sauces can offer a convenient shortcut—just be sure to choose one that’s thick and flavorful.
The bananas should be ripe but firm to provide natural sweetness and avoid mushiness. Overripe bananas can make the pie soggy and overly sweet, so aim for ones with bright yellow skin and a few brown spots. Freshly whipped cream adds a light, airy topping that balances the dense caramel and fruit beneath. Optional toppings like chocolate shavings, chopped nuts, a sprinkle of cinnamon, or a dusting of coffee powder can elevate the pie with extra texture and complementary flavors.
Using high-quality ingredients is crucial; good butter, fresh cream, and ripe bananas make a noticeable difference in the final dessert’s flavor and texture.
Step-by-Step Guide to Making a Classic Banoffee Pie
Step 1: Make the Crust
Crush 200g digestive biscuits or graham crackers into fine crumbs using a food processor or a rolling pin in a zip-top bag. Mix with 100g melted unsalted butter until well combined. Press the mixture evenly into the base and slightly up the sides of a 9-inch pie tin. Chill in the fridge for at least 30 minutes to set.
Step 2: Prepare the Caramel Layer
Traditional caramel is made by boiling a can of sweetened condensed milk for 2-3 hours until it turns a rich, golden dulce de leche. Alternatively, use a good-quality store-bought caramel sauce for speed. Spread the caramel evenly over the chilled crust and return to the fridge.
Step 3: Add the Bananas
Slice 3-4 ripe but firm bananas evenly and layer them carefully over the caramel. Ensure the slices cover the entire surface for balanced bites.
Step 4: Whip the Cream
Whip 300ml heavy cream with a little sugar (about 1 tbsp) until soft peaks form. Spread the whipped cream gently over the bananas in an even layer.
Step 5: Decorate and Chill
Decorate the top with chocolate shavings, crushed nuts, or a dusting of cinnamon or coffee powder if desired. Chill the pie for at least 2 hours before serving to allow flavors to meld and the cream to set.
Tips:
-
Use a sharp knife to slice bananas evenly.
-
Don’t rush chilling times; they are key to texture.
-
Avoid making the cream too stiff to keep it light and fluffy.
Essential Tools and Equipment for a Perfect Banoffee Pie
To craft a flawless banoffee pie, some key tools make the process easier and more enjoyable. A 9-inch pie tin or springform pan is ideal for shaping and serving your dessert neatly. For crushing biscuits, a food processor offers speed and even texture, but a rolling pin and sturdy bag work just as well. A medium saucepan is necessary if you’re boiling condensed milk for caramel, providing safe and controlled heat.
A hand mixer or stand mixer makes whipping cream effortless, ensuring soft peaks every time. For spreading layers evenly, a rubber spatula or butter knife is handy. Presentation can be elevated with a grater for chocolate shavings or a small sieve to dust cinnamon or cocoa powder finely.
Optional tools like a silicone baking mat for easy cleanup or a cooling rack to rest the pie before chilling add convenience but aren’t essential. With these tools, your banoffee pie experience will be smooth, efficient, and enjoyable.
Delicious Banoffee Pie Variations to Try
While the classic banoffee pie is a crowd-pleaser, experimenting with variations can add exciting twists to this beloved dessert. For those following a vegan or dairy-free diet, swapping traditional whipped cream for coconut cream works beautifully. You can also create a luscious plant-based caramel using coconut milk and coconut sugar, which adds a subtle tropical note.
If gluten is a concern, try replacing the traditional biscuit crust with an oat-based crust or a nutty crust made from ground almonds or walnuts mixed with a little coconut oil or vegan butter. These alternatives bring added texture and flavor while keeping it gluten-free.
For chocolate lovers, layering the pie with a rich chocolate ganache or incorporating cocoa powder into the caramel adds indulgence and depth. Another favorite is the coffee-infused caramel, perfect for mocha enthusiasts—simply stir in a shot of espresso or instant coffee granules into the caramel layer.
To make individual servings, try creating mini banoffee pies in jars or tart pans. These portable versions are perfect for parties or gifting. Finally, adding a sprinkle of toasted nuts or a light dusting of sea salt over the top creates a delightful contrast in texture and a subtle flavor boost, elevating the experience even further.
Serving Suggestions and Presentation Tips
Banoffee pie pairs wonderfully with a cup of freshly brewed coffee, a glass of dessert wine, or a scoop of vanilla ice cream for an extra indulgent treat. When serving, a few simple garnishes can transform the pie into a stunning centerpiece—try fresh mint leaves, elegant chocolate curls, or a sprinkle of crushed toasted nuts for texture and visual appeal.
This dessert shines at holidays, potlucks, birthdays, or any gathering where you want to impress without fuss. For clean slices, use a sharp knife dipped in hot water and wiped dry between cuts to prevent sticking.
To create a show-stopping dessert table, place the banoffee pie on a cake stand, surrounded by complementary sweets like shortbread or caramel candies. The inviting aroma of caramel and bananas will draw everyone in, making it the star of the celebration.
How to Store Banoffee Pie and Keep It Fresh
Banoffee pie should be stored in the refrigerator, covered loosely with plastic wrap or a pie dome to protect it from absorbing other fridge odors while preserving moisture. It keeps well for up to 3 days but is best enjoyed fresh for optimal texture—after that, bananas may start to brown and the crust may soften.
Freezing is not generally recommended, as the whipped cream and banana layers don’t freeze well and can become watery or mushy upon thawing. However, you can freeze the crust or caramel separately for later use.
When ready to serve, take the pie out of the fridge about 10 minutes beforehand to soften the caramel slightly. If you want a slightly firmer texture, serve it chilled.
Watch for signs of spoilage like an off smell, discoloration, or slimy texture, and discard if you notice any.
Frequently Asked Questions (FAQs)
Q1: Can I make banoffee pie ahead of time?
Yes! Banoffee pie actually benefits from resting in the fridge for at least 2 hours or overnight to allow the flavors to meld and the layers to set perfectly.
Q2: How do I prevent the crust from getting soggy?
Use crushed biscuits mixed with melted butter and chill the crust before adding the filling. Some also brush the crust lightly with melted chocolate or a thin layer of caramel before assembling to create a moisture barrier.
Q3: What’s the easiest way to make homemade caramel?
Boiling a sealed can of sweetened condensed milk for 2-3 hours is a foolproof method. Alternatively, simmer condensed milk gently in a saucepan until thick and golden, or use good-quality store-bought caramel.
Q4: Can I use bananas that are not fully ripe?
For the best flavor and texture, ripe but firm bananas are ideal. Overripe bananas may make the pie soggy and overly sweet, while underripe bananas lack the desired sweetness.
Q5: How long does banoffee pie last in the fridge?
Up to 3 days if properly stored. The bananas and cream start to lose freshness after that, affecting taste and texture.
Q6: What are good substitutes for whipped cream?
For a lighter or dairy-free option, try coconut whipped cream or aquafaba (chickpea water) whipped with a bit of sugar.
Q7: Is banoffee pie suitable for freezing?
Freezing is generally not recommended as the cream and bananas do not freeze well and can separate or become watery on thawing.
Q8: How can I make banoffee pie healthier?
Use a nut-based crust, swap regular caramel for a date or coconut sugar caramel, reduce the cream quantity, or use Greek yogurt whipped with honey as a topping for a lighter twist.

Banoffee Pie | Caramel Banana Bliss
Equipment
- 9-inch pie dish or springform pan
- Mixing bowls
- Saucepan for caramel
- Electric hand mixer or stand mixer (for whipping cream)
- Whisk
- Spatula
- Measuring Cups and Spoons
- Rolling pin or food processor (for crust preparation)
Ingredients
- 250g (9 oz) digestive biscuits or graham crackers
- 100g (7 tbsp) unsalted butter, melted
- 1 can (395g/14 oz) sweetened condensed milk (for caramel/dulce de leche)
- 3–4 ripe bananas, sliced
- 300ml (1¼ cups) heavy whipping cream
- 2 tbsp powdered sugar (optional)
- 1 tsp vanilla extract (optional)
- Chocolate shavings or cocoa powder, for garnish (optional)
Instructions
- Prepare the crust:Crush the digestive biscuits into fine crumbs using a rolling pin or food processor. Mix the crumbs with melted butter until combined. Press the mixture evenly into the base and sides of your pie dish. Chill in the fridge while preparing the caramel.
- Make the caramel:Boil the unopened can of sweetened condensed milk in a pot of water for 2–3 hours (make sure the can is fully submerged, topping up water as needed) to create dulce de leche. Alternatively, use store-bought caramel sauce for convenience. Let it cool completely.
- Assemble the pie:Spread the caramel evenly over the chilled crust. Layer sliced bananas evenly on top.
- Whip the cream:In a clean bowl, whip the heavy cream with powdered sugar and vanilla extract (if using) until soft peaks form.
- Top the pie:Spread the whipped cream over the bananas, smoothing gently.
- Chill and serve:Refrigerate the assembled pie for at least 2 hours to set. Before serving, garnish with chocolate shavings or a dusting of cocoa powder.
Notes
- Caramel shortcut: Use good-quality store-bought dulce de leche or caramel sauce to save time.
- Ripeness matters: Use ripe but firm bananas to avoid soggy pie layers.
- No-bake ease: No oven required—ideal for summer or quick desserts.
- Storage: Keep refrigerated and consume within 2–3 days for best freshness.
- Variations: Add a sprinkle of chopped nuts or a drizzle of coffee liqueur for extra flair.
- Safety tip: If boiling condensed milk, never open the can while hot. Let it cool fully.