Why Caramelized Banana Sundaes Are Irresistible
There’s something truly magical about the moment warm, golden caramelized bananas hit a scoop of velvety ice cream. It’s the kind of dessert that instantly feels indulgent, comforting, and a little bit fancy—all without requiring any complicated steps.
What makes a Caramelized Banana Sundae so special is the beautiful contrast it delivers: hot and cold, silky and creamy, soft and crunchy. It’s the kind of dish that delights both kids and grown-ups, and it comes together with just a skillet and a few simple ingredients you probably already have.
This treat is a perfect go-to for last-minute dessert cravings, impromptu dinner parties, or even a date-night-in. Whether you’re swirling warm banana sauce over classic vanilla or layering it up with whipped cream and nuts, this sundae is guaranteed to impress.
In this post, I’ll walk you through caramelizing techniques, serving ideas, and expert tricks to take this cozy, nostalgic dessert to the next level.
What Is a Caramelized Banana Sundae?
A Caramelized Banana Sundae is a delightful twist on the classic ice cream sundae. At its core, it’s a warm dessert built around bananas that are gently cooked in a rich mixture of butter and sugar—often with a splash of vanilla or rum—to create a deep golden glaze. Once caramelized, the bananas are served warm over scoops of ice cream, and finished with your favorite toppings like whipped cream, chopped nuts, or a drizzle of chocolate sauce.
This sundae draws inspiration from Bananas Foster, the iconic New Orleans dessert, but dials it down into a simpler, more weeknight-friendly treat. You get the same indulgent flavor profile—minus the flambé and restaurant fuss.
The beauty of this dessert is in its balance: warm, buttery fruit and gooey sauce melting over cool, creamy ice cream. With just the right crunch from toppings and a cherry on top, it’s a texture and flavor explosion that’s surprisingly easy to master.
Ingredient Breakdown: Bananas, Caramel & Toppings
At the heart of this sundae are a few simple ingredients that shine when used right.
Bananas
Start with ripe, but not overripe, bananas. Look for fruit that’s yellow with a few brown specks. This ensures the bananas are sweet but still firm enough to hold their shape when caramelized. If they’re too soft, they’ll turn mushy in the pan.
Caramel Sauce Base
There are two main ways to make the caramel:
Quick caramel with brown sugar and butter melted together. It’s fast and forgiving.
Or a dry caramel by melting white sugar directly in the pan for a deeper flavor—though this requires more precision.
Either way, you can add a splash of vanilla extract, dark rum, or cinnamon for extra flair. A pinch of sea salt brings balance.
Ice Cream
Classic vanilla pairs beautifully with caramelized bananas, but don’t stop there. Try chocolate, coffee, coconut, or even salted caramel for variation.
Toppings
This sundae loves a good finishing touch. Add:
Toasted nuts (walnuts, pecans, or almonds)
Whipped cream
Chocolate or caramel drizzle
Maraschino cherry
Shaved chocolate or flaked sea salt for extra oomph
Tools & Prep Essentials
You don’t need fancy equipment, but a few kitchen basics help ensure smooth execution:
Non-stick skillet or heavy-bottomed frying pan (for even caramelization)
Spatula or tongs to gently flip banana slices
Measuring spoons for precision with sugar and flavorings
Knife and cutting board to prep bananas
Ice cream scoop for perfect presentation
Serving bowls or dessert glasses to build your sundae
Optional tools include a baking sheet if using the oven method for caramelizing, and a pastry brush if you want to glaze bananas more precisely.
Step-by-Step Recipe: Caramelizing Bananas & Building the Sundae
Here’s how to bring it all together like a pro.
🍌 Step 1: Prep Your Bananas
Peel and slice the bananas either lengthwise (for dramatic presentation) or into thick coins (easier for scooping). If not using immediately, toss lightly in lemon juice to prevent browning.
🔥 Step 2: Make the Caramel
In a skillet over medium heat, melt 2 tablespoons of butter. Add 2–3 tablespoons of brown sugar and stir until the mixture bubbles and thickens (about 2 minutes). Add vanilla, rum, or a pinch of cinnamon if desired.
Pro Tip: Want a deeper caramel flavor? Let the sugar darken just slightly before adding bananas—but don’t walk away. Burnt sugar
Step 3: Caramelize the Bananas
Add your banana slices to the pan in a single layer—crowding will steam the fruit instead of caramelizing it. Cook each side gently for 2–3 minutes, flipping carefully, until the bananas turn a beautiful golden brown and are fully coated in glossy caramel.
If you prefer an oven method, arrange the banana slices on a parchment-lined baking sheet, brush them with a mixture of melted butter and brown sugar, then broil 4–6 inches from the heat for about 3–5 minutes, until bubbling and caramelized. Keep a close eye so they don’t burn!
Step 4: Build Your Sundae
Scoop your favorite ice cream into bowls or pretty sundae glasses. Gently layer the warm caramelized bananas on top, letting their sweet warmth melt into the cold creaminess.
For an extra indulgent touch, spoon any leftover caramel sauce from the pan over the whole sundae. This adds a luscious, sticky finish that takes it to the next level.
Step 5: Add Toppings & Serve
Finish with a sprinkle of toasted nuts, a dollop of whipped cream, a drizzle of rich chocolate sauce, and a classic maraschino cherry on top.
Serve immediately to enjoy the glorious contrast of warm caramelized bananas meeting cold, creamy ice cream—the perfect balance of textures and temperatures.
Expert Tips for Perfect Caramel & Banana Texture
Choose the right bananas: Use ones that are just ripe—yellow with a few spots. They’ll hold their shape while cooking but still taste sweet and flavorful.
Control the heat: Keep your skillet at medium heat. Too hot, and the sugar burns before caramelizing; too low, and the sauce won’t thicken properly.
Give bananas room: Don’t overcrowd the pan. Each slice needs space to develop that gorgeous caramelized crust.
Fix thick caramel: If your caramel gets too thick or sticky, add a splash of milk or cream to loosen it to a pourable consistency.
Serve warm, serve fast: Bananas and caramel taste best hot. Assemble and serve right away to keep that amazing hot-and-cold contrast.
Creative Variations & Flavor Twists
The beauty of caramelized banana desserts lies in their versatility—there’s plenty of room to get creative and tailor the flavors to your mood or occasion. Here are some fun, tasty twists to try next time you whip up this treat:
Bananas Foster Twist: Give your caramelized bananas a classic New Orleans vibe by adding a splash of dark rum and a pinch of cinnamon to the caramel sauce. For a bit of theatrical flair, ignite the rum gently right before serving to create a tableside flame—just be careful and enjoy the show! This adds a warm, boozy depth and a cozy spicy note.
Spiced Variants: If you love warming spices, try stirring in nutmeg, ground ginger, or cardamom into your caramel sauce. These spices complement the natural sweetness of the bananas and add a subtle complexity that’s perfect for fall or winter desserts.
Tropical Style: Embrace island flavors by tossing in toasted coconut flakes or small mango cubes alongside your bananas. The coconut adds crunch and nuttiness, while mango brings a fresh, juicy contrast—making the dish feel bright and summery.
Chocolate-Citrus Combo: For a sophisticated flavor play, drizzle melted dark chocolate or chocolate sauce over your caramelized bananas, then sprinkle with finely grated orange or lemon zest. The citrus zest cuts through the richness and adds a zingy freshness.
Healthier Version: To lighten up the dessert without losing flavor, swap regular butter for coconut oil and use coconut sugar instead of white sugar in your caramel. Serve it alongside Greek yogurt or frozen yogurt instead of ice cream for a tangy, protein-rich twist that still feels indulgent.
Vegan Option: Easily make this dessert vegan-friendly by using vegan butter or coconut oil and coconut sugar. Pair the caramelized bananas with your favorite plant-based ice cream for a delicious dairy-free treat everyone can enjoy.
Serving Suggestions & Presentation Tips
Presentation can elevate this dessert from simple to stunning in seconds. Here are some ways to make your caramelized banana dish truly shine on the table:
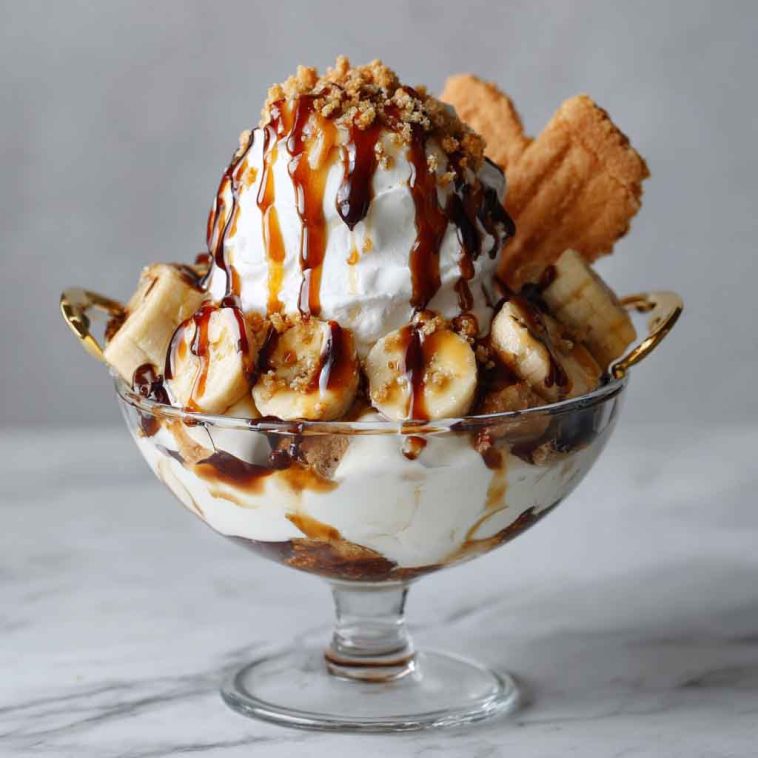
Showcase Layers: Serve your caramelized bananas and ice cream in clear glass cups or parfait bowls to highlight the luscious layers of caramel, fruit, and creaminess. The contrast of golden bananas against creamy white ice cream is visually appealing.
Artful Arrangement: Place banana slices or halves artfully on top or side-by-side, then drizzle the caramel sauce generously but with intention—think gentle zigzags or delicate pools rather than a clumsy splash.
Add Freshness & Color: Garnish with fresh berries like raspberries or blueberries, and add a sprig of fresh mint for a pop of vibrant green. This not only brightens the plate but also adds a refreshing balance to the sweetness.
Creative Presentation: Set up a sundae bar where guests can build their own caramelized banana sundaes, or serve mini glass parfaits for a party-friendly option. For a fun twist, thread caramelized banana chunks onto skewers and dip ends in melted chocolate before chilling for a playful finger food dessert.
Drink Pairings: Complement the dessert with coffee (a strong espresso or dulce de leche latte works wonders) or a glass of dessert wine like a late-harvest Riesling or Moscato to enhance the overall indulgence.
Storage, Reheating & Make-Ahead Tips
Caramelized bananas are best enjoyed fresh because the fruit softens quickly and the ice cream melts fast. However, with a little planning, you can prepare parts of the dessert ahead:
Caramel Sauce Storage: Make the caramel sauce in advance and store it in an airtight container in the fridge for up to one week. When ready to serve, gently reheat it over low heat, stirring occasionally to restore that glossy, pourable texture. Avoid boiling, as this can cause the sugar to crystallize or burn.
Bananas: It’s best to caramelize bananas fresh right before serving to maintain their shape and texture. If you must prepare early, lightly caramelize and cool, then keep covered in the fridge for a few hours—but note they may become a bit softer and lose some of their fresh flavor.
Ice Cream: Keep ice cream frozen until the last minute, and serve immediately once scooped. Pre-chill serving dishes to slow melting.
Avoid Freezing the Assembled Sundae: Freezing a fully assembled banana sundae isn’t recommended—it causes the bananas to become mushy and the ice cream to develop ice crystals, ruining texture and flavor.
Expert Tips for Perfect Caramel & Banana Texture
Choose the right bananas: Use ones that are just ripe—yellow with a few spots. They’ll hold their shape while cooking but still taste sweet and flavorful.
Control the heat: Keep your skillet at medium heat. Too hot, and the sugar burns before caramelizing; too low, and the sauce won’t thicken properly.
Give bananas room: Don’t overcrowd the pan. Each slice needs space to develop that gorgeous caramelized crust.
Fix thick caramel: If your caramel gets too thick or sticky, add a splash of milk or cream to loosen it to a pourable consistency.
Serve warm, serve fast: Bananas and caramel taste best hot. Assemble and serve right away to keep that amazing hot-and-cold contrast.
Even experienced cooks run into minor hiccups sometimes. Here’s how to fix common caramelized banana and caramel sauce problems:
Burnt Sugar: If your caramel tastes bitter or smells burnt, lower the heat and watch carefully as the sugar melts. Remove from heat as soon as it turns a golden amber color. Stir gently but avoid over-stirring.
Mushy Bananas: Choose bananas that are ripe but still firm. Overripe bananas cook too quickly and become mushy. Also, don’t overcook—just a minute or two per side is usually enough.
Thin Caramel Sauce: If your sauce is too runny, cook it a little longer to thicken or whisk in a tiny bit of cornstarch slurry to help it set.
Sauce Separation: If the sauce looks curdled or oily, whisk in a splash of cream or butter off the heat to emulsify and smooth it out.
Ice Cream Melts Too Fast: Pre-chill bowls or serve one portion at a time to keep ice cream from melting quickly.
FAQs – People Also Ask
Q1: What bananas are best for caramelizing?
Use bananas that are ripe but still firm—yellow with just a few brown spots. Overripe bananas tend to break down quickly and become mushy when cooked, losing their shape and texture.
Q2: Can I caramelize bananas in the oven?
Yes! Place banana halves or slices on a parchment-lined baking sheet, and broil them at 425°F (220°C) for 3 to 5 minutes per side. Keep a close eye to prevent burning and achieve a nice caramel color.
Q3: How do I prevent sugar from burning when making caramel?
Cook sugar over medium heat rather than high, and avoid stirring aggressively. Watch for the sugar to melt evenly and turn a golden amber color—remove from heat immediately to avoid bitterness.
Q4: Can I use frozen bananas?
Thawed frozen bananas tend to be mushier and lose shape, so fresh bananas are preferred for caramelizing to keep the texture intact.
Q5: Is this dessert healthy?
Caramelized bananas do contain added sugars and fats from the caramel and butter. For a healthier option, consider using coconut sugar or reducing the amount of caramel, and serve with Greek yogurt or frozen yogurt instead of ice cream.
Q6: What ice cream flavors work best with caramelized bananas?
Vanilla is a classic and balances the sweetness nicely. Other great options include chocolate, caramel swirl, coffee, or coconut ice cream, all complementing the bananas’ flavor beautifully.
Q7: Can I make a caramel banana sundae ahead of time?
You can prepare the caramel sauce and bananas in advance, storing them separately in the fridge. Reheat the sauce gently before serving and combine with freshly scooped ice cream for the best texture and taste.

Caramelized Banana Sundae Recipe
Equipment
- Skillet or non-stick frying pan
- Spatula or tongs
- Measuring spoons
- Knife and cutting board
- Ice cream scoop
- Serving bowls or sundae glasses
- Optional: Baking sheet and parchment paper (for oven method)
Ingredients
- 3–4 firm, ripe bananas (yellow with slight spots)
- 3 tbsp unsalted butter
- 1/4 cup brown sugar (light or dark)
- 1 tsp vanilla extract (optional)
- 1 tbsp rum or orange juice (optional)
- Juice of 1/2 lemon (to toss bananas)
- 1 quart vanilla ice cream (or your preferred flavor)
- Toppings: chopped nuts (walnuts or almonds), whipped cream, chocolate sauce, maraschino cherries, sea salt flakes (optional)
Instructions
- Prepare Bananas: Peel bananas and slice lengthwise or into 1/2-inch thick rounds. Toss gently with lemon juice to prevent browning.
- Make Caramel: In a skillet over medium heat, melt butter. Stir in brown sugar and cook until it melts and becomes syrupy (about 2 minutes). Optionally add vanilla and rum.
- Caramelize Bananas: Arrange banana slices in a single layer in the skillet. Cook for 2–3 minutes per side, flipping gently, until bananas are golden and coated in caramel. Avoid overcrowding. (Or broil bananas on a parchment-lined baking sheet brushed with butter and brown sugar for 3–5 minutes.)
- Assemble Sundaes: Scoop ice cream into serving dishes. Top with warm caramelized bananas and spoon any extra caramel sauce over the top.
- Add Toppings: Garnish with nuts, whipped cream, chocolate sauce, and a cherry if desired. Serve immediately.
Notes
- Banana ripeness: Use firm bananas for best texture; overripe bananas become mushy when cooked.
- Caramel consistency: If caramel thickens too much, stir in a splash of milk or cream to loosen.
- Serving tip: Serve immediately to enjoy the contrast of warm bananas and cold ice cream.
- Variations: Add spices like cinnamon or nutmeg to the caramel for extra flavor. Try coconut sugar and coconut oil for a healthier twist.
- Make-ahead: Prepare caramel sauce in advance and reheat gently before caramelizing bananas. Avoid assembling sundaes until ready to serve.