Why This Cake Deserves a Standing Ovation
When one chocolate isn’t enough… go for three. A Triple Chocolate Mousse Cake is the ultimate dessert for serious chocolate lovers. Each bite is a symphony of textures and flavors—from the bold depth of dark chocolate to the silky richness of milk chocolate, finishing with the creamy sweetness of white chocolate.
This elegant, layered masterpiece isn’t just delicious—it’s a showstopper. Its distinct strata create a visually striking slice that turns heads at birthdays, holidays, dinner parties, or anytime you want to impress.
Best of all? It’s surprisingly doable at home with a few smart techniques. Whether you’re a seasoned baker or a weekend dessert enthusiast, this guide will walk you through everything—from choosing the right base to achieving those perfect mousse layers. Let’s dive into the chocolate trifecta of your dreams.
What Is Triple Chocolate Mousse Cake?
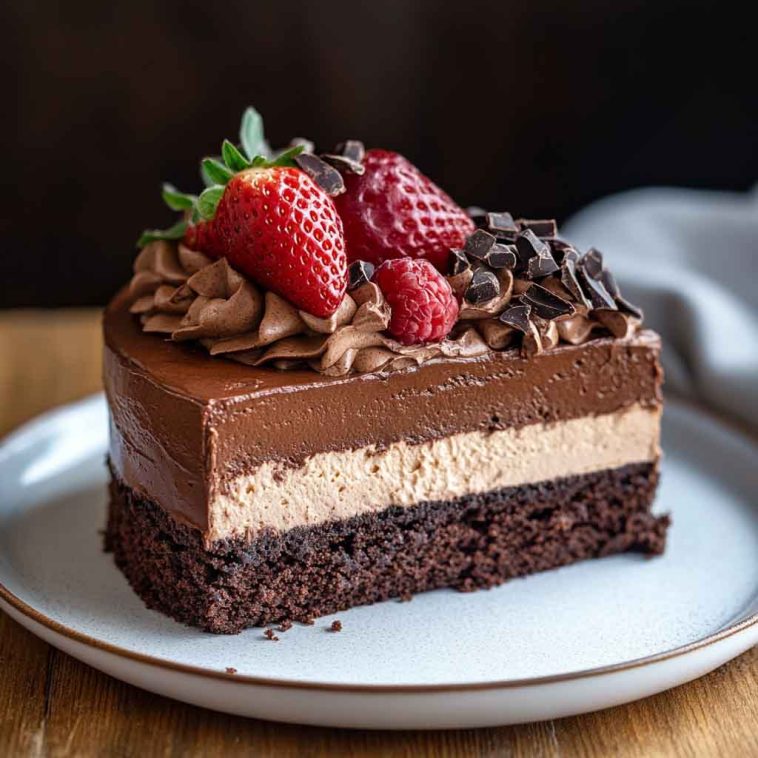
Triple Chocolate Mousse Cake is a luxurious, layered dessert consisting of three mousse tiers, each made from a different type of chocolate: dark, milk, and white. It’s typically constructed on a base layer—most often a rich brownie, sponge cake, or chocolate cookie crust.
The magic lies in the texture: light, airy mousse that melts in your mouth, with distinct layers that each bring something special to the table. The dark chocolate layer brings intensity and slight bitterness, the milk chocolate adds creamy sweetness, and the white chocolate offers mellow richness.
The cake is usually set in a springform pan and chilled rather than baked—making it a no-bake favorite after the base is done. A dusting of cocoa powder, glossy ganache, or a flourish of chocolate curls on top adds the final touch.
It’s a balance of elegance and indulgence that’s hard to beat.
The Three Chocolate Layers: Flavor and Texture Breakdown
Each layer of this cake has a unique role—together, they create harmony on the plate.
Dark Chocolate Mousse: This is your flavor anchor. With a slightly bitter, bold profile, it provides depth and richness. It also balances the sweetness of the layers above. For best results, use 70% dark chocolate or higher for an intense flavor.
Milk Chocolate Mousse: Smooth, milky, and comforting, this middle layer softens the intensity of the dark chocolate below. Milk chocolate brings a caramel-like undertone and a creamier finish. It’s often the most crowd-pleasing layer—sweet without being too sweet.
White Chocolate Mousse: Sweet and buttery, the white chocolate top layer provides a mellow finish. Its texture is ultra-smooth and it lightens the overall flavor profile. Be sure to use real white chocolate with cocoa butter for the right texture.
The key to mousse perfection? Airiness with structure. That’s achieved with whipped cream, sometimes stabilized with gelatin or agar, folded gently into melted chocolate to form each distinct, dreamy layer.
Choosing the Right Base
Before you get to the mousse, let’s talk cake base. This foundational layer anchors the dessert and adds contrast in texture.
Brownie Base: Rich, fudgy, and dense, this is a popular choice. It adds chewiness and a deeper chocolate flavor. Make sure it’s fully cooled before layering mousse on top.
Chocolate Sponge Cake: Lighter and airier than brownie, sponge provides a more delicate base that melds smoothly with the mousse layers.
No-Bake Cookie Crust: Crushed Oreos or chocolate biscuits mixed with butter create a quick, crunchy base. Great for speed and texture, especially in summer or no-oven kitchens.
Gluten-Free Tip: Use almond flour brownies, gluten-free cookies, or flourless sponge to keep the cake fully gluten-free without sacrificing flavor.
Whichever base you choose, make sure it’s level, cool, and sturdy—a stable foundation makes for clean layers and a cake that holds its shape beautifully.
Tools and Equipment You’ll Need
To make this cake like a pro, gather the following tools:
8–9” springform pan: Removable sides make unmolding easy.
Heatproof bowls: For melting chocolate safely over a double boiler.
Whisk or hand mixer: To whip cream to the perfect soft peaks.
Silicone spatula: Essential for folding mousse gently.
Offset spatula: Helps level each layer neatly.
Parchment paper or acetate strip: Lining the pan ensures clean edges when unmolded.
Pro Tip: Use acetate collars if you want that professional, smooth-sided finish you see in pastry shops. They peel off cleanly once the cake is set.
Step-by-Step Method for Assembling Triple Chocolate Mousse Cake
Ready to build this chocolate masterpiece? Here’s how to do it step-by-step:
Step 1: Prepare Your Base
Bake a brownie or sponge base in your springform pan, or press a cookie crust into the bottom.
Let it cool completely (or chill if using a no-bake crust).
Step 2: Make the Dark Chocolate Mousse
Melt chopped dark chocolate gently over a double boiler.
Whip cream to soft peaks; if using gelatin, bloom and dissolve it first.
Fold whipped cream into cooled melted chocolate (and gelatin if using) until smooth.
Spread over the base and chill for 30–45 minutes until just set.
Step 3: Repeat with Milk Chocolate Mousse
Follow the same steps: melt, whip, fold, and layer.
Chill again until the layer is firm to the touch (about 30 minutes).
Step 4: Top with White Chocolate Mousse
Repeat once more with the white chocolate.
Spread the final layer evenly and chill for at least 4–6 hours, ideally overnight.
Step 5: Unmold and Finish
Run a warm knife along the edges, or remove the acetate strip.
Smooth the top with a warm offset spatula if desired.
Garnish with cocoa powder, chocolate curls, or whipped cream.
Now slice and serve! Each layer should be distinct, smooth, and stunning.
Pro Tips for Perfect Layers and Flawless Texture
Want bakery-level results at home? Keep these tips in mind:
Chill between layers: 20–30 minutes per mousse helps avoid blending.
Use gelatin (or agar): Just a small amount stabilizes the mousse without making it rubbery.
Don’t overwhip cream: Stop at soft peaks to avoid a grainy mousse.
Pour gently: Use a spoon or ladle to control flow and prevent splashing.
Acetate collars: These ensure a clean, professional finish and make unmolding a breeze.
With a little patience and precision, your mousse layers will look as good as they taste.
Flavor Variations & Creative Additions
Ready to put your own spin on this decadent dessert? The beauty of a triple chocolate mousse cake is how versatile it is—small tweaks can add exciting new dimensions without complicating the process.
Espresso or Kahlúa: Stir a teaspoon of instant espresso powder or a splash of Kahlúa into the dark chocolate mousse for a rich, mocha-inspired depth. The coffee notes enhance the bitterness of the dark chocolate perfectly.
Berry Purees: Layer in raspberry or cherry puree between the mousse layers to add a bright, tangy contrast that cuts through the richness and adds a pop of color.
Crunch Factor: Add texture to your base by folding in crushed hazelnuts, feuilletine (crispy crepe flakes), or chopped nuts. This gives every bite a delightful crunch that complements the creamy mousse.
Mint Chocolate Twist: Add a few drops of peppermint extract to the dark or milk chocolate mousse for a refreshing minty lift—perfect for festive occasions or summer treats.
Vegan or Dairy-Free: Substitute dairy cream with coconut cream and use vegan chocolate to create a luscious, plant-based version that everyone can enjoy.
Nutty Swirls: Swirl Nutella or peanut butter into the milk chocolate mousse for an indulgent, nutty surprise that’s sure to please kids and adults alike.
Feel free to mix and match these ideas to create your signature version of this showstopper dessert.
Serving Ideas & Presentation Tips
Presentation makes a great dessert unforgettable. Here are some pro tips to serve your mousse cake with flair:
Perfect Slices: Use a sharp knife dipped briefly in hot water, then wiped dry, before slicing. This ensures clean, smooth cuts without smudging the layers.
Elegant Garnishes: Decorate with chocolate shavings, a light dusting of cocoa powder, delicate gold leaf, or piped whipped cream rosettes for a bakery-worthy finish.
Pairing: Serve chilled alongside a strong coffee, espresso, or a glass of dessert wine like tawny port or late harvest Riesling to enhance the chocolate flavors.
Occasions: This cake shines at birthdays, holiday dinners, romantic evenings, or any celebration that calls for a chocolate lover’s dream dessert.
A little care in serving turns a simple cake into an experience.
Storage, Freezing & Make-Ahead Tips
Planning ahead? Triple chocolate mousse cake is forgiving and stores well:
Refrigeration: Keep it covered tightly with plastic wrap or stored in an airtight container in the fridge for up to 4–5 days. The mousse layers maintain their creamy texture beautifully when chilled.
Freezing: You can freeze the whole cake for up to 1 month. Wrap securely in plastic wrap and foil to prevent freezer burn. Thaw overnight in the fridge before serving.
Make-Ahead: For best flavor and texture, prepare the cake at least 1 day ahead. This allows the mousse layers to fully set and the flavors to meld.
Portion Control: Individual mini mousse cakes in silicone molds or small rings freeze well and make perfect single-serving desserts that can be defrosted as needed.
Freezing and make-ahead prep mean you can enjoy this luscious cake anytime with minimal stress.
Troubleshooting Common Issues
Even pros hit a snag sometimes. Here’s how to troubleshoot common hiccups:
Mousse won’t set: Often due to too little gelatin or not enough chilling time. Double-check your gelatin amounts and ensure you chill for the recommended hours.
Layers mixing: Pouring the next mousse layer before the previous one is set causes blending. Patience is key—chill layers 20–30 minutes until firm.
Cake won’t unmold cleanly: Line your pan with parchment or use acetate collars for easy release. Running a warm knife around edges also helps.
Chocolate seized: Happens if water gets into melted chocolate or it’s overheated. Fix by gently reheating with a little warm cream or butter, stirring constantly.
Staying calm and precise will save your cake!
FAQs – People Also Ask
Q1: Can I make triple chocolate mousse cake without gelatin?
Yes! You can substitute gelatin with agar-agar (a plant-based alternative) or use stabilized whipped cream to help the mousse hold its shape. Alternatively, chilling the mousse layers longer can improve firmness, though texture may be a bit lighter.
Q2: What kind of chocolate is best for mousse?
Use high-quality baking or couverture chocolate with at least 55% cocoa for dark and milk chocolate layers. Avoid chocolate chips as they often contain stabilizers and don’t melt smoothly, which can affect mousse texture.
Q3: Is triple chocolate mousse cake gluten-free?
It can be! Simply use a gluten-free brownie or cookie crust for the base. Make sure all other ingredients are certified gluten-free, especially if using store-bought mousse or decorations.
Q4: Can I use store-bought mousse to save time?
Yes, but homemade mousse generally offers richer flavor and better texture. Store-bought mousse can be convenient for shortcuts but may lack the light, airy quality of freshly whipped mousse.
Q5: How long does mousse cake last in the fridge?
Up to 4–5 days when covered well. For the best texture and flavor, enjoy it within the first 48 hours.
Q6: Can I make this cake in advance?
Absolutely! Prepare the cake 24 hours ahead to let the mousse layers fully set and the flavors develop. Garnish right before serving for a fresh look.
Q7: How do I prevent layers from blending together?
Chill each mousse layer until it’s set before pouring the next—typically 20–30 minutes per layer. Use gentle pouring techniques and patience for perfectly distinct layers.

Triple Chocolate Mousse Cake
Equipment
- 8 or 9-inch springform pan
- Heatproof mixing bowls
- Whisk or electric mixer
- Silicone spatula
- Offset spatula (for smoothing layers)
- Parchment paper or acetate collar (optional but recommended)
Ingredients
(Note: adjust quantities as needed for scaling)
- Chocolate base (brownie, sponge, or cookie crust)
- High-quality dark chocolate (60–70% cocoa)
- Milk chocolate
- White chocolate
- Heavy whipping cream
- Gelatin or alternative stabilizer (optional but recommended)
- Sugar (granulated or powdered, depending on mousse recipe)
- Eggs (if using traditional mousse method)
- Flavorings (vanilla extract, espresso, liqueurs as desired)
Instructions
- Prepare and cool the base layer (bake brownie/sponge or press cookie crust).
- Make dark chocolate mousse: melt chocolate, mix with whipped cream and gelatin, spread evenly on base, chill until set.
- Prepare milk chocolate mousse the same way; gently spread over set dark chocolate layer, chill again.
- Repeat for white chocolate mousse as the top layer; chill thoroughly (4–6 hours or overnight).
- Unmold carefully, garnish with chocolate shavings, cocoa powder, or other toppings.
- Slice with a hot knife and serve chilled.
Notes
- Resting & Chilling: Patience is key—allow each mousse layer to set before adding the next for clean layers.
- Gelatin: Adds structure and helps mousse hold shape, especially if serving warm. Can be substituted with agar-agar or skipped if chilled well.
- Chocolate Quality: Use the best chocolate you can find; it dramatically impacts flavor and texture. Avoid chips labeled “baking chocolate” that contain stabilizers.
- Make Ahead: The cake can be assembled a day before serving and stored in the fridge for convenience.
- Freezing: Wrap tightly and freeze up to 1 month; thaw in fridge overnight before serving.
- Cutting: Heat your knife in hot water and wipe between cuts for smooth slices.