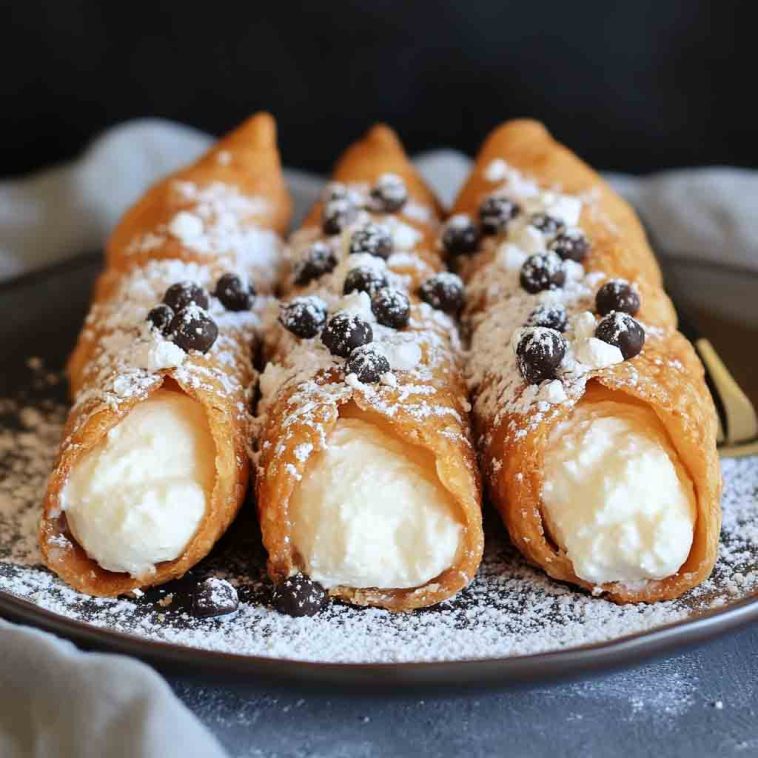
Why Crispy Italian Cannoli Shells with Creamy Ricotta Filling Are So Loved
Cannoli are a beloved Italian dessert for good reason. The contrast between the crisp, golden-brown pastry shell and the luscious, lightly sweet ricotta filling creates a perfect bite. Their festive appearance and rich, creamy texture make them a crowd-pleaser at celebrations, holidays, and dessert tables worldwide.
What Are Crispy Italian Cannoli Shells with Creamy Ricotta Filling?
Cannoli are traditional Sicilian pastries made of tube-shaped shells of fried pastry dough filled with a rich ricotta-based cream. These treats are often flavored with vanilla, orange zest, cinnamon, or chocolate chips and sometimes dipped in pistachios or candied fruit.
Ingredients That Make These Cannoli Shells with Creamy Filling Special
-
Pastry Shells: Made with flour, sugar, butter, vinegar, and wine or water for lightness and crispiness.
-
Ricotta Cheese: The star of the filling—creamy, mild, and slightly tangy.
-
Flavor Enhancers: Vanilla extract, orange or lemon zest, cinnamon.
-
Add-ins: Mini chocolate chips, candied orange peel, or chopped pistachios.
-
Powdered Sugar: For sweetness and dusting.
Creamy Ricotta Choices: Which Ricotta Works Best?
-
Whole Milk Ricotta: Creamier and richer; best for flavor and texture.
-
Fresh Ricotta: Ideally drained overnight for a smooth filling.
-
Avoid Pre-Sweetened or Low-Fat Ricotta: These can make the filling watery or bland.
Ricotta Forms – What’s Right?
-
Drained Ricotta: Always drain it through cheesecloth to remove excess moisture.
-
Blended Ricotta: Whipped ricotta gives a smoother, silkier texture.
-
Mixed Ricotta: Combine with mascarpone for extra richness (optional).
How to Make Cannoli (Step-by-Step Method)
-
Make the Dough
-
Mix flour, sugar, butter, and vinegar with wine or water. Knead into a smooth dough. Rest for 30 minutes.
-
-
Roll and Shape
-
Roll dough thin, cut into ovals, wrap around metal cannoli tubes, sealing with egg white.
-
-
Fry the Shells
-
Deep-fry until golden and crisp. Drain on paper towels and cool completely.
-
-
Prepare the Filling
-
Drain ricotta, then mix with powdered sugar, vanilla, and optional add-ins.
-
-
Assemble Cannoli
-
Pipe ricotta filling into cooled shells. Optionally, dip ends in chocolate chips or pistachios.
-
-
Serve or Chill
-
Dust with powdered sugar before serving. Best eaten the same day for maximum crispness.
-
Variations to Try
-
Chocolate-Dipped Shells
-
Orange-Zest Infused Ricotta
-
Mini Cannoli for Bite-Sized Treats
-
Shells with Cinnamon or Cocoa Powder in the Dough
-
Gluten-Free Shell Option
Make-Ahead and Storage Tips
-
Shells: Can be made ahead and stored in an airtight container for up to a week.
-
Filling: Store in fridge up to 3 days, but do not fill shells until ready to serve.
-
Filled Cannoli: Best enjoyed fresh—shells can soften quickly.
What to Serve With Crispy Cannoli
-
Espresso or cappuccino
-
Dessert wine like Vin Santo or Moscato
-
Fresh fruit
-
A scoop of vanilla or pistachio gelato
Cannoli are a showstopper dessert for:
-
Christmas and Easter
-
Weddings and birthdays
-
Italian-themed dinners
-
Dessert platters and party tables
Troubleshooting Common Issues
| Problem | Fix |
|---|---|
| Shells not crispy | Roll dough thinner, fry at proper temp |
| Ricotta filling is runny | Drain ricotta thoroughly |
| Shells cracked after frying | Dough not rested long enough or too thick |
| Filling leaks from ends | Don’t overfill; chill before piping |
FAQs
Can I bake the shells instead of frying?
Baking is possible but results in a less crispy texture.
Can I use store-bought shells?
Yes, for convenience. Freshly made shells taste better, but pre-made works in a pinch.
What if I don’t have cannoli tubes?
You can make small tarts with muffin tins or roll aluminum foil into tubes.
Final Thoughts & Baking Encouragement
Making authentic cannoli at home is a rewarding process that brings a taste of Sicily right to your kitchen. With a little patience and care, you’ll create a dessert that’s crispy, creamy, and totally unforgettable. Perfect for impressing guests—or just treating yourself.

Crispy Italian Cannoli Shells with Creamy Ricotta Filling
Equipment
- Cannoli tubes
- Mixing bowls
- Piping bag
- Deep-fryer or heavy pot
- Cheesecloth or fine sieve
Instructions
For the Cannoli Shells:
- 2 cups (240g) all-purpose flour
- 2 tablespoons granulated sugar
- 1/2 teaspoon ground cinnamon (optional)
- 1/4 teaspoon salt
- 3 tablespoons unsalted butter, cold and cubed
- 1 egg yolk
- 1/2 cup dry white wine (or water, as a substitute)
- 1 tablespoon white vinegar
- 1 egg white (for sealing)
- Vegetable oil (for deep frying)
For the Ricotta Filling:
- 2 cups whole milk ricotta cheese (drained well)
- 1/2 cup powdered sugar (adjust to taste)
- 1 teaspoon vanilla extract
- 1/2 teaspoon orange zest or lemon zest (optional)
- 1/2 teaspoon ground cinnamon (optional)
- 1/3 cup mini chocolate chips or chopped candied orange peel (optional)
Optional Garnishes:
- Powdered sugar (for dusting)
- Chopped pistachios
- Extra mini chocolate chips
- Melted chocolate (for dipping shell edges)
Notes
- Drain Ricotta Thoroughly: Use cheesecloth or a fine mesh sieve to drain the ricotta for several hours or overnight. This prevents the filling from becoming watery.
- Don’t Fill in Advance: Fill the cannoli just before serving to keep the shells crispy. Filled cannoli left in the fridge for too long will soften.
- Use a Thermometer When Frying: Maintain oil temperature around 350°F (175°C) for evenly crisp shells.
- Add Flavor to Dough: You can enhance the shell dough with a splash of Marsala wine, cocoa powder, or a pinch of citrus zest.
- Shell Storage: Store unfried dough in the fridge for up to 2 days, or freeze shaped, uncooked shells. Fried, unfilled shells stay crisp for up to 1 week in an airtight container.
- No Cannoli Tubes? Try using cleaned metal dowels or form homemade molds with rolled-up aluminum foil wrapped in parchment paper.