Why Italian Nut Roll Cookies Are So Loved
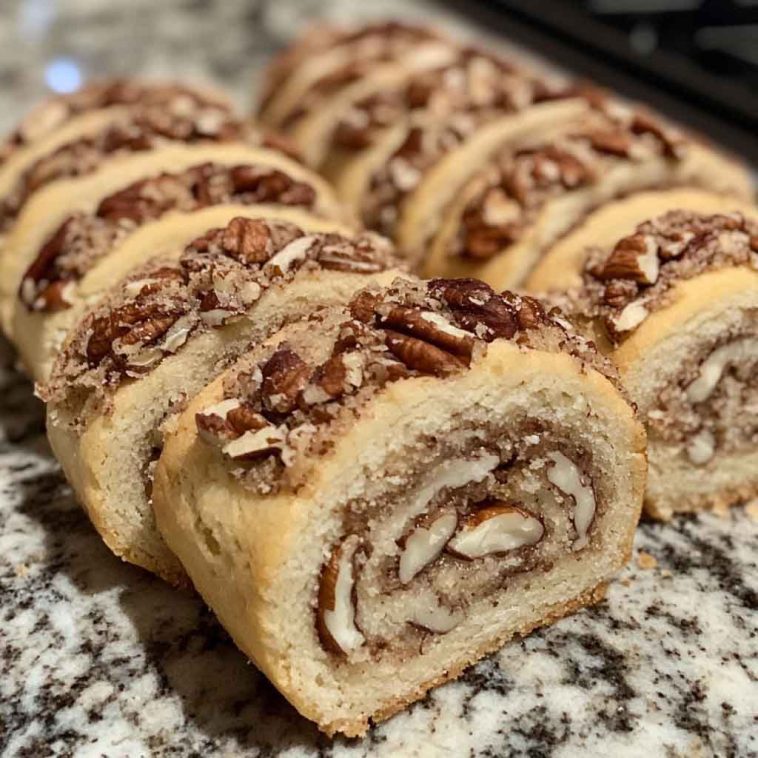
What AreItalian Nut Roll Cookies?
Ingredients That Make These Cookies Special.
Yeast Dough – A soft, slightly sweet dough that creates a tender and fluffy texture, different from typical cookie dough.
Nuts (Walnuts, Hazelnuts, or Almonds) – Finely chopped or ground, they provide a rich, crunchy filling full of flavor and texture.
Sugar and Honey – Sweeten the filling naturally, balancing the nutty flavors with just the right amount of sweetness.
Cinnamon and Spices – Add warmth and depth to the filling, enhancing the overall flavor with classic aromatic notes.
Butter – Incorporated in both dough and filling, it adds richness and moistness to the cookies.
Vanilla Extract – A subtle yet essential flavor enhancer in the dough or filling.
Eggs – Help bind the dough and enrich its texture.
These ingredients together create the unique balance of soft dough, sweet and spiced nut filling, and a slightly crisp exterior that makes Italian Nut Roll Cookies so beloved.
Nut Choices: Which Nuts Work Best for Italian Nut Roll Cookies?
| Nut Type | Flavor Profile | Texture | Best For |
|---|---|---|---|
| Walnuts | Earthy, slightly bitter, rich | Crunchy, slightly coarse | Traditional choice, classic flavor |
| Hazelnuts | Sweet, nutty, aromatic | Crunchy, smooth | Adds a sweeter, more delicate taste |
| Almonds | Mild, sweet, slightly floral | Crunchy, smooth | Light and subtle nut flavor |
| Pecans | Buttery, sweet, rich | Soft to crunchy | Adds buttery richness and depth |
| Pistachios | Sweet, slightly grassy, unique | Crunchy | Unique color and flavor variation |
Which to choose?
Walnuts are the classic and most common for Italian Nut Rolls, giving that traditional taste.
Hazelnuts or almonds offer a sweeter, more delicate alternative.
Pecans bring a buttery twist, and pistachios can make your rolls stand out visually and flavor-wise.
Often, recipes even combine nuts to balance flavor and texture perfectly!
How to Make Italian Nut Roll Cookies (Step-by-Step Method)
Step 1: Prepare the Dough
In a large bowl, combine the flour, sugar, baking powder, and salt.
Cut in cold butter (cubed) using a pastry cutter or your fingers until the mixture resembles coarse crumbs.
Add the egg, vanilla extract, and sour cream (or cream cheese) and mix until the dough comes together.
Shape the dough into a ball, wrap it in plastic wrap, and refrigerate for at least 1 hour.
Step 2: Prepare the Nut Filling
While the dough chills, prepare the nut filling.
Chop your chosen nuts finely or pulse them briefly in a food processor (don’t overdo it to avoid turning into nut butter).
In a bowl, mix the chopped nuts with sugar, cinnamon, a pinch of salt, and a little milk or cream to moisten the mixture.
Add vanilla extract and sometimes a little citrus zest (lemon or orange) for extra flavor.
Step 3: Roll Out the Dough
Once chilled, remove the dough from the fridge.
On a floured surface, roll the dough out into a large rectangle, about 1/8 inch thick.
Step 4: Add the Filling
Spread the nut filling evenly over the dough, leaving a small border around the edges.
Step 5: Roll and Shape
Starting from one long edge, carefully roll the dough tightly into a log or jelly roll shape.
Pinch the seam and ends to seal well.
Step 6: Slice the Cookies
Using a sharp knife, slice the roll into 1/4 to 1/2 inch thick slices.
Arrange the slices cut-side up on a parchment-lined baking sheet, spaced apart.
Step 7: Bake
Preheat your oven to 350°F (175°C).
Bake the cookies for about 15-20 minutes or until the edges are golden and the nuts are toasted.
Step 8: Cool and Serve
Let the cookies cool completely on a wire rack before serving or storing.
Optionally, dust with powdered sugar or drizzle with a simple glaze once cooled.
Variations to Try
1. Different Nut Blends
Mix walnuts, pecans, and hazelnuts for a richer, deeper flavor.
Try pistachios or almonds for a unique twist.
2. Add Dried Fruits
Incorporate finely chopped dried cherries, cranberries, or raisins into the nut filling.
Use candied orange peel or lemon zest for a bright citrus note.
3. Chocolate Infusion
Sprinkle mini chocolate chips or drizzle melted chocolate over the baked cookies.
Add cocoa powder to the nut filling for a chocolate-nut combo.
4. Spice It Up
Enhance the filling with warm spices like nutmeg, cardamom, or cloves along with cinnamon.
Add a pinch of chili powder for a subtle spicy kick.
5. Glaze or Icing
Top the cooled cookies with a simple powdered sugar glaze flavored with vanilla or almond extract.
Use cream cheese frosting for a richer, tangy finish.
6. Nut Butter Swirl
Swirl in a spoonful of smooth almond or hazelnut butter into the filling before spreading it on the dough.
7. Gluten-Free Option
Use gluten-free flour blends to make these nut rolls suitable for gluten-sensitive guests.
Make-Ahead and Storage Tips
Make-Ahead Tips:
Prepare the Dough in Advance: You can make the dough 1-2 days ahead. Wrap it tightly in plastic wrap and refrigerate until ready to use.
Assemble Ahead: Fill and roll the cookies, then wrap them tightly and refrigerate overnight before baking. This helps flavors meld and makes baking the next day easier.
Freeze Before Baking: After rolling and shaping, freeze the unbaked nut rolls wrapped in plastic wrap and foil. When ready to bake, thaw overnight in the fridge, then bake as usual.
Storage Tips:
Room Temperature: Store baked cookies in an airtight container at room temperature for up to 5 days.
Refrigeration: For longer freshness (up to 2 weeks), store them in an airtight container in the fridge.
Freezing Baked Cookies: Wrap baked cookies tightly in plastic wrap and place in a freezer-safe container or bag. Freeze for up to 3 months. Thaw at room temperature before serving.
Avoid Moisture: Keep cookies dry to prevent sogginess. Use parchment or wax paper between layers if stacking.
What to Serve With Italian Nut Roll Cookies
Coffee: A strong espresso or a creamy cappuccino complements the nutty, sweet flavors beautifully.
Tea: Black teas like Earl Grey or Darjeeling balance the richness, while herbal teas such as chamomile provide a gentle contrast.
Hot Chocolate: For a decadent treat, pair with rich, velvety hot chocolate.
2. Cold Beverages:
Milk: Classic whole or almond milk pairs perfectly, balancing sweetness and richness.
Dessert Wine: Sweet wines like Vin Santo or Moscato d’Asti highlight the cookie’s nutty and sweet notes.
3. Fresh Fruit:
Fresh berries or sliced pears can add a refreshing, light contrast to the dense cookies.
4. Cheese Plate:
Mild cheeses like mascarpone or ricotta with a drizzle of honey work well alongside the nut rolls for an elegant touch.
Italian Nut Roll Cookies for the Holidays & Celebrations
Italian Nut Roll Cookies are a cherished treat during holidays and special celebrations, bringing warmth and tradition to any gathering. Their rich, nutty filling wrapped in a tender, buttery dough makes them perfect for festive occasions like Christmas, Easter, and family reunions.
Why They Shine During Holidays:
Tradition: These cookies often carry family recipes passed down through generations, evoking nostalgia and family bonding.
Flavor: The combination of toasted nuts, cinnamon, and sweet syrup or honey creates a comforting taste that feels festive.
Presentation: Their beautiful swirled design makes them visually appealing on holiday dessert tables or cookie platters.
Sharing: Perfect for gifting or bringing to parties, they symbolize generosity and celebration.
Tips for Holiday Prep:
Make batches in advance and freeze them to enjoy fresh cookies anytime during the season.
Pair with seasonal drinks like mulled wine, spiced cider, or hot cocoa for a complete holiday treat.
Customize with festive add-ins like dried cranberries or orange zest to match the occasion.
These cookies are more than just dessert — they’re a holiday tradition that brings joy, warmth, and sweetness to your celebrations.
Troubleshooting Common Issues
| Problem | Fix |
|---|---|
| Dough is too sticky | Chill the dough for 15-30 minutes before rolling to make it easier to handle. |
| Filling oozes out during baking | Don’t overfill the dough; spread filling evenly but thinly. Seal edges well before rolling. |
| Cookies turn out dry | Don’t overbake. Check cookies a few minutes before the recommended time. |
| Rolls crack when slicing | Let the rolls cool completely before slicing to prevent cracking. |
| Nut filling is bland | Toast nuts lightly before grinding to enhance flavor; add cinnamon, honey, or vanilla. |
| Dough doesn’t rise properly | Use fresh yeast or baking powder (depending on recipe) and ensure proper proofing times. |
| Cookies stick to the pan | Use parchment paper or grease the baking sheet well. |
FAQs About Italian Nut Roll Cookies
Q: Can I use different types of nuts in the filling?
A: Yes! Walnuts, pecans, almonds, or hazelnuts all work well. You can mix nuts for more complex flavor.
Q: How long do Italian Nut Roll Cookies stay fresh?
A: Stored in an airtight container at room temperature, they stay fresh for up to 1 week. Refrigeration can extend freshness to 2 weeks.
Q: Can I freeze Italian Nut Roll Cookies?
A: Absolutely! Wrap tightly in plastic wrap and place in a freezer-safe container. Freeze for up to 3 months. Thaw at room temperature before serving.
Q: Can I prepare the dough or filling ahead of time?
A: Yes, you can prepare the dough or filling a day in advance and refrigerate it. Bring dough to room temperature before rolling.
Q: What can I use if I don’t have honey or sugar for the filling?
A: You can substitute with maple syrup or agave nectar, but the texture and sweetness may vary slightly.
Q: How do I prevent the rolls from cracking when slicing?
A: Make sure the rolls are completely cooled before slicing, and use a sharp serrated knife for clean cuts.
Final Thoughts & Baking Encouragement for Italian Nut Roll Cookies
Italian Nut Roll Cookies are more than just a delicious treat—they’re a labor of love that brings tradition, warmth, and joy to your kitchen and gatherings. While the process might seem a little intricate at first, each step is worth it when you pull those golden, nut-filled rolls from the oven and slice into them, revealing their beautiful swirls and rich flavors.
Remember, baking is as much about enjoying the journey as it is about the final result. Don’t worry if your first batch isn’t perfect—practice makes perfect, and each try will improve your technique and confidence.
So, take your time, have fun, and savor the sweet aroma filling your home. These cookies are sure to become a beloved staple for holidays and celebrations, creating memories with every bite.
Happy baking—you’ve got this!

Italian Nut Roll Cookies
Equipment
- Mixing bowls
- Rolling Pin
- Baking sheet
- Parchment paper or silicone baking mat
- Knife or dough cutter
- Measuring Cups and Spoons
- Stand mixer or hand mixer (optional but helpful)
Ingredients
For the Dough
- 3 cups all-purpose flour
- 1/2 cup granulated sugar
- 1 cup unsalted butter, softened
- 2 large eggs
- 1 teaspoon vanilla extract
- 1/2 teaspoon baking powder
- Pinch of salt
For the Nut Filling
- 2 cups finely chopped walnuts (or pecans)
- 1/2 cup granulated sugar
- 1/4 cup milk
- 1 teaspoon vanilla extract
- Zest of 1 lemon (optional)
- 1 tablespoon honey or corn syrup (optional, for binding)
Instructions
Prepare the dough:
- Cream the softened butter and sugar until light and fluffy.Beat in eggs and vanilla extract until combined.In another bowl, whisk together flour, baking powder, and salt.Gradually add dry ingredients to wet, mixing until a smooth dough forms.Wrap the dough in plastic wrap and chill for at least 30 minutes.
Make the nut filling:
- Mix chopped nuts, sugar, milk, vanilla extract, lemon zest, and honey until you get a thick paste.
Assemble the cookies:
- Preheat oven to 350°F (175°C).Roll out the dough on a floured surface into a rectangle about 1/4 inch thick.Spread the nut filling evenly over the dough.Roll the dough tightly from one long edge to form a log.Slice the log into 1/2-inch thick cookies.Place slices on a parchment-lined baking sheet.
Bake:
- Bake for 18-20 minutes or until the edges turn golden.Let cool on a wire rack before serving.=
Notes
- Chilling the Dough: Chilling the dough helps firm it up, making it easier to roll out and shape. Don’t skip this step if you want clean, neat spirals.
- Nut Options: While walnuts are traditional, pecans, almonds, or even hazelnuts can be used. Just make sure they are finely chopped for an even spread and better texture.
- Sweetness Adjustment: You can adjust the sugar in the filling to your liking. Adding a little honey gives a richer flavor and helps bind the mixture.
- Add Spices: A pinch of cinnamon or nutmeg in the filling adds warmth and depth to the cookies—perfect for the holiday season.
- Rolling Tip: Use parchment paper underneath the dough when rolling to prevent sticking and make clean-up easier.
- Slice Cleanly: Use a sharp knife or dental floss to slice the rolled log cleanly into cookies without squishing them.
- Make-Ahead: These cookies freeze well! Freeze the unbaked log and slice and bake when needed, or freeze baked cookies in an airtight container.
- Storage: Keep in a tightly sealed container at room temperature for up to a week or refrigerate for up to two weeks.