Why Chocolate Mousse Brownies Deserve a Spot in Your Life
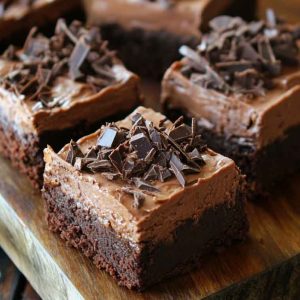
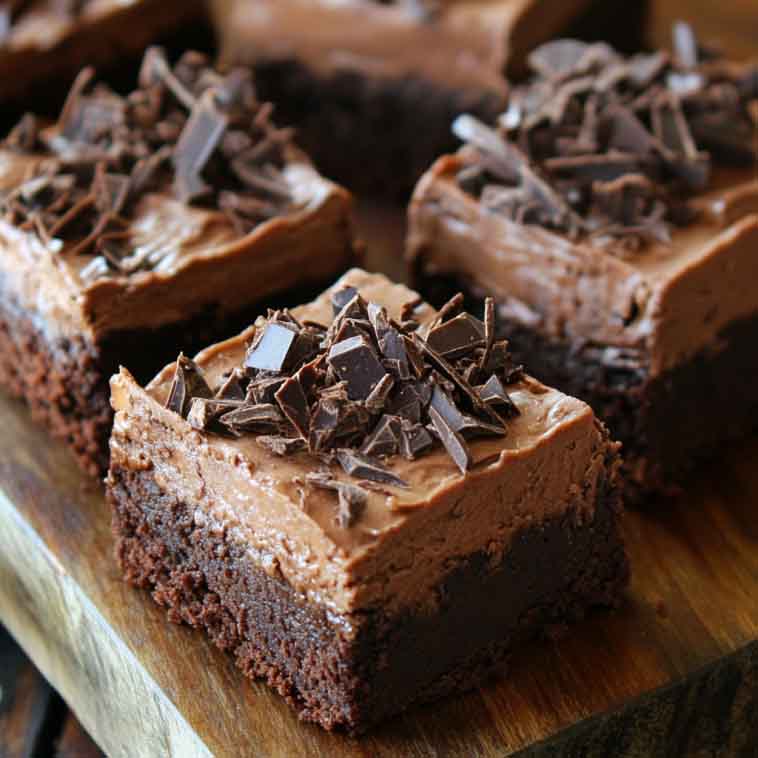
Imagine sinking your fork into a dense, fudgy brownie base, then gliding up into a silky, airy chocolate mousse layer—each bite a perfect contrast of rich and light, decadent and dreamy. Chocolate Mousse Brownies are where indulgent comfort food meets elegant dessert, and they deliver every single time.
What sets these brownies apart from classic ones is the sophisticated pairing of textures. While traditional brownies rely solely on gooey centers and crackly tops, mousse brownies elevate the experience by adding a velvety layer of airy chocolate cream. It’s like having your favorite brownie and a luxurious pot de crème in one beautiful square.
Whether you’re baking for a dinner party, a birthday celebration, or just to treat yourself on a cozy weekend, these brownies offer a wow factor that’s surprisingly easy to achieve. In this article, you’ll learn to master both layers—fudgy brownies and silky mousse—from scratch, ensuring bakery-quality results in your own kitchen.
What Are Chocolate Mousse Brownies?
Chocolate Mousse Brownies are a two-layer dessert featuring a base of rich, chewy brownies topped with a smooth, airy layer of chocolate mousse. Each bite offers a harmonious balance of deep cocoa intensity and creamy lightness—ideal for chocolate lovers who crave texture and depth.
This dessert combines two beloved sweets into one: the dense, chocolate-forward experience of brownies with the luxurious lightness of a classic French-style mousse. Typically served chilled, mousse brownies cut beautifully and look just as impressive as they taste.
They’re perfect for:
Dinner parties and date nights
Valentine’s Day or holiday tables
Bake sales and potlucks
Anytime you want to impress with minimal fuss
While their layered look makes them appear complex, they’re surprisingly simple to execute with the right tips and high-quality ingredients. And the best part? You can customize them with toppings like ganache, whipped cream, or fresh berries.
Layer Breakdown – What You’re Building
These brownies have three potential layers, depending on how luxe you want to go:
1. Brownie Layer – The Foundation
This is a rich, chewy base made from cocoa powder, melted chocolate, butter, sugar, and eggs. The goal: deep flavor and a fudgy (not cakey) texture.
2. Mousse Layer – The Cloud
Made with melted bittersweet chocolate and whipped cream (and sometimes egg yolks or gelatin for stability), the mousse sits gently atop the cooled brownies. It’s airy, creamy, and melts in your mouth.
3. Optional Topping – The Crown
For extra drama and richness, you can add:
A glossy chocolate ganache
Dollops of whipped cream
Shaved chocolate, cocoa powder, or berries
Each layer plays a role: the brownie is dense and grounding, the mousse is light and ethereal, and the topping adds polish and contrast. When chilled and cut cleanly, the layers are visually stunning and texturally unforgettable.
Ingredients – Quality Over Quantity
Let’s break down the essentials for both layers—and a few optional toppings:
For the Brownie Layer:
Butter (unsalted): Adds richness and moisture.
Sugar (granulated or a mix of granulated and brown): Fuels fudgy texture.
Eggs: Provide structure and chewiness.
Cocoa Powder: Use Dutch-processed or natural—unsweetened only.
Bittersweet or Semisweet Chocolate Chips: Melts into the batter for extra decadence.
All-purpose Flour: Just enough to bind without drying.
Salt & Vanilla: Balances and enhances chocolate flavor.
Pro Tip: Use melted butter and sugar together (a technique called “blooming”) to create that glossy top and rich flavor.
For the Mousse Layer:
Bittersweet Chocolate (60–70%): Choose a high-quality bar or chips.
Heavy Cream: Whipped to soft peaks to lighten the mousse.
Egg Yolks (optional but traditional): Adds richness and creaminess.
Granulated Sugar: Lightly sweetens the mousse.
Gelatin (optional): For extra stability, especially if serving at room temp.
Alternative: You can make a stabilized whipped cream mousse by folding melted chocolate into sweetened whipped cream, skipping eggs entirely.
Optional Toppings:
Chocolate Ganache: Equal parts cream and chocolate, melted and poured over the mousse.
Fresh Whipped Cream: For contrast and softness.
Berries, Mint, Shaved Chocolate: For garnish and freshness.
Tools & Equipment You’ll Need
A smooth mousse and rich brownie depend on using the right tools:
Electric Mixer or Stand Mixer – For whipping cream and eggs effortlessly
Saucepan – To melt butter and chocolate
Mixing Bowls – At least two large bowls
8×8 or 9×9-inch Baking Pan – For a thick, tall brownie
Parchment Paper – Ensures clean release and easy lifting
Offset Spatula or Rubber Spatula – For spreading layers evenly
Measuring Cups & Spoons – Accuracy matters!
Optional but helpful:
Double Boiler or Heatproof Bowl over Simmering Water – To gently melt chocolate
Fine Mesh Sieve – For sifting cocoa or flour to avoid lumps
Step-by-Step Instructions – Making Chocolate Mousse Brownies from Scratch
Brownie Layer:
Preheat & Prep Pan
Preheat oven to 325°F (163°C). Line an 8×8″ or 9×9″ square baking pan with parchment paper, leaving some overhang for easy removal.Melt Butter & Chocolate
In a saucepan over low heat, melt butter and chocolate chips until smooth. Remove from heat and let cool slightly.Mix Eggs & Sugar
In a mixing bowl, whisk together eggs and granulated sugar until light and slightly thickened (about 2 minutes).Combine & Fold
Slowly pour the cooled chocolate mixture into the egg mixture while whisking. Stir in vanilla extract.Add Dry Ingredients
Sift in flour, cocoa powder, and a pinch of salt. Fold gently until just combined. Don’t overmix.Bake
Pour batter into prepared pan and spread evenly. Bake for 20–25 minutes, or until a toothpick comes out with a few moist crumbs. Let cool completely.
Mousse Layer:
Melt Chocolate
In a heatproof bowl, melt dark chocolate over a double boiler or in the microwave in 30-second bursts. Let cool slightly.Whip Cream
In a separate bowl, whip heavy cream until soft peaks form. Set aside.Egg Yolks (Optional)
For structure, whisk egg yolks with sugar in a double boiler over low heat until pale and slightly thickened, then let cool.Fold Mousse
Combine melted chocolate with egg yolk mixture (if using), then fold in whipped cream gently until no streaks remain.Assemble
Spread mousse over cooled brownie base. Smooth top with offset spatula.Chill
Refrigerate for at least 3 hours (or overnight) until fully set.
Optional Ganache Topping:
Heat ½ cup cream until steaming.
Pour over ½ cup chopped chocolate.
Let sit for 2 mins, then stir smooth and pour over chilled mousse. Chill again.
Variations & Add-Ins to Try
Flavored mousse: Add espresso powder, orange zest, or raspberry purée for flavor twists.
Nutty crunch: Add chopped hazelnuts or pecans to the brownie batter.
Boozy touch: Add 1 tbsp of Bailey’s, Kahlúa, or Grand Marnier to the mousse.
Mint version: Add a drop of peppermint extract to the mousse for holiday flair.
Gluten-free option: Use almond flour or a GF all-purpose blend for the base.
Serving Ideas & Presentation Tips
Serve chilled with a dollop of whipped cream and chocolate shavings.
Cut into clean squares using a sharp knife dipped in warm water for neat edges.
Dust lightly with cocoa powder or powdered sugar before serving.
Add fresh berries or a drizzle of raspberry sauce for a fruity contrast.
Make mini versions in cupcake liners for parties or portion control.
Storage Tips – Keep Them Fresh
Refrigerator: Store in an airtight container in the fridge for up to 4–5 days.
Freezer: Freeze the whole slab (wrapped tightly) or individual slices. Thaw overnight in the fridge before serving.
Do not freeze ganache topping separately—it may lose texture after thawing.
FAQs – Your Chocolate Mousse Brownies Questions Answered
Can I use boxed brownie mix?
Yes, but make sure it’s a dense, fudgy style. Cool completely before adding mousse.
Do I have to use eggs in the mousse?
No. For an egg-free version, skip the yolks and simply fold whipped cream into melted chocolate. You can add 1 tsp gelatin (bloomed and melted) for extra stability.
Can I make this dairy-free?
Use dairy-free butter, chocolate, and coconut cream (whipped) in place of heavy cream. Check labels on chocolate and brownie mix.
How do I make them ahead of time?
You can make them a day ahead and store chilled. They actually taste better once they’ve had time to set and marry flavors.
Can I double the recipe?
Yes! Use a 9×13″ pan and adjust baking time to about 30–35 minutes for the brownies.
Chocolate Mousse Brownies
These Chocolate Mousse Brownies feature a rich, fudgy brownie base topped with a silky, airy chocolate mousse. It's the ultimate dessert fusion — chewy, creamy, and indulgent. Whether you're baking for a special celebration or simply satisfying a chocolate craving, these layered brownies are sure to impress.Equipment
Ingredients
For the Brownie Base:
- 1/2 cup (1 stick) unsalted butter
- 3/4 cup granulated sugar
- 2 large eggs
- 1/3 cup unsweetened cocoa powder
- 1/2 teaspoon salt
- 1/2 teaspoon vanilla extract
- 1/2 cup all-purpose flour
- 1/2 cup chocolate chips or chopped dark chocolate (optional for extra richness)
For the Chocolate Mousse Layer:
- 6 oz (170g) high-quality bittersweet chocolate (60–70%), chopped
- 2 tablespoons unsalted butter
- 1/4 cup granulated sugar
- 2 tablespoons water
- 2 large egg yolks (or 1 teaspoon unflavored gelatin for a no-egg version)
- 3/4 cup cold heavy cream
- 1/2 teaspoon vanilla extract
- Pinch of salt
Optional Topping:
- Whipped cream
- Shaved chocolate or cocoa dusting
- Chocolate ganache (made from 1/4 cup cream + 1/2 cup chocolate)
Instructions
Step 1 – Make the Brownie Layer:
Step 2 – Prepare the Chocolate Mousse:
Step 3 – Finish and Serve:
Notes
- For a shortcut version, use boxed brownie mix, but homemade delivers a more refined texture.
- If using gelatin instead of egg yolks, bloom 1 tsp unflavored gelatin in 1 tbsp cold water and melt before mixing into chocolate.
- Want a mocha version? Add 1 tsp espresso powder to the brownie or mousse layer.
- For gluten-free, substitute brownie flour with 1:1 gluten-free flour blend.
- Mousse can also be piped into cups with brownie crumbles for a parfait-style dessert!