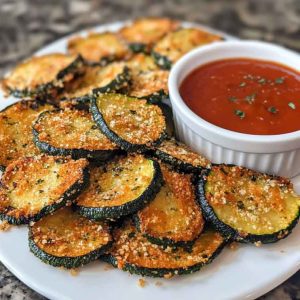
Why You’ll Love Baked Zucchini Chips
Imagine biting into a crisp, golden chip that’s not made of potatoes—but zucchini. Thinly sliced, lightly seasoned, and roasted to perfection, these Baked Zucchini Chips are a crunchy, flavorful snack that won’t weigh you down.
Whether you’re cutting carbs, sneaking more veggies into your day, or just craving something crispy and salty, zucchini chips deliver all the satisfaction of traditional chips—without the guilt. Best of all, they’re incredibly easy to make at home with just a few simple ingredients and no deep fryer required.
Perfect for picky eaters, lunchboxes, or snacking on the go, these chips will quickly become a household favorite. They’re naturally gluten-free, customizable, and baked—not fried—for a lighter, better-for-you treat.
Stick around, and I’ll show you exactly how to make them extra crispy and delicious every time.
Why Zucchini? The Magic of This Versatile Veggie
Zucchini is a summer garden superstar—and one of the most versatile vegetables in the kitchen. With its mild flavor, tender texture, and high water content, it’s ideal for baking into crispy chips that absorb whatever seasoning you throw at them.
Not only is zucchini low in calories and carbs, but it’s also packed with vitamins, minerals, and fiber—making it the ultimate snack base. Whether you’re keto, gluten-free, or just veggie-curious, zucchini chips offer a smart and tasty alternative to processed snacks.
Health Benefits of Baked Zucchini Chips
Crunchy, salty, and satisfying—without the junk food guilt. Baked Zucchini Chips offer a powerhouse of health benefits in every crisp bite:
Low in Calories: Zucchini is naturally low-calorie and fat-free, perfect for mindful snacking.
Rich in Nutrients: It’s a great source of Vitamin C, potassium, and antioxidants.
Keto & Low-Carb Approved: A great potato chip replacement for those on carb-conscious diets.
Gut-Friendly: High in fiber, which supports digestion and keeps you feeling full.
No Preservatives or Additives: Unlike store-bought chips, these are clean and wholesome.
By baking instead of frying, you also cut down on excess oil and unhealthy fats—while still getting that crave-worthy crunch.
Tip: These chips tend to disappear fast, so double the batch if you’re feeding a crowd (or yourself).
Flavor Variations to Try
One of the best parts about baked zucchini chips? You can season them any way you like. Here are some flavorful ideas to switch things up:
Classic Salt & Pepper: Keep it simple and satisfying.
Garlic Parmesan: Sprinkle with garlic powder and finely grated Parmesan for a savory upgrade.
Spicy Kick: Add chili powder, cayenne, or smoked paprika for heat.
Italian Herb: A dash of oregano, basil, and thyme makes these taste like pizza.
Ranch or BBQ: Use powdered ranch or BBQ seasoning for a bold, chip-like flavor.
Bold Tip: Add delicate seasonings (like cheese or herbs) after baking for extra crispness and flavor intensity.
Mix and match to create your perfect batch, or set out a variety for a fun, customizable snack board.
Ingredient Breakdown – What You’ll Need & Why
Here’s what goes into the crispiest zucchini chips:
Zucchini
Choose medium-sized zucchini with firm skin.
Thinner slices = crispier chips.
Uniform size = even baking.
Pro Tip: Use a mandoline for consistent 1/8-inch slices.
Olive Oil or Avocado Oil
Helps with browning and crisping.
Light coating is enough—you don’t want soggy chips.
Salt
Essential for flavor and also helps draw out moisture from the zucchini before baking.
Optional Seasonings
Garlic powder, smoked paprika, nutritional yeast, chili flakes, Italian herbs, or Parmesan.
Make it savory, spicy, herby, or cheesy—it’s up to you.
These basic ingredients are pantry staples and easy to customize for any diet. Best of all, they’re naturally gluten-free, dairy-optional, and vegan-friendly depending on your toppings.
Tools You’ll Need
Making zucchini chips at home is simple, but these tools make a big difference:
Mandoline Slicer or Sharp Knife: For uniform, thin slices—key to getting them crisp.
Baking Sheets: Preferably rimmed to avoid oil drips.
Parchment Paper or Silicone Baking Mat: Prevents sticking and makes cleanup easy.
Wire Rack (optional): Lifts chips off the tray for even airflow = extra crisp.
Mixing Bowl: For tossing zucchini slices with oil and seasonings.
Paper Towels or Kitchen Towel: Crucial for drawing out excess moisture before baking.
With just a few kitchen basics, you’ll be ready to roast your way to chip perfection.
Prepping Zucchini for Maximum Crisp
Here’s the secret to perfectly crispy baked zucchini chips: remove as much moisture as possible before baking. Zucchini is 95% water—and that means soggy chips if you skip this step.
Step-by-Step Moisture Control:
Slice zucchini very thin—about 1/8 inch or less.
Lay slices on a clean towel and sprinkle lightly with salt.
Let sit for 10–15 minutes to allow the salt to draw out moisture.
Blot dry with another towel or paper towels.
Optional: Lay slices on a wire rack instead of parchment for more airflow underneath.
This prep step is quick but essential for achieving a crisp texture—don’t skip it!
Expert Tips for Perfect Zucchini Chips
Go Thin: The thinner the slice, the crispier the chip—aim for 1/8-inch or less.
Low and Slow: Bake at 225–250°F (110–120°C) to dehydrate without burning.
Don’t Overcrowd: Leave space between slices—overlapping = steaming, not crisping.
Flip Once: About halfway through baking, flip the slices for even texture.
Watch Closely Near the End: Chips go from crisp to burnt very quickly.
With these pro tips, you’ll get consistent, crunchy results every time—even with high-moisture veggies like zucchini.
Step-by-Step: How to Make Perfect Baked Zucchini Chips
Step 1 – Slice the Zucchini Thinly:
Use a mandoline for uniform 1/8-inch slices to ensure even baking and consistent crispness.Step 2 – Draw Out Moisture:
Lay slices on paper towels, sprinkle lightly with salt, and let sit for 20–30 minutes. This crucial step removes excess water to prevent sogginess. Pat slices dry with fresh towels before baking.Step 3 – Season:
Gently toss zucchini slices with olive oil and your preferred seasonings. Optional: dredge in grated Parmesan or breadcrumbs for extra crunch.Step 4 – Bake:
Arrange in a single layer on a parchment-lined baking sheet or wire rack. Bake low and slow at 225–250°F (105–120°C) for 1.5 to 2 hours, flipping halfway through. Watch closely as chips brown and crisp to avoid burning.Step 5 – Cool:
Transfer to a wire rack to cool completely. Chips crisp up as they cool, achieving the perfect crunch.Step 6 – Serve or Store:
Best enjoyed fresh but can be stored in an airtight container for up to 2 days. Re-crisp in a warm oven if needed.
Variations to Try
Savory Ranch Zucchini Chips: Toss slices with ranch seasoning blend before baking for that classic chip flavor.
Cheesy Parmesan Zucchini Chips: Sprinkle finely grated Parmesan on top before baking for a cheesy crust.
Spicy Chipotle Version: Add smoked paprika and chili powder or cayenne for a smoky heat kick.
Herb-Crusted Chips: Mix dried oregano, thyme, and garlic powder for an Italian-inspired twist.
Keto-Friendly Coating: Use almond flour and nutritional yeast as a low-carb, crunchy coating alternative.
Air Fryer Zucchini Chips: Bake at 375°F for 7–10 minutes, flipping once for a faster, equally crispy snack.
Pro Tips for Crispy, Non-Soggy Chips
Thin Slices Are Key: Keep slices at 1/8-inch or thinner for maximum crunch.
Salt-Draw Method Is Essential: Removing moisture upfront prevents sogginess.
Bake Low and Slow: Higher heat burns before crisping; patience pays off.
Use a Wire Rack: Elevates chips, allowing hot air to circulate underneath.
Avoid Overcrowding: Give each slice space to crisp evenly.
Flip Halfway: Ensures both sides bake to perfect crispness.
Stay Attentive Toward the End: Chips can go from perfectly crispy to burnt very quickly.
Serving Ideas – More Than Just a Snack
Serve with dips like Greek yogurt ranch, tzatziki, or fresh salsa.
Include in charcuterie boards or party platters for a veggie crunch.
Crush over soups or salads as a low-carb alternative to croutons.
Stack on veggie burgers or wraps to add a delightful texture contrast.
Storage Tips – How to Keep Them Crisp
Store cooled chips in an airtight container at room temperature.
Place a piece of paper towel inside to absorb moisture and maintain crispness.
Avoid refrigeration as it causes chips to soften.
If chips lose crunch, re-crisp in a 250°F oven for 10 minutes.
FAQs – People Also Ask
How do you keep zucchini chips from getting soggy?
Salt the slices and pat dry before baking; use thin slices and bake low and slow.Can I make these in an air fryer?
Yes! Air fryer zucchini chips take about 7–10 minutes at 375°F, flipping once for even crisping.Are baked zucchini chips healthy?
Absolutely. They are low in calories and carbs, and free from added preservatives or excess oil.Do I need to peel the zucchini?
No, the skin adds texture, color, and nutrients.Can I freeze baked zucchini chips?
Freezing is not recommended as it makes the chips lose their crispness and become chewy upon thawing.
Baked Zucchini Chips
Equipment
- Mandoline slicer or sharp knife
- Baking sheets
- Parchment paper or silicone baking mat
- Wire cooling rack (optional but recommended)
- Mixing bowl
- Paper towels or clean kitchen towels
- Spatula or tongs
Ingredients
- Medium zucchini (2-3, about 1 pound)
- Olive oil or avocado oil (2 tablespoons)
- Salt (1 teaspoon, plus extra for salting slices)
- Optional seasonings: garlic powder, smoked paprika, chili flakes, dried herbs, Parmesan cheese, nutritional yeast
Instructions
- Slice Zucchini: Using a mandoline or sharp knife, slice zucchini into uniform 1/8-inch thick rounds.
- Draw Out Moisture: Lay slices on paper towels, sprinkle lightly with salt, and let sit 20–30 minutes. Pat dry thoroughly.
- Season: In a mixing bowl, toss zucchini slices with oil, salt, and desired seasonings until evenly coated.
- Arrange & Bake: Place slices in a single layer on parchment-lined baking sheets or wire racks. Bake at 225–250°F (105–120°C) for 1.5 to 2 hours, flipping halfway through. Watch closely near the end to prevent burning.
- Cool: Transfer chips to a wire rack to cool and crisp fully.
- Serve or Store: Enjoy immediately or store in an airtight container for up to 2 days. Re-crisp in a 250°F oven if needed.
Notes
- Moisture control is key: Salting and drying zucchini before baking ensures crisp chips.
- Slice thickness matters: Too thick, and chips will be soggy; too thin, they may burn. Aim for 1/8-inch.
- Low and slow baking: Baking at lower temperatures dries chips without burning them.
- Wire rack option: Baking on a wire rack allows air circulation for even crisping.
- Customize freely: Experiment with flavors like ranch seasoning, chili powder, or Parmesan for different taste profiles.
- Storage tip: Use a paper towel in the storage container to absorb moisture and keep chips crunchy.