The Magic of the 3 Ingredient Creamy Yogurt Cake
Imagine a cake that comes together in minutes, requires just three simple ingredients, and still delivers a rich, creamy texture with a subtle tang. The 3 Ingredient Creamy Yogurt Cake is exactly that—a game-changer for beginner bakers, busy weeknights, or anyone craving a quick homemade dessert without a long shopping list.
This cake’s magic lies in its simplicity: yogurt adds moisture and tenderness, self-rising flour does the leavening work, and sweetened condensed milk brings sweetness and creaminess all in one. It’s an effortlessly comforting dessert that’s versatile enough to be dressed up or down, healthy-ish with lower fat and sugar than many traditional cakes, and completely reliable every time.
Whether you’re new to baking or just want a no-fuss crowd-pleaser, this yogurt cake recipe will quickly become your go-to for birthdays, afternoon treats, or last-minute celebrations.
The Science Behind Yogurt in Baking
Yogurt plays a starring role in this cake’s success. Its moisture content keeps the crumb tender and soft, while the natural acidity gently reacts with baking soda (found in self-rising flour) to produce carbon dioxide, helping the cake rise and stay fluffy. This subtle tang from the yogurt also balances sweetness and enhances overall flavor.
Unlike butter- or oil-based cakes, yogurt contributes protein and probiotics, adding a nutritional edge without sacrificing taste. Greek yogurt, regular yogurt, and flavored yogurts each bring different textures and moisture levels: Greek yogurt is thicker and creamier, resulting in a denser crumb, while regular yogurt yields a lighter cake. Flavored yogurts add extra sweetness and aroma but may alter the cake’s texture slightly.
Understanding yogurt’s role helps you tweak the recipe confidently and makes this cake a perfect example of simple, science-backed baking.
The Essential 3 Ingredients Explained
Yogurt:
Choose plain yogurt for the best balance of tang and moisture. Full-fat yogurt offers richer flavor and creamier texture, but low-fat works fine too. Greek yogurt will give a thicker batter and denser cake, while regular yogurt results in a lighter crumb. Avoid flavored yogurts unless you want a subtly different taste.
Self-rising flour:
This is key to the cake’s rise without additional leaveners. Self-rising flour contains flour, baking powder, and salt pre-mixed, streamlining your recipe. If you don’t have self-rising flour, you can make your own by combining 1 cup of all-purpose flour with 1 ½ teaspoons baking powder and ¼ teaspoon salt.
Sweetened condensed milk:
This pantry staple acts as both sweetener and liquid, giving the cake its luscious creaminess and moist crumb. Unlike granulated sugar, it adds density and a slight caramel undertone.
Substitutions:
For gluten-free baking, swap self-rising flour with a gluten-free blend plus 1 ½ teaspoons baking powder and salt. Dairy-free yogurt (coconut or almond milk-based) and sweetened condensed coconut milk can make a vegan or dairy-free version. Keep in mind these swaps may change texture and flavor slightly.
Using high-quality ingredients—especially fresh yogurt and good condensed milk—makes a noticeable difference in the cake’s final taste and texture.
Step-by-Step Instructions: How to Make the 3 Ingredient Creamy Yogurt Cake
Step 1: Prepare Your Ingredients and Equipment
Preheat your oven to 350°F (175°C). Grease and flour an 8-inch round cake pan or line it with parchment paper for easy removal. Gather your yogurt, self-rising flour, and sweetened condensed milk.
Step 2: Mix the Batter
In a large bowl, combine 1 cup plain yogurt and 1 can (14 oz) sweetened condensed milk. Stir gently to blend, then gradually sift in 1 ½ cups self-rising flour. Fold the mixture carefully using a spatula or wooden spoon — overmixing can make the cake tough, so aim for just incorporated. The batter will be thick but smooth, similar to muffin batter.
Step 3: Transfer and Bake
Pour the batter into your prepared pan and smooth the top. Bake for 35–40 minutes. Start checking doneness at 30 minutes with a toothpick inserted into the center — it should come out clean or with a few moist crumbs, not wet batter. The cake should spring back lightly when touched.
Step 4: Cool and Serve
Allow the cake to cool in the pan for 10–15 minutes, then transfer to a wire rack to cool completely. This helps prevent sogginess. Serve plain, dusted with powdered sugar, or with fresh fruit and a dollop of yogurt or whipped cream.
Troubleshooting Tips:
-
If the cake sinks in the center, your oven temperature might be too low or you opened the oven door too early.
-
Dense texture usually means overmixing or too much flour.
-
For extra moisture, cover the cake loosely with foil during the last 10 minutes of baking.
Basic Variations on the 3 Ingredient Yogurt Cake
Once you master the basic cake, the possibilities for variations are endless — a great way to customize flavors or use up ingredients on hand.
Add Fresh Fruit:
Fold in ½ cup blueberries, raspberries, or finely chopped apples for bursts of juicy sweetness. Berries work best for light, summery cakes; apples add cozy warmth.
Citrus Zest:
Grate the zest of one lemon or orange into the batter to brighten flavors and add a fragrant note that pairs beautifully with the cake’s creamy texture.
Chocolate Swirl:
Gently swirl in 2 tablespoons of cocoa powder or a handful of chocolate chips before baking for a marbled or studded effect — a perfect treat for chocoholics.
Flavored Yogurts:
Substitute plain yogurt with vanilla or strawberry yogurt for subtle twists. Adjust sweetened condensed milk slightly if your yogurt is already sweetened.
Gluten-Free and Vegan Adaptations:
Use a gluten-free self-rising flour blend or homemade mix to make it gluten-free. Swap dairy yogurt and condensed milk for coconut or almond-based alternatives to veganize the cake, noting the texture may be slightly different.
Add Nuts or Seeds:
For crunch and nuttiness, sprinkle chopped walnuts, pecans, or sunflower seeds into the batter or on top before baking.
These simple tweaks allow you to tailor the cake for any season or occasion while keeping the core magic of three easy ingredients intact.
How to Achieve the Perfect Creamy Texture Every Time
Getting that luscious, creamy texture in your yogurt cake comes down to a few simple but important details. First, use room temperature ingredients—cold yogurt straight from the fridge can make the batter uneven and slow rising. Let your yogurt sit out for 15–20 minutes before mixing.
Avoid overmixing! This is crucial. Mix just until ingredients are combined to keep the batter light and airy. Overmixing activates gluten in the flour, leading to a tough, dense crumb. Use a gentle folding technique with a spatula, scooping from the bottom and folding over rather than vigorous stirring.
Not all yogurts are created equal. Choose brands known for thick, creamy consistency without excessive watery separation—Greek-style yogurts tend to work well but can create denser cakes, so adjust accordingly.
The type of baking pan also affects moisture retention. Glass or ceramic pans retain heat and moisture better than metal, often resulting in a moister cake. If using metal pans, reduce baking time slightly to avoid drying out.
By paying attention to these details, you’ll enjoy a reliably soft, tender cake that melts in your mouth every time.
Serving Suggestions and Presentation Ideas
This cake’s subtle flavor makes it incredibly versatile on the table. For an easy finish, dust with powdered sugar or a light cocoa powder sprinkle to add a hint of sweetness and elegance.
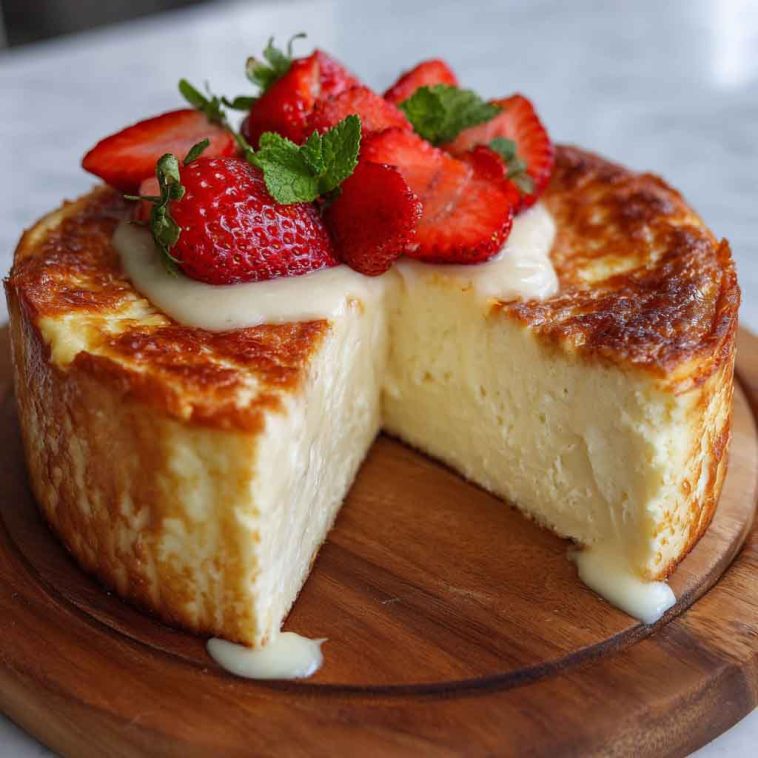
Pair with fresh berries, such as blueberries, raspberries, or sliced strawberries, or a vibrant fruit compote for a refreshing contrast. A light glaze—think honey drizzled over warm slices or a lemon glaze made from powdered sugar and fresh lemon juice—adds brightness without overpowering.
Serve the cake warm to highlight its creamy texture and comforting aroma, or chill it for a denser, firmer slice that’s perfect on hot days. It also makes an excellent base for layered desserts or trifles, where you can add whipped cream, fruits, and nuts for a showstopping treat.
Presentation tip: Serve individual slices with a dollop of Greek yogurt or whipped cream and a mint sprig for a café-worthy finish.
How to Store and Freeze the Yogurt Cake
At room temperature, this cake stays fresh for up to 2 days if wrapped tightly in plastic wrap or stored in an airtight container. For longer storage, refrigeration is best and will keep it moist for up to 5 days. Keep the cake covered well to prevent it from drying out.
To freeze, wrap the cooled cake tightly in plastic wrap and then foil, or cut into individual slices and freeze them separately for convenience. Frozen yogurt cake can last up to 3 months.
When ready to enjoy, thaw slices overnight in the fridge or at room temperature for 1–2 hours. For a fresh-out-of-the-oven experience, reheat slices gently in a microwave for 10–15 seconds or in a preheated 300°F oven for 5–7 minutes, covered loosely with foil to retain moisture.
Watch for signs of spoilage such as off smells, mold, or unusual texture before consuming leftovers.
Frequently Asked Questions (FAQs)
Q1: Can I use regular flour instead of self-rising?
Yes! To substitute, mix 1 cup all-purpose flour with 1 ½ teaspoons baking powder and ¼ teaspoon salt to mimic self-rising flour. This ensures your cake rises properly without extra leavening agents.
Q2: What type of yogurt is best for this cake?
Plain, full-fat yogurt provides the best balance of moisture and flavor. Greek yogurt works but may yield a denser cake. Avoid flavored yogurts unless you want to add sweetness or flavor variations.
Q3: Can I reduce the sugar or sweetened condensed milk?
Sweetened condensed milk provides moisture and sweetness simultaneously. Reducing it might affect texture and moistness. For less sweetness, try using half sweetened condensed milk and half plain milk, but results may vary.
Q4: How do I make this cake vegan or gluten-free?
Use gluten-free self-rising flour blends and swap yogurt with plant-based alternatives (coconut, almond) plus vegan condensed milk. Keep in mind texture and flavor might be slightly different but still delicious!
Q5: Why is my cake dense or dry? How do I fix it?
Overmixing or too much flour can cause density. Make sure to fold gently and measure flour accurately (fluff then spoon into cup). Baking too long or oven temperature too high can dry it out—use an oven thermometer for accuracy.
Q6: Can I add other flavors or toppings?
Absolutely! Add citrus zest, fresh fruit, chocolate chips, nuts, or spices to customize. Toppings like glazes, powdered sugar, or whipped cream elevate the cake further.
Q7: What is the shelf life of this cake?
At room temperature, 1–2 days; refrigerated up to 5 days; frozen up to 3 months.
Q8: Is this cake suitable for meal prep or freezing?
Yes! Its sturdy yet moist texture makes it ideal for prepping ahead. Slice and freeze portions for convenient snacks or desserts on demand.

3 Ingredient Creamy Yogurt Cake
Equipment
- 8-inch round cake pan (or similar size)
- Mixing bowl
- Spatula or wooden spoon
- Measuring cups
- Cooling rack
- Toothpick or skewer (for doneness test)
- Oven
Ingredients
- 1 cup plain yogurt (full-fat or low-fat)
- 1 can (14 oz) sweetened condensed milk
- 1 ½ cups self-rising flour (or all-purpose flour + baking powder & salt)
Instructions
- Preheat oven to 350°F (175°C). Grease and flour an 8-inch cake pan or line with parchment paper.
- In a mixing bowl, combine yogurt and sweetened condensed milk. Stir gently until smooth.
- Sift in self-rising flour gradually, folding carefully with a spatula until just combined. Avoid overmixing.
- Pour batter into prepared pan and smooth top evenly.
- Bake for 35–40 minutes. Check doneness with a toothpick; it should come out clean or with a few moist crumbs.
- Let cool in the pan for 10–15 minutes, then transfer to a cooling rack.
- Serve plain or with optional toppings like powdered sugar, fresh fruit, or whipped cream.
Notes
- Use room temperature yogurt for best results.
- If you don’t have self-rising flour, make your own by mixing 1 ½ tsp baking powder and ¼ tsp salt with all-purpose flour.
- Avoid overmixing to keep the cake tender and light.
- For variations, add fruit, citrus zest, nuts, or chocolate chips to the batter before baking.
- Store cake covered at room temperature up to 2 days, or refrigerate for up to 5 days. Freeze for longer storage.
- This recipe is easily adapted for gluten-free or vegan diets with ingredient substitutions.